
vintagenut
-
Posts
63 -
Joined
-
Last visited
Contact Information
-
Hey slowrider, So sorry to hear this happened to you. Your experience has always been at the back of my mind when beginning a restoration. Sounds like a nightmare. She was a beautiful bike and really a shame you have no apparent recourse. Out of curiosity, what did CHP say you could have done differently to protect yourself from something like this happening? Are you supposed to call DMV to confirm clear title before buying? Not really practical in some cases as certain sellers might feel apprehensive to provide that information over the phone or email, fearing the potential of a scam. Further, I hear now that DMV is changing their policy for obtaining title and registering in cases where there is no paperwork or the bike is out of the system. Sounds more stringent including taking the motorcycle to CHP for inspection as well as purchasing a title bond (to protect against issues such as yours) if there isn't any accompanying paperwork. From CA DMV website: A California defective title bond is required for vehicle owners who don't have sufficient proof of ownership for vehicle registration. Once you've purchased and received your official title surety bond, you'll be able to apply for your California bonded title. Again, I'm sorry to read this happened to you. Truly a shame.
-
Thanks, SteveM. I'll give Hugh's a call. I suspect you're right about Hot Rods being the manufacturer, though I thought the Hot Rods name actually appears on the rod itself. Regardless, it sounds like you've had consistently good luck with them. Perhaps Tim can provide some further info. Appreciate the recommendation! Cheers! C.
-
Thank you, Model 80! Lynn and Dorothy were hugely helpful in keeping my Pursangs going in the late 90s, and later, helped me with my Sherpas as well. Truly wonderful folks! I'll give Ralph a try to see what he might have available. Otherwise, there do appear to be options out there. Interestingly, when visiting Bultaco Classics, In Motion and France Trials Classics, the rod kits photographed appear to vary slightly... and none resembled the Italkit rods I expected to see. Only Feked Classic featured photos of actual Italkit rod kits. Maybe the catalog photos on the other sites mentioned don't actually represent the rod kits one would receive upon ordering? Who knows! Again - thank you kindly for Ralph's contacty info. Greatly appreciated! C. l
-
Thank you, Feetupfun and Bullylover I haven't found at this time any other replacement rod manufacturers. I'd only sought OEM parts in the past but those are becoming more and more difficult to locate as time goes on. I have an Italkit in my Fantic, I believe, and it seemed to be of good quality. If that's what Bultaco Classics (as well as In Motion et al) offers, then that's the way I'll go. Haven't checked shipping from the UK of late but I suspect prices have not come down since last I looked. Again - thank you for your input. Can't wait to get her all done for (hopefully) several more years of great performance before the next big teardown! Cheers - C.
-
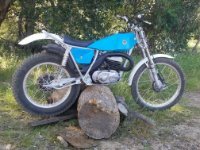
Hello All - Well... the time has finally come for a complete engine overhaul. I've been enjoying faultless performance from my 199a for over ten years, with only some minor top end work when she was first purchased. Following a recent timing check and adjustment though, I noticed some up and down play in my main bearings. Not a problem (motivation-permitting)... but, before I begin tear things down, I thought I'd look for a quality replacement con rod kit to have my crank serviced while I'm at it. Any recommendations for the best quality replacement con rod rebuild kit for a 350 199a currently available? My nearest and most favorite OEM supplier here in the US has retired so I'm now exploring aftermarket options. I love the folks at In Motion and have also successfully ordered parts through France Trial Classic. Is the In Motion kit a good option? Thank you in advance for your input. Greatly appreciated! C.
-
 vintagenut changed their profile photo
 -
I absolutely love these pegs! Have them on both my Sherpa and my 240 Fantic. Affordable, strong, grippy, mildly adjustable and great quality. Yes - you do have to weld the brackets into place (I purchased my universal brackets separately from In Motion) but it's well worth it for what you gain in the end. If you're careful with a cutoff wheel, you can pretty neatly cut away your old mounts and save with your OEM pegs... just in case you sell the bike later on and want to include the parts needed to return to original.
-
Nice-looking wheelset you've got there. And I'll bet you're glad you didn't toss 'em. They polished up very nicely! As to your swingarm... the cable guide was likely modified for additional brake rod clearance with the left-side brake. Personally, I like the positive feel of the brake rod vs. right-side pedal using a cable. Doesn't take long to acclimate to opposite shift/brake orientation... and, as an added bonus, with right-side shifting you can really raise that lever for greater obstacle clearance - which you can't do as well with the left-side lever due to lever contact with the drive chain. Looking forward to your finished restoration!
-
Good luck with your move and the rest of your build. See ya down the road!
-
Your Alpina project is coming along nicely! As long as your old piston, rings and cylinder aren't too worn, there's no reason to replace. Check the end gap on your rings when seated in the bore and compare to the tolerance measurements to the specs that can be found in the manual. Same with the piston. Measure the width of the bore and piston to determine if it's within spec. and, if so, just clean up your piston and run with it. As may have been mentioned earlier, a new piston pin and bearing would be advisable. As to orientation... the piston ring locating pins (in each ring groove) face toward the intake (carb) side of the cylinder. You're doing great - almost there! Looking forward to hearing about and seeing your final results. Good luck!
-
RE: counter boring for cap screws, the 159 and 199a castings are almost identical, save one screw hole nearest the kickstarter on the 199a cover. That one Bultaco chose to counter bore for some reason. Otherwise, all else appears the same. I will add that if purchasing a black-painted 199a cover, be prepared to spend some time at the polisher if you're after a mirror-like finish. Bultaco did not polish cases before painting!
-
Confirmed - fits perfectly. No visible gaps - all screws seat correctly. I've included a pic taken through the access cover to illustrate clutch hub clearance. No contact there. When shopping for a replacement, definitely follow Feetup's advice in getting a measurement from the seller. Shouldn't be too much to ask of the seller if reputable. Cheers! C.
-
Confirmed - measures from the gasket surface to the point mentioned. For comparison sake, I also measured the cover from my 199a. As you can see, the factory removed the step that can be seen on the 159 cover, gaining an additional 3mm clearance - 75mm depth total (attached). Does seem your cover is from another model or lost 5mms worth of material on a sanding table. Cheers- Christian
-
Hi Phillip, Well... disregard what I mentioned about the distance between the clutch spacer and seal surface. My memory of working on the 159 was too foggy to accurately recall. I cracked open the clutch cover last night to take a few measurements and photos (attached). All seem to be in line with the measurements Woody provided as well as confirming his description of the 159 clutch hub (original to mine, anyway) incorporating studs with pin retainers NOT threaded. On the off-chance you simply have a weird clutch cover, I did measure mine internally using a straight edge and came up with 72mm taken from the ledge of the threaded access port for external clutch adjustment (see photo). Hope this helps a bit. Good luck!
-
Hey Phillip, Looking at this photo, it appears that clutch spacer is either not seated properly or is too long (+ 5mm, I'm guessing from the look of it). From memory, I believe my spacers typically sit nearly flush with the top of the seal once seated. Yours appears to have significantly more clearance than I recall. This would certainly move the clutch assembly outward as you describe... but you also said the primary chain is presently in line with the flywheel primary? Could it be that you have two spacers (clutch and primary) that are of incorrect lengths if this is so? Time permitting I may pull the clutch from my 159 spare to measure what I have. I'll let you know what I find soon.
-
Been following this thread and have to agree with Woody. If the primary is full seated and the primary chain is perfectly in line with the basket - exactly parallel with the edge of the case when looking downward over the chain - then the culprit HAS to be the clutch hub not fully seating. I don't recall from memory if the shaft on a 159 is splined or if the hub is held in position via a keyway, but it's possible either the key isn't lining up properly and stopping the hub from landing home or, if splined, if some material is preventing the hub from sliding into its fully seated position. It helps to take some tension off of the primary chain when positioning the clutch hub by securing the chain tensioner with zip ties to the frame (if still in the frame) or via similar method if out. That will reduce the lateral pull caused by the tensioner when positioning the clutch hub with its key or splines... and wlll make it easier to guide the hub straight through the basket bearing into its fully seated position. Out of curiosity, have you tried sliding the hub onto the shaft without the basket to test whether or not it's somehow getting hug up? Give it a shot and take a measurement of exposed shaft threads, then compare that reading to exposed threads with the basket in place. Hang in there - you will defeat this problem!!
