andrep Posted November 13, 2017 Author Report Share Posted November 13, 2017 11 hours ago, b40rt said: Probably thinks your trying to groom him .... Not at all , just wasn´t sure he knew I live almost 2700km (or 1670miles) away from him. More then happy to but all this to good use!!! 1 Quote Link to comment Share on other sites More sharing options...
nigel dabster Posted November 14, 2017 Report Share Posted November 14, 2017 I met Killer once...... 1 Quote Link to comment Share on other sites More sharing options...
andrep Posted November 16, 2017 Author Report Share Posted November 16, 2017 (edited) Place is almost ready for the toys The wiring and fusebox were in an awful state but luckily didn´t die in the progress of replacing it! The ceiling is in a pretty bad shape(water driping from four places) but winter is coming and it will have to wait till spring, it´s also a medow roof or what ever you call it, so a bit more complicated on the repairing part. That´s why the walls are also very discolored, the concrete is damp and it reacts in different ways. I´ll try to get the air moving and hopefully the second layer will look better. Edited November 16, 2017 by andrep Quote Link to comment Share on other sites More sharing options...
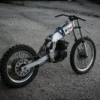
andrep Posted January 11, 2018 Author Report Share Posted January 11, 2018 (edited) Finaly something is happening Today I started with the tyres, put on a new rimtape and inners + used Dunlop D803´s Although forgot the soap and didn´t really have the right tools so one side of the rear tyre still needs some elbow grease and the front needs soap so it would sit nicely in the groove. There isn´t really that much room to work now that everything is shoved in but will have to do, as soon as the tyres are done I´ll start with the brakes and cleaning the engine parts, since it´s halfway taken apart and been standing like that for too many years. Edited February 6, 2018 by andrep 2 Quote Link to comment Share on other sites More sharing options...
andrep Posted January 12, 2018 Author Report Share Posted January 12, 2018 Okay, so an importen question, do I really need the rim locks? The rear wheel has two and the tyre is already a pain in the ass to get on, today got it , with a proper tyre lever and soap BUT also pinched the tube so it ran out in a minute or two. I know that I´m going to be running more on the low side of the pressure so they should be important... Quote Link to comment Share on other sites More sharing options...
trapezeartist Posted January 12, 2018 Report Share Posted January 12, 2018 Yes, you really need them. Without them a tubed tyre will rip the valve off the tube as soon as the tyre moves a bit on the rim. It's less important on a tubeless tyre, which is presumably why there is normally only one rimlock (I always called them "security bolts") on a rim designed for tubeless. Quote Link to comment Share on other sites More sharing options...
scifi Posted January 12, 2018 Report Share Posted January 12, 2018 A few messages back you mentioned having problems fitting the tyre. When I used to ride Long Distance Mountain Bike Events, some of us riders could remove a tyre and replace it, and new tube, using just our hands, in less than 30 seconds. The trick is to make sure that if you are working on the top part of the tyre, all the bottom part must be in the well of the rim. So stand on that part, whilst you rip the tyre off the rim at the top. Admittedly it is harder with a motor cycle tyre with the security bolts, but the same principle applies, and you won't need much force on the tyre levers. 1 Quote Link to comment Share on other sites More sharing options...
andrep Posted January 12, 2018 Author Report Share Posted January 12, 2018 45 minutes ago, scifi said: A few messages back you mentioned having problems fitting the tyre. When I used to ride Long Distance Mountain Bike Events, some of us riders could remove a tyre and replace it, and new tube, using just our hands, in less than 30 seconds. The trick is to make sure that if you are working on the top part of the tyre, all the bottom part must be in the well of the rim. So stand on that part, whilst you rip the tyre off the rim at the top. Admittedly it is harder with a motor cycle tyre with the security bolts, but the same principle applies, and you won't need much force on the tyre levers. Believe me, done a fair amount of changes and watched all the videos just for touch up but the tyres are a bit too old and gone hard. I´ll try to get the tube replaced tomorrow and will keep the locks just trying to be as gentle as possible, Since the tyre is meant to be on a tubeless setup the bead might be also just a tad harder to get on there. Quote Link to comment Share on other sites More sharing options...
scifi Posted January 13, 2018 Report Share Posted January 13, 2018 Ooooo... Are you trying to put a tubeless tyre on a tubed rim..? This might not ever work. The bead on the tubeless tyre is wider than that on a tubed tyre, and will not sit well on a standard rim. Also the bit that overhangs inwards is sharp and can explode a tube, with a big split, if pumped up to any pressure to seal the rim... ( I tried to do it on a TY175.) . Quote Link to comment Share on other sites More sharing options...
andrep Posted January 13, 2018 Author Report Share Posted January 13, 2018 Yep, I am having trouble getting it to pop on there, got it off and a new tube in, the second time around was WAY easier!!! I started thinking about the fitment problem with the rim today aswell and I´m gonna try again with a compressor but 3 bars didn´t change much. So gonna try to look for a tubed tyre second hand but since trials is still pretty small in Estonia it might be complicated. Already started on the rear brake system and will make a template for the front. Also the right peg fixing is getting in the way of the chain Quote Link to comment Share on other sites More sharing options...
katana Posted January 15, 2018 Report Share Posted January 15, 2018 Lots and lots of soapy water. Quote Link to comment Share on other sites More sharing options...
andrep Posted January 15, 2018 Author Report Share Posted January 15, 2018 (edited) On 1/15/2018 at 3:06 PM, katana said: Lots and lots of soapy water. Yep and maybe some wamth will also help, in my garage there´s 5℃, so gonne take the weels to the workplace and keep them inside overnight. Pretty sure warmth, lots of soap and a compressor will do the trick Atleast today was productive, got the rear brake sorted, it needed some mods for the caliper hanger and caliper itself. Too many spacers! The front needed also some new spacers, somehow it was not exactly in the middle but after the adjustment the disc bolts started sraping the forks, nothing a little grindig won´t fix Removed 7mm of aluminium from the caliper mounting points and cleaned the caliper + master cyclinder. It was pretty nasty but now filled with new fluid and bleed, works fine, though the line is a bit long for this setup, but it´s only a cosmetical problem so something for the future. Made a template for the new hanger, which will be 6mm thick and have four threaded holes and this will finish up the front brakes! Edited February 6, 2018 by andrep 2 Quote Link to comment Share on other sites More sharing options...
andrep Posted January 17, 2018 Author Report Share Posted January 17, 2018 Bought a compressor today and started with sealing the holes in the engine, will see if this will hold, there sholdn´t be too much pressure. Finished the front caliper mount, but had to thread it at my work because it´s a pain without a vice, should get to see the fitment tomorrow! Quote Link to comment Share on other sites More sharing options...
zippy Posted January 18, 2018 Report Share Posted January 18, 2018 what is the engine you are using? And do you know why it has those gouges/holes in it? Quote Link to comment Share on other sites More sharing options...
andrep Posted January 18, 2018 Author Report Share Posted January 18, 2018 9 minutes ago, zippy said: what is the engine you are using? And do you know why it has those gouges/holes in it? Engine is a Beta TR32 - 240cc, bought it off ebay UK and supposedly it ran... The holes are from lack of tools from my last place waaay back. I had to narrow down the rear mounts and only had an angle grinder for the job. If the liquid metal starts leaking I´ll take it to my friend for a weld. Quote Link to comment Share on other sites More sharing options...
Recommended Posts
Join the conversation
You can post now and register later. If you have an account, sign in now to post with your account.