Alpina M85 was available 1971-74. Which of these years / what model is your Sherpa engine ?
Factory parts book (later issue) for Sherpa 250 M80 lists M85 frame and also upper/lower yokes (triple clamps) as replacement parts ; I take this to mean they are mutually interchangeable, even if not actually identical.
Many components are shared throughout the 100/101/102/103/104 Pursang range. If it still has original Amal carb. this might provide a clue : 27mm. on the 125, 36mm. on 250.
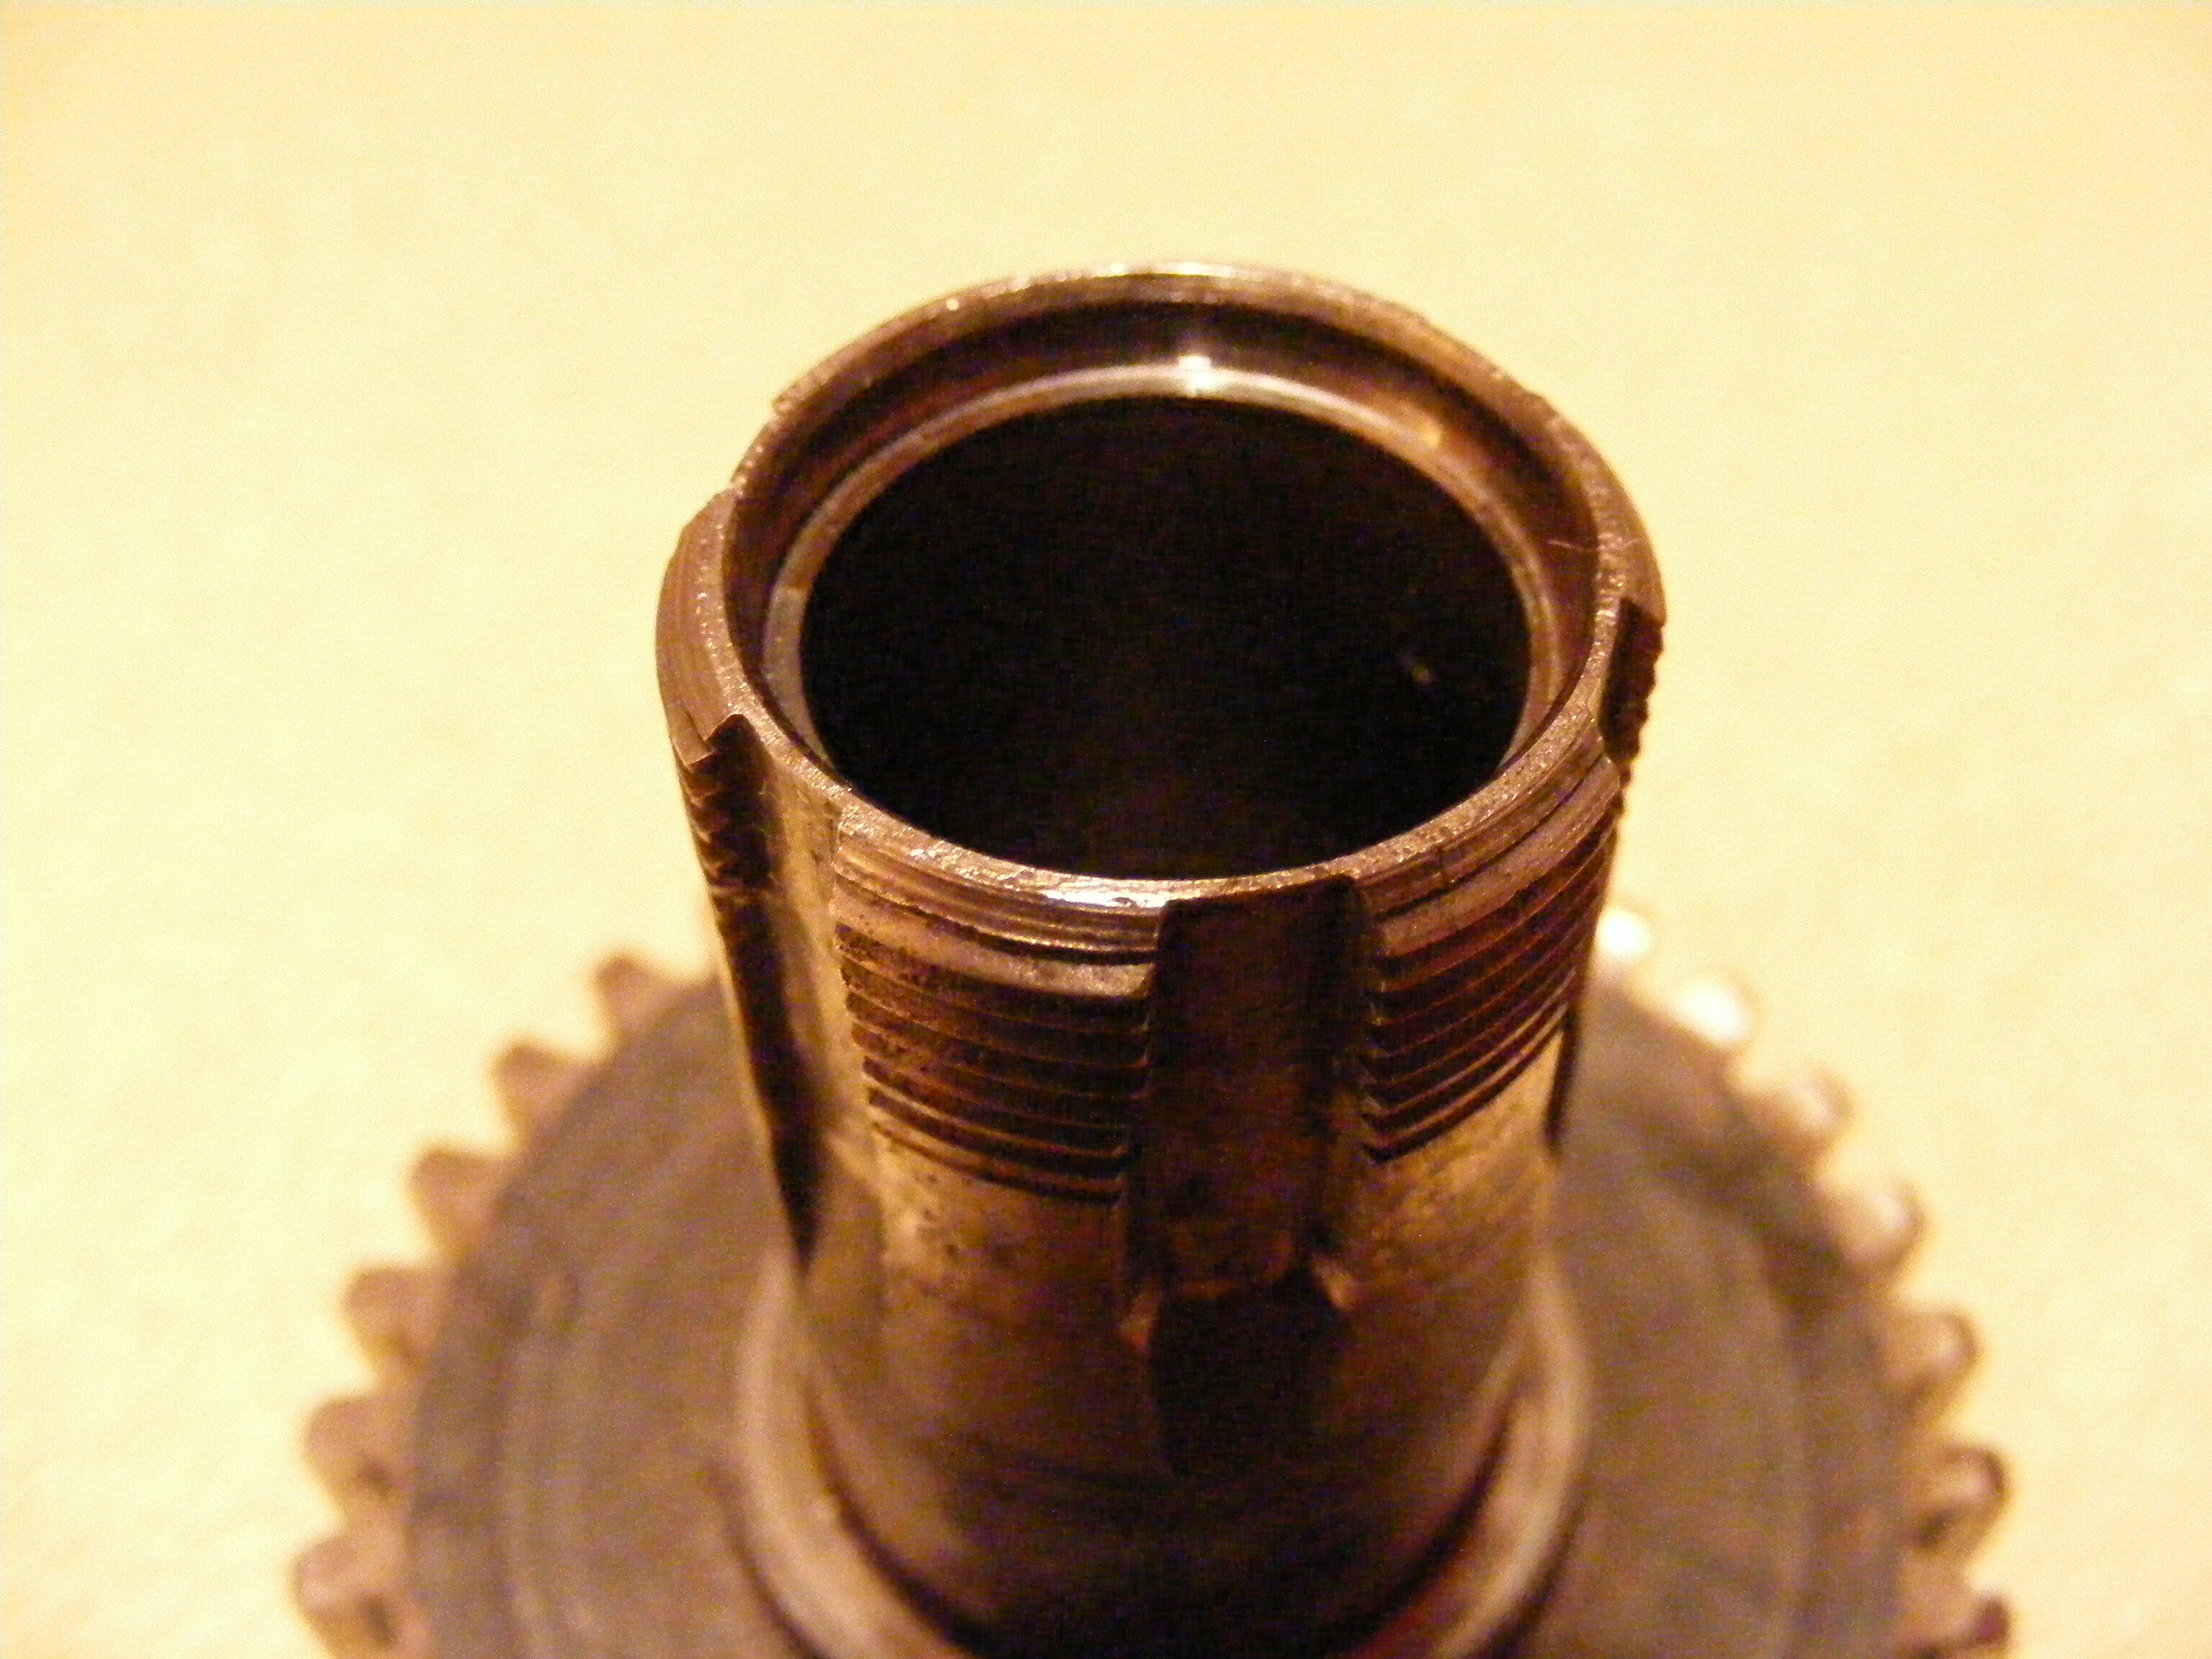
On 5-spd. Sherpas, the early type sleeve gear bushes were replaced from mod. 124 onwards with needle roller bearings and the 20mm. o.d. seal #160-031 and this arrangement continued to the end of production as far as I know..
I've dug out a mod. 124 sleeve gear so you can see what yours should look like: (ignoring the worn sprocket splines)
As far as counterboring your existing sprocket,goes, it looks to have suffered some significant scoring to its bore. If your new needle roller bearings are to enjoy a worthwhile service life, the bore needs to be very smooth. (see above).
To save yourself lots of further grief, you may do well to check off all the other gearbox parts against the parts book; some earlier (or later) parts will interchange and work, many will not. Who knows what mechanical mischief it may have suffered in the last 40-odd years ?
As purchased, was this a complete (running) engine, or was it already dismantled ?
Does the mainshaft have needle roller bearings ?
The sleeve gear you have appears to be an earlier variant, which would have had 2 bronze plain bushes..........and NO oil seal..... It doesn't belong on a 191.
The "spare" "O" ring 111-025-1 is for the crankshaft sprocket spacer (the crank seal sleeve).
The sleeve gear seal 160-031 is correct at 14 x 20 x 3 - has the old seal been removed ? If your sleeve gear is 18mm. i.d. with 2 needle roller bearings, then the oil seal should be correct. This is originally a metal-cased seal - you will probably find that when you remove the old (rubber) seal it will leave the metal case behind, thus appearing to be just 18mm.
Can't really comment on very early Bultaco numbering, but it makes sense to me that Lobito model 19 would have a 7-digit serial, in common with most (all ?) models up to at least model 99.
I have units of models 80, 85, 92 - all have 7-digit serial no. Can't say at what point Bultaco went to 8-digit........logic says model 100 onwards, (to distinguish from 4-spd. Sherpa mod. 10), .......but I had a model 100 Pursang 125, still with a 7-digit serial .......
Maybe someone out there has the definitive answer ?
There may well be nothing wrong and it could just be the angle the wheels are at to the camera........a full side-on shot of the whole wheel from the right (non-brake) side would probably help.
Don't worry about it being a learning curve ; I also like to do things right (first time if possible) and after decades of working with bikes I'm still learning, too.
Placing the security bolt diametrically opposite the valve stem hole is a bad idea - as b40rt pointed out, that's where the join weld is. This would be where the Akront label is placed on an original rim; also unsuitable for the reason that it's where two spokes are converging at the rim. Placing the security bolt hole as close as possible to opposite at a point with diverging spokes would locate it at just two nipple holes away from the join weld, probably equally undesirable.
If you look at your wheel, you will see that the nipple holes/dimples in the rim are disposed in (nine) groups of four. I have only original Akront rims and all are drilled the same, with security bolt hole between 3rd. and 4th. groups from the valve hole, between 12th. and 13th. spoke from valve stem. .. Viewing wheel from the left, this means that with the valve at 6 o'clock, the security bolt hole is at 10 o'clock, i.e. security bolt trails valve in forward rotation.
Hope this makes sense.
Looking at your pic. something doesn't look quite right with the rear wheel lacing..........
Appreciate everything you've said, although probably now of little or no interest to jonnywobbles as I believe he disposed of his bike some while ago, unfortunately
The ease or otherwise of setting contact gap and timing is greatly affected by preparation, and practice. With almost any pointed system the fixed contact is liable to moving when the adjustment screw is tightened and can be eased by lubrication and placing a suitable washer under the screw head if one isn't there already. Furthermore, a bit of practice will allow you to anticipate the direction and magnitude of this movement.
The biggest help of all is to use a buzzer, or multimeter with buzzer to determine points opening. Trying to look at a bulb, d.t.i. and flywheel at the same time is just too many things to look at ! Especially when you've been temporarily blinded by staring at the bulb.......
Setting points through a small hole in the flywheel ? OK, it's a bit of a faff, but with practice doesn't represent that much of a challenge, really...
Points opening checked with a multimeter, connected to (disconnected) black feed wire to coil. Also disconnected green from earth to prevent path to earth via magneto coil.
Was the condenser in situ in the stator plate, and still connected to the c/b points ? If so, this will provide a path to earth, as it's wired in parallel, i.e. across the contacts.
I wonder if your multimeter would be sensitive enough to give a worthwhile result.......
Timing figures are always given for the point at which the contacts open, which is when the spark occurs, as stated by naichuff . If your contacts arefully open at 2.6mm. before TDC, the timing will be substantially over advanced.
10 hours ago, JonnyWobbles said:
with regard to the modern points, I’ve none to compare but can say that a brand new set I purchased were faulty and intermittently went short circuit. Very poor quality when you look at the riveting etc.
I'm unable to comment on "modern" points, as all I've ever used are these :-
which I believe are o.e.m.
If the contacts you purchased were as bad as you claim, you should return them to the seller for replacement or a refund
Probably 1972-73, depending on what you mean by "year" - of manufacture, import, registration , etc.
Is it road registered ?
As has been mentioned many times, when it comes to categorising Bultacos, far more important than "year" is MODEL No. which in this case is mod. 92, 1st. series. (Sherpa 325 "Slimline")
Slide #3 cutaway Main jet 150 Needle jet .106 Pilot jet 20 Cold start jet 40
I suspect your problem lies in the idle circuit (smallest orifices block the easiest) and if it's been lying about unused for a long time I doubt that soaking in paraffin would do any good as far as cleaning it is concerned. You need CARB cleaner ! in aerosol form, preferably.
A combination of this, and compressed air if available would be much more effective.
Failing this, you may have to resort to using an ultrasound cleaner. But don't ditch the Amal just yet.....
Or, the nut that locates the spring is on the threaded end of the ratchet guide so if you undid the nut fully it's possible that the guide moved inwards whilst fitting the spring. I don't think it can move enough to affect its correct location but can't be certain. The guide has a flat on one side and this locates against a recessed flat on the inside of the casing. If the guide moved inwards and turned it might be possible that it turned enough that the flats didn't line up and when you tightened the nut back up and it hasn't pulled the guide back far enough to fully locate the ratchet. With the nut removed there should be approximately 14mm length of thread showing on the outside of the case. If it's less by a few millimetres it could be incorrectly located, try pulling on it gently and turning left and right to see if it slots back into place. This is just a guess but it's what I'd be looking at if I was certain the spring was fitted and tensioned correctly
+ 1 on that.
These were my thoughts too - but expressed so much more eloquently than I could manage........


M85 Frame Question
in Bultaco
Posted
Alpina M85 was available 1971-74. Which of these years / what model is your Sherpa engine ?
Factory parts book (later issue) for Sherpa 250 M80 lists M85 frame and also upper/lower yokes (triple clamps) as replacement parts ; I take this to mean they are mutually interchangeable, even if not actually identical.