Yes, Mecatecno definitely needs a sub-forum on here as I posted about a year ago, but nothing has happened yet. Xispa has it's own sub-forum and I've never even seen one!
I think @Andy may have moved on to other endeavors. It has been a long time since I have seen any activity by him.
I am not sure how often this site is monitored by him anymore.
and it doesn't take much to shorten the bars to where it is comfortable. I think I cut 1/2 inch off each side. Start small, you can always cut more off, a bit harder to add it back on.
Risers won't mess with your ability to learn, being uncomfortable and in pain will mess with your ability to learn.
Down side of using risers with low bend bars, it brings the center of the bar up so there is more possibility of hitting your body with the bars on big ups.
Bars with a taller bend will give height but keep center of bars out of the way of the body.
OK quick arguing about whether tall or short is an advantage, it doesn't help answer this person's question.
@dirtrider86 When you state "older trials" are you referring 10-15 year old machine or even older? - but either way my notes below still apply to both.
I used to suffer from low back pain and sore wrists due to riding position. 2 small changes made all the difference so that I could support myself with my legs and not lean on the bars.
1. Bar risers - I didn't go crazy, I think I got the 10mm risers at V-Mar racing. https://vmar.com/barmounts.html#close - Same results could be gained using taller bars. and as @Tr1AL stated be sure to buy Trials bend, this is what they are designed for.
2. Bar width - I cut my bars shorter so that my forearm, wrist and hand were all in line. I will explain, this one takes some visualization to understand.
stand on your bike, place your hands as far apart on the bars as possible - notice that your wrists bend outward and your back is bending forward
Now bring your hands inward on the bars until your forearms and wrist are in a relative straight line. Your back will also move to a straighter position - you should be able to find a natural feeling position that is still somewhat bent forward.
Setting the bar width for my "wingspan" solved the sore back from having a too forward riding position and solved the sore wrists from having them bent at an uncomfortable angle.
The first workshop manual GasGas produced for the TXT trials bikes (2003 until now) was in 2018. Prior to that all you could get was a User Manual and an exploded parts diagram.
The 2018 Workshop manual is 95% correct for your bike anyway, so you will be able to figure it out.
Zippy, did you ever find out what year those boots were? I just missed a set of these -- kicking myself!
Nope, but a short while later I switched to Alpinestars and never looked back. So much happier with the Alpinestars, stiffer sole so my arches don't hurt.
My experience has been that you can get the newer GasGas trials parts in the US via KTM dealers (often at a discount). But you may have to come up with the part number on your own.
My 2015 GasGas 300 came with a flywheel weight from the previous owner. I noticed immediately that it did not have that "pop" at small throttle inputs, it had to be revved more to get that response.
Made the bike feel sluggish to me.
I took the flywheel weight off within a couple days.
A flywheel weight may provide the result you're looking for.
I probably have the same lift. Takes a little effort to get in up on the thing, but it works really well.
17 hours ago, Butch said:
Yep it's a Vovor. Like you said, still have to get it up on there but then your all set up without kneeling on the floor. That's not pleasant for old guys like me lol
Tip when lifting a trials bike onto a stand, as tempting and convenient as it is do not grab the muffler to lift the bike.
Reach down just a little farther and grab the tire/rim and lift. Will save the muffler from getting wonky and provides better lift to set it on a stand.
There are many that say that style of rim will always leak and is impossible to seal.
Best / Easiest fix is to buy a new rim with the 2 piece turnbuckle style spokes. No rim band, no leaks.
I did replace a rim band on a 2003 GasGas more than 5 years ago, it sealed up just fine and had no leaks for years. (I did break off a sprocket mounting tab on the hub.... but that's a story for a different day)
Use a lot of patience and soapy water when installing the new rim band, I suggest a band with the valve stem integrated in the band.
Thoroughly and meticulously clean the rim before installing the new band. Use rounded tire irons (tire spoons), no sharp edges, to stretch the band into place.
Use much soapy water and carefully work the band into the groove in the rim. do not use anything sharp or pointed to push the band into place. the band must fit under the lip in the groove.
I used the backside of a dental pick, the rounded portion so the point was sticking up away from the band.
Also check out this video from Jim Snell, dude has much experience and knowledge.
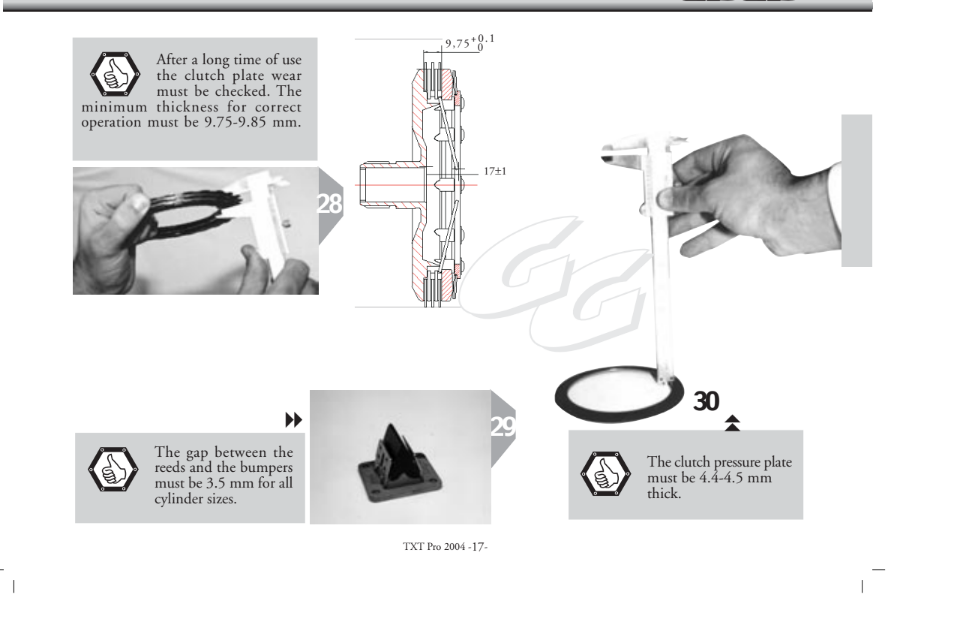
L'épaisseur du pack d'embrayage affectera la difficulté ou la facilité de traction de l'embrayage. La hauteur du "doigt" change à mesure que les plaques s'usent et peut modifier la sensation de traction de l'embrayage. Le pack d'embrayage pour 2004 Pro devrait mesurer 9,75 - 9,85 mm. la hauteur du "doigt" doit mesurer 17mm +/- 1mm. Je pense que la hauteur des "doigts" est plus importante. Le ressort rond doit mesurer entre 4,4 et 4,5 mm d'épaisseur.
L'image ci-dessous provient de The Hell Team in Australia
Si vous avez besoin d'ajuster l'épaisseur du pack d'embrayage, de nouvelles plaques de fibre peuvent être achetées ou différentes épaisseurs de plaques métalliques peuvent être achetées. Ils sont empilés dans diverses combinaisons pour atteindre l'épaisseur correcte. Exemples en lien ci-dessous.
À un moment donné, des plaques de pression d'embrayage plus minces (ressorts) pouvaient provenir de fournisseurs de pièces de rechange. Je ne sais pas s'ils sont encore disponibles
I don't know if the Brak-Tec caliper on my GasGas is the same as yours but here goes.
I have a 4 piston mono block caliper. I decided to clean the pistons and reassemble
I did it one piston at a time. NOTE: I did not remove the large Torx plugs in the caliper.
1. disconnect brake hose from caliper - drain as much brake out of the caliper as you can, some will remain
2. wrap mechanics wire around the 3 pistons you want to stay in the caliper
3. using compressed air "pop" the 4th non-wired piston out
4. At this point I cleaned the piston and reassembled, you would pull the seal out of the caliper with a pick. Lube the new seal (I just use brake fluid), insert new seal. Lube new piston, insert new piston.
5. wrap mechanics wire around the new piston, unwire next piston to be changed.
The good news is that I've found a wheel builder in the UK that's doing some vintage tubeless wheel builds for me and my son that has extensive knowledge of these type wheels. Have messaged him and have an initial response with his willingness to virtually help me get it back together.
Thanks. Been out cutting dead limbs all day on my property out of my manlift, so have no patience or energy to try to tackle it tonight. At best, I might put some antisieze on all the threads.
If you come up with a better process for lacing these types of rims, Please share the info.
I recently replaced 7 bent spokes on that style of rim, disassembled, reassembled, etc.
Much cursing and swearing, sorry don't have a trick other than patience. but there is a point in the "length" of the spoke where the hub side is past the bend in the spoke but not touching the end stop of the spoke. This allows a little room to slide back and forth a little bit. I did have to do a little forcing to get spokes started in the turnbuckle.
I tried to start both spokes in the turnbuckle at the same time, so that one end would not bottom out before the other and have maximum adjustment available.
thanks, I know there is one diagnostic cable but besides this one, I got 2 free left - 1 single wire and second dual wire plug. Both near the regulator.
I popped the fuel tank off and poked around a bit. I have not owned this bike long or did too much maintenance on it due to multiple injuries. (yes I am making excuses and whining)
I did not see any unconnected plugs under the gas tank. There is quite the mess of wires under there.
I must have been thinking about the 2003 when I mentioned two plugs not connected.
My 2015 was produced prior to KTM buying GasGas, the 2022's are made after KTM bought GasGas. So there is a possibility of differences in wiring etc.


09 txt pro 250 cutting out when warm.
in Gas Gas
Posted
You just recently had the top end done.
Was the bike running fine before that? definition of fine for this case: continuous running, only shutting off when rider wished to do so.
was the engine removed from the frame or only the barrel, head, and piston removed?
Start looking at what items were disturbed, disconnected, etc.
Any sharp bends in the wiring that could have broken wire inside the insulation.