pmk
Members
-
Joined
-
Last visited
Everything posted by pmk
-
Progress. Footpeg relocating also entailed relocating the kickstand. Been busy getting a lot done on this OSSA. Still getting messages that I can not post photos, otherwise I would.
-
Sorry, a few posts touched upon what they are on. Bike is an 72 OSSA MAR. Overall though, removing the spherical bearings and replacing with vinyl tubing got them mounted with no concerns regarding installation. However, open to hear what other ideas you might have that could be better.
-
Emulsion shocks run body up...Yes, you should be ok. My own MAR runs period correct Curnutt shock, bodies up, shafts down and are emulsion type. I would say, but have not tested these shocks as emulsion shocks. I suspect that what I have seen with these shocks, if you ran them as emulsion type, you could also not gas them since the sealhead is clamped between the clip and the end cap. No doubt gas pressurized performs better, but no pressure makes seals last longer and less likely to leak.
-
I modified the IFP with a bleed hole that is sealed with a sealing washer and screw after the shock is bled and IFP position set. I serviced the fluid from the top since I removed the upper eyelet from the shock body. If you do not modify the the IFP, you could position the IFP to the proper depth, then do not insert the seal into the counterbore. The excess fluid will leak past the DU bushing until the sealhead seats on the circlip. Insert the combined oil / dust seal and install the end cap. As for softening the damping, I installed a bleed shim between the single main shim and piston face, plus altered the far side clamp diameter by adding a small shim above the machined aluminum seat. Used Motorex 2 1/2 wt fluid. Yes I know it says fork on it but it is also a very good rear shock oil. Also, while apart, everything was deburred, and the shafts were polished. I went a touch lower than typical gas pressure at 125 psi, but was higher than the 60 psi in one and 80 psi in the other shock from the factory. These shocks now will extend freely, and so far, when installed, the bike feels good and returns to static height. As I mentioned before, not bad shocks for the money, the price point seems OK for two shocks with springs. The real question will be are parts available?
-
Unladen. Even my stock footpeg location MAR, when riding the footpegs are below axle centers.
-
Ironically, expecting an internal bladder, I was super cautious on disassembling the first shock. Once I saw the internals, the second was apart in minutes. No bladder lessened any likelihood of damage while working on them.
-
Progress was made, Footpeg structure for the frame mods has been fabricated and installed. Footpegs are no more than 5mm above the axle centers. The pegs were not moved forward or rearward as best we can measure them, and if they have move it could be rearward a mm or two. Everything is aligned so the pegs are parrallel to the swingarm pivot, same distance rearward, outboard ends are slightly up and footpeg tilt is level front to rear and match within 1/2 degree side to side. Material used to make the parts was 4130 chromoly steel, 1/8" thick. forward curved edge is welded to oem frame, the other edges are bent / flanged then welded to give side load support. We did not box the backside. Certainly would be stronger. Do not consider it needed, but time will tell. It will see cheap paint to sort out any issues before taking it apart again for powdercoat of the frame. I would post a photo but I must be maxed out since no more photos can be posted.
-
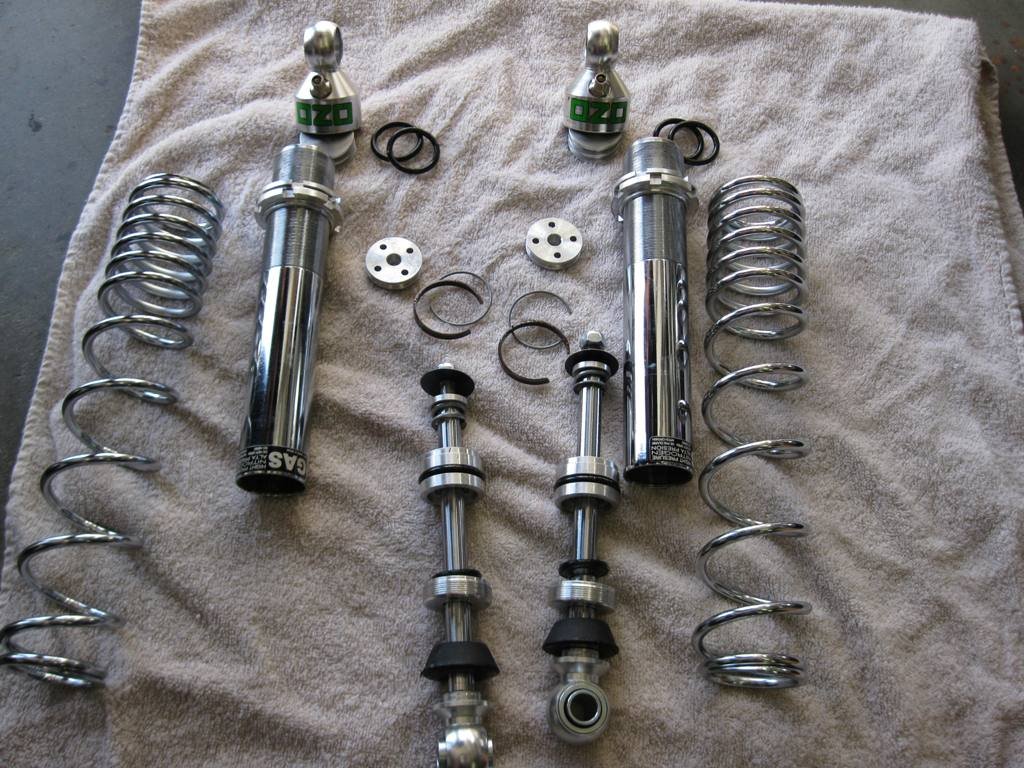
Kind of comical...the advertising says "internal bladder technology" however, there are no bladders inside these shocks. In the photos, kind of holding the pose for the OZO sticker on the upper shock eyelet / endcap you can see the two O rings per IFP and the IFP separator pistons under the endcaps. So no bladders, but there are aluminum IFP with dual O rings to keep the gas and fluid separated.
-
I tend to agree somewhat, but not always. These would have been difficult to ride at the event as they were and not broken in / freed up. At this point, after the event, if more changes need to be made, it is an easy task. Honestly though, at this point it was a good choice and my buddy can bring his previously ridden Betors in case he decides to swap back.
-
As feetupfun mentioned, a fiddle with the damping. Yes, correct, this all started with my friend buying these OZO shocks for his MAR. Initially, there was concern removing the upper eyelet mounting bushing setup as shown in another topic. He installed these OZO shocks onto his MAR, replacing aftermarket Betor shocks he purchased a while back. The Betors were pretty firmly damped, actually overdamped and had a design that did not allow easy removal of the coil spring. The OZO shocks were purchased with intentions to fit his second MAR, the one being modified with lowered footpegs and more, again, the reason for yet another topic. We have an event this weekend. My buddy wanted to run the OZO shocks on his current MAR, the relatively stock bike, not the one we are moving footpegs on. So after getting the mount setup sorted, he installed them. Yesterday he came by my house to check that the OZO setup would be good. He rode the bike about 10 minutes and I rode it a few minutes. After I rode it, I told him they were over damped, ultimately, he accepted that in this application they were over damped. What you see in the photo, his shocks, pulled apart. I made some valving changes and redeveloped how they are assembled allowing both shocks to be easily worked on, with repeatable assembly setups that match the left and right shocks performance. Initially, the intent was to merely swap the fluid for something with less viscosity. Finding the viscosity of the fluid fairly thin, other options were utilized to accomplish the goal. Nothing difficult, merely took a good base to work from and made a few minor setting changes. Once together, he was able to again ride the features at my house. The changes were in my friends own words “night and day difference”. In simplest terms, the compression was softened and rebound quickened. Not to the point of change to be like a modern bike all springy and hoppy, rather to follow the ground and features better with more control. Obviously not something everyone should delve into. The photo is merely to share information about what is inside. Realize also, I have the proper tools and experience to do this. Being old, I have tuned many shocks and forks since I started working on suspension in the mid 1970s. These shocks should prove to be a very good setup for him. My hope is seals are maybe available, plus if needed other parts too. Start to finish the entire job took about 2 hours. The first one coming apart was slower in disassembly, to understand how these were assembled. The second one was apart in a couple of minutes. We did take the added time to hand finish typical edges to make reassembly and performance smoother with less likelyhood to cut an Oring. In simple terms, these are now blueprinted as we call it in the USA, the pistons valving was changed, shafts were smoothed and polished, and the fluid in them now is a known item, easily attainable. Not bad shocks for the money, just needed a bit of attention to be what was needed for his bike and riding.
-
Could be smoother.
-
A look inside the OZO Pro shocks.
-
Agree. At the moment, I want to ensure the new brackets are true. The tacked on peg mounts are so we can ensure the pegs are not droopy or angled forward or aft. Once that stuff is welded, I will probably do something similar to what you mentioned to attain the height and tilt to be positioned correctly. None of it is difficult, just time, and best to do right the first time.
-
My buddy has installed his new OZO rear shocks onto his current MAR. Not the one getting footpeg mods, his current rider. The upper eyelts now are pivoting on clear vinyl tubing. He needs to get a ride in on it, but indicated they had a better initial feel than his Betors he purchased previously. The photos of the Magicals end eyelets explains visually how they described the valves were protected. I did not realize the enter eyelet was threaded onto the shock body.
-
Footpeg support structure has been fabricated, and tack welded into place. So, I do appreciate the advice given and will post some updates in a bit. Next will be to verify alignments and double check the pegs have been moved downward only, with very little or ideally, no change to the front or back. Also, in regards to handlebar position, on my own MAR, I purchased production bar risers. Have not ridden it yet, but the reposition has moved the bars up 15mm and forward 12mm in relation to the triple clamp flat surface. Accounting for the triple clamp being tilted on account of the headtube angle, the actual amount forward is less, probably 9 or 10mm.
-
I admit to not knowingly ever seen Magical brand rear shocks. Is it possible, or does anyone know, if the Magicals are manufactured by Betor to Magicals design criteria, or are they manufactured somewhere else? I ask, since this pressed in mount design sounds similar and common to the Betor shocks. Honestly, no idea where they are made, just asking a simple question.
-
Commonly, most times, a spherical bearing, being similar to say a ball bearing is sized by ID, OD, Width, and degree of misalignment. In most cases, the ball is permanently installed by the manufacturer swaging the outer race. On some styles, the outer race is machined with to notches that can allow the ball to be removed if rotated 90 degrees allowing the flats to pass by the notches. Some version are manufactured as a steel ball riding against a steel outer race. Other version may have a Teflon fabric liner and are considered self lubricating or there are versions utilizing brass races pressed into the steel outer race. Some version are designed to be lubricated by grease and have a groove machined on center around the outer race circufrence. This style also has a small hole drilled through the outer race within the groove to allow grease to reach the inner ball surface. The groove acts as a passageway from the housing the bearing is seated into, allowing a grease nipple on the housing to recieve grease that flows inward to the ball. I would post a photo of an Ohlins eyelet with a spherical bearing installed, however my upload limit is close to zero.
-
Woody, are the Magicals pivots a press in type or spacers with a bearing retained by a circlip. Just curious.
-
Reference photo that may help others. Buddy texted this to me after he finally got the pivot pressed apart. Two silver cups. The spacer has the spherical ball machined as part of it. Small O rings are the only seals. No circlips to retain a spherical bearing assembly, simply each cup is press fit into the shock eyelet. At a guess, those peen type marks are likely from the socket as the upper cup in the photo was pressed out.
-
Life is short, enjoy what you can while you are can. Trials Central and other forums or FB groups are kind of an entertainment overall and like TV there are many characters. Each person comes here for their own reasons. Myself, I enjoy learning from others, and helping if possible when I can, and like grandkids or kids, sharing photos of my challenges of tasks, completion of tasks, and if worthy pictures of the bikes others may also enjoy. Sometimes the characters are great to learn from or see what’s going on, other times less so. When people act in a manner that deviates from what you enjoy, like TV, we can choose to not watch. Your recent comment, indicating I had no idea about removing the eyelet bushings I shrugged off with a “whatever”, simply because you were not wrong in that I was not able to remove them. I was asking to learn, there were no replies stating how, but once it was learned, I shared. The shock eyelets are tangible and beyond obvious once apart. Other times, topics are less tangible. Recently on another website, there was discussion about other things, trials related. Each of us has an opinion. Some have knowledge and experience in various sunjects. Never to old or unwilling to learn, open minded I ask the why question. Until the why is answered, the opinion is merely that. Granted the why must be answered with a means to support the reason. Sadly, often the why answer is a perpetuated tribal knowledge, simply based on hearsay. Being miles apart in distance, often not knowing the other person, most times there is no reason to become upset about posts. If you have the time to share knowledge and can support the knowledge that is awesome. If you prefer to read and ask questions, awesome too. Those that entertain themselves via negativity, that too is awesome since we as the viewer can change the channel and ignore them... No worries from me about your previous comments here, from your side I can see I may have deserved it.
-
Yes people with experience and skill can work it out themselves. I handed them back and said wait on the reply from InMotion. The idea of destroying the shock eye on someone elses new shock was not cool. Last thing I needed was a broken shock and InMotion saying they accidentally sent the wrong shocks. I stand behind my decision to wait an extra day or two until InMotion replied. If I need to go inside these to get them dialed in, I will post some photos so others have an idea of how the are assembled. Advertising says they use a bladder. Possible but no common on non rezzy shocks with long shaft travel.
-
Thanks for the kind words. Myself and my buddy that bought the shocks are both curious how well they perform. Time will tell. If needed I will revalve them if shimmed or make appropriate mods internally to get them dialed in. Again time will tell. Expect them to be pretty basic and no big deal other than waiting on seals when needed. Myself, I wish he had just gone with sime USA made shocks. He was tempted by Magicals but cost was more than he cared to spend. At a guess, had he truly known OZO shocks are Betors, he may have avoided purchasing them. His other Betors are crap to ride and do not use a quick release spring retainer.
-
Time out guys. First off, Woody is correct, the MAR uses two size shock mounts. As for InMotions reply, it certainly was short and sweet, essentially saying they just push out. Fair enough, they were correct. They did just push out, but required the force of the vise acting as a press to make it happen. Yesterday while with the owner of the shocks, he went further than telling me he got them out. His words were they both were very tightly pressed in, and released with a “pop”. So, if others are buying these OZO shocks for an MAR, realize what may be required. As for lubricating this setup, unless you use just oil, or build a greasing adapter, you must run the pivots dry, or press them apart to grease them. Regarding the use of rubber hose as shock eyelet mounts on some applications. The early 70s Curnutt shocks on my MAR, I have the original instructions for them. They explain, go to tne hardware store and purchase vinyl tubing in size needed to make the shock mount setup.
-
Say what you might, but that post of yours is inaccurate and you are missing the context. My buddy that owns the shocks first attempted to push out the what appeared to be a spacer bushing. Fearing he would damage them, he asked me to give it a try. Not knowing how Betor designed these eyelets, and nothing moved with reasonable effort, I too feared there was possibly a clip, or something else required to get these apart. The idea of destroying a new shock eyelet was not cool and waiting to have good info was not an issue. InMotion finally replied, and with that, my buddy, that owns the shocks stacked sockets and wise what he described as good effort, the vise pressed them out. The design is silly and kind of dumb. Hardly a true spherical bearing. The design requires a tight press fit to retain the ball races. But whatever. Your description in your reply explains a typical spherical bearing setup, exactly as I too expected it to be. Every pherical bearing I have worked with, whether shock eyelets, aircraft or automotive typically has spacers that can be removed from the ball, and the entire spherical bearing is inserted then retained. With the spacer and ball as one item as on these shocks, the design is not common. As for using rubber hose for shock eye mounts, with Betor not offering the correct size on this model shock, and being the upper mount with minimal movement, it is a non issue. if you require more info to understand, I shall post a photo when time permits.
-
To update for others. I attempted to remove the upper eyelt pivots. The owner of the shocks got a reply from InMotion saying they just push out. With reasonable effort, I was unable to get them to budge. I handed the shocks back to my buddy that owns them. Using a socket to support the backside, he pressed them out in the vise. The design does not use circlips. Simply two pressed in cups with a center bushing that is ball shaped at the midpoint. His installation will require using a rubber or similar hose over the frames mounting lug, wirh the shock eye slipped over the hose.