We really need a picture of the rear wheel from both sides. Just from logic it looks like the spacers are in the wrong side as the long one should be on the brake side.
Lots of good pointers here and all valid. Check the condition of the wire from the points which can often become hard and brittle and will need replacing if this is the case. Sometimes you can purchase new OEM points which come with a sort of "Teflon" coating which NEEDS to be file
On the TY250A frame the fixing bracket on the rear frame loop is slightly offset! If you drill the center of the new mudguard you will see that it is NOT centered over the tyre/tire.
As you can see from your own picture the cable won't fit with it's holder fitted to the brake arm, and likewise can't fall out of there when fitted correctly. Pull the split pin and fit the extended nipple in the hole (you may need to cut a little of the black plastic cable cover off) It makes NO difference which way round you fit the holder.
With regard to "poor brakes" while a NEW cable will give you a smoother action I would replace the OEM shoes with the EBC grooved ones and also before fitting remove the actuating rod attached to the brake arm. Give it a really good cleaning and a light greasing when refitting as this will stop the brake locking on.
Depends where you live, what competitions you plan on riding, their rules, and of course what you are willing to pay. In the USA for example I can use BSA B50 four stud forks and their yokes which are 3/4" and fit perfectly. If you use Yam TY250 forks and their yokes you will need to get either bearing holders or the stem machined to the Cub. Yam forks and yokes work well but do extend the wheelbase by 1/2". There are of course many other options but I fear they are not cheap!
A very interesting discussion with plenty of input from experienced riders. Taking a slice of history into the equation and going back into the 60's even the purpose built machines of the
era all had solid welded footrests and fairly flat bars with hardly any lift. Just look at an
unmodified Greeves from those days, a classic being the 24TES. Our standard posture was the
"banana bend" stance. In those days it was not uncommon for footrests to get broken off and we then progressed to small painful spring loaded units mounted higher on the frame and many top
riders having their own handlebars made by Renthal with around a 7" lift. Riding styles of the period were either Sammy Miller and Gordon Farley, knees together, or gripping the tank, and
balance controlled by upper body movement or in contrast to our British Experts from the
Southern Centers the rock experts from Yorkshire were using the "knees wide apart" lavatory
stance allowing the bike to bounce left and right without needing the out of balance dab.
Throughout the 70's we were set on this design with high footrests (around 14" and 7.5" lift
bars). Higher the footrests=higher the bars to maintain our "banana bend". Wheelbase on the
majority of machines was 52.5". Handlebars were set to a neutral position with the bend of the lift being in line with the fork action. Rotate the bars forward and the Cowhorn portion of the bars will cause your wrists to cant inwards and you will increase the pressure of your grip,
take it too far forward and you will have too much weight over the front wheel with all the
problems that will cause. Rotate the bars rearward and you will soften the banana and be
standing too upright and find the bike difficult to manage on long steep climbs.
Moving the footrests back and down is a great idea, 2 x 2, seems about right as it lowers the
center of gravity, but one of the critical measurements seems to be the distance from front
wheel spindle to center of rest which from my experience over 50 years is between 38-39"
Your main problem would seem to be the chain and sprocket set up and nothing to do with the clutch.
The original set up was 13 front and 53 rear with a 428 chain. The ideal for modern day
events is 12 front and 53 rear. Any smaller on the front and it will bite into the swinging arm and clack as it tries to follow the front causing the chain tensioner to bounce.
The BEST cables made for the Yam are the OEM ones as other makes do not usually have all the "extras". Your best bet is to go to Speed & Sport PA web site (Yamatopdog) and if you are buying new clutch and brake cables they come with the lever covers as well.
Our next event is Dolores Co on Aug 9/10 with all the fun of the usual format of riding in the Town Parade and then 36 sections a day. This year is NOT a National and the sections will therefore be slightly easier. Full details of all the section building are up and coming on the "blog" so you can see what is on offer.
9/10 Aug is the Town's Escalante Days festival so accommodation is tight. If you planning on coming BOOK early!
When I built one of these 320 motors I bought the "kit" from Craig and then put all the internals in it from a TY 250A engine. I bought the Mikuni VM26 and used a 35 pilot and 290 main! The main jet increase seemed excessive but was spot on. It could well be that your carb has the original jetting and the main is far too small. The problems you speak of could simply be fuel starvation in the upper rev ranges.
Only one week away! Taping and carding is underway, check the "blog" to see the sections from design to completion. Over 200 man hours with brush saw and secateurs and a whole lot of walking ! No ATV's were harmed during the making of this epic. Loop marking complete, hillsides strimmed, spectator friendly sections, the new Town bar is up and running and Dolores is ready to welcome YOU.
It sounds like a weekend in the workshop going back to basics. You obviously took the flywheel off to get the condenser out, did the woodruff key reseat correctly ? The points may have the rose gardener's "black spot" if they are old so check that. Check the wiring from the stator plate as this often goes brittle where it lies on the top of the engine cases. Personally I always remove the two yellow lighting wires and fit a new black wire all the way up to the top coil. Keep the kill switch disconnected until sparks have been found. If you have recently fitted new points make sure they are shiney as some of the OEM ones come with a sort of teflon coating that must be removed before fitting. Good earth on the frame is essential as everyone says. What sort of plug cap are you using ? If its a rubber screw on one then have a look at the HT wire and make sure thats bright and not rusty or cut it back 1/4" to be sure. Plug should be NGK B9ES or a B7ES will do and set at about 22 thou. Yes, the source coil can fail on the stator plate and new ones are around 50 quid but before going to all that expense find a friend with a TY175 and do some swappsies, stator plate, top coil, etc to find the problem...... frustrating I know, but very satisfying when you find the problem which is often something very simple!
Dolores Co is the venue for Rounds 3 & 4 of ITSA NATIONAL CHAMPIONSHIP and Rounds 9 & !0 of the ITSA Mtn West
Series. 230 acres of never used trials land slap in the middle of town. The event is being run in conjunction with the Town's Escalante Days festivities on August 10/11 and we get to ride in the Town parade with unregistered bikes on the public highway. For full details of all the fun and to see the proposed sections in all their glory press the "Blog" button and all will be revealed. Hope you all have this event on your to do list. ALL Classes Vintage and Modern including Early Mono.
Standard problem on any 2T the PILOT jet will get blocked! If it runs on the choke the choke circuit is good and the moment you take off the choke the engine dies, splutters or is not smooth then the pilot jet is blocked. Blow it out with compressed air. Depending on who has been playing with it will determine what jets you have. Standard is 240 main, 25 pilot. Standard airscrew setting 1.75 turns out as datum. The above vid is good but I would suggest you start with a slightly higher rpm by turning in the idle screw which effectively raises the slide. This makes it easier to hear an increase or decrease as you adjust the airscrew. When you have it adjusted SLAM the throttle wide OPEN and see if it accelerates smoothly. Also before starting any of this make sure you have the correct plug gapped at around 22-25 thou NGK9ES, NGK7ES will do and the points set at 15 thou.
Welcome, better join the ITSA Mountain West Vintage Trials Association, we have a class for your bike. Like us on Facebook as they say and see all our upcoming rounds on TC under USA Trials and Reviews.
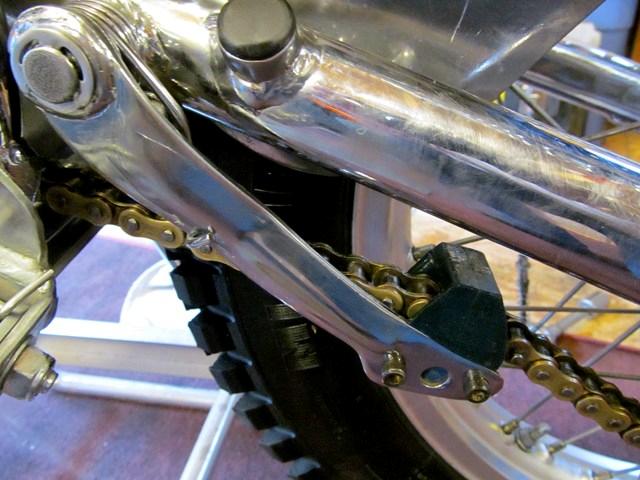
The TY tensioners are the same for both the 175 and the 250. The mount is on the swinging arm and the spring fit over the tensioner arm which then slips over the mounting lug. It is then secured with the spring circlip.
Wheels front and rear are the same for both models along with brake anchor arms. Front brake cable is the same, as is the fender, or aftermarket SM brace.
You don't give us many clues. Have you recently acquired this bike? What altitude are you riding at ? What carb is fitted and what are the jet sizes, cut away on slide, needle setting ? What plug are you using and what is the gap? Has the ignition system been changed ? What state is the air filter and exhaust system? Is the reed system good? Are you using pre mix and what ratio ?


Denver Trials scene ???
in USA Trials
Posted
Yes please!