| |
-
Thank you for correcting that mistake. Congress did enact other regulations, mostly import taxes, to protect H-D. These were primarily aimed at the Japanese manufacturers after it was discovered that Yamaha was selling motorcycles at a loss to capture the US market. Also the first US Bultaco importer on the east coast, John Taylor, originally sold the bikes out of Spitzies Harley-Davidson before forming Cemoto East.
-
The original rear brake light was powered off the ignition coil and used a resistor in case the filament burned out. Without the resistor the brake switch became a kill switch every time you stepped on the rear brake.
-
Two best things I did to my M98 Sherpina was swap over to a Mikuni and dump the points for electronic ignition.
-
You don’t say what model of Bultaco you have. This is key. I have an M98 Alpina that I turned into a trials bike for vintage trials. I used the trans gears and heavier primary flywheel from an M91 Sherpa T to compliment all the other modifications.
-
Did some testing going over logs and rocks yesterday. My son was racing his ‘79 YZ250 and between motos I gave the skidplate a good thrashing. It may have just a bit less ground clearance now (another reason for me to lose weight), but I didn’t really notice it. This material is certainly more slippery than the bare frame rails. This might be more of an issue with large, angled log crossings, but hitting them straight on it just glides right over. Same with rocks, but the area I was testing it in only had a couple good sized rocks buried in the ground. A better test will be in a rock garden with loose boulders.
-
As for the shape, I drew it out based on the template from an old article I found where someone removed the frame rails and perforated bash plate from an M92 and replaced it with 3/8” thick aluminum. I’m not too thrilled about the shape, but I’m going to give it a go in some rocky sections tomorrow.
If I were to do this again, I’d start out with making a cardboard pattern in the shape I want then trace it onto the material before doing and bending.
-
-
For all the trouble I had bending this material, you’d think cutting would be the easy part. Nope! Even on the slowest speed with my jig saw and feeding it slowly by hand the material would melt and fuse back together after cutting. A good whack with the hammer would break off the cut piece. Trying to trim the cut edges was another lesson. One method only resulted in creating more balled-up melted material. The sanding drum on my Dremel used at half-speed worked best.
-
The material, called a polygranite, as it’s imbedded with small pieces of granite, is under a lot of tension. Even bolting it at all four spots, using the clamps with flat stock and heating it with the torch still left about a 1-inch gap. UHMW is a much easier material to work with.
Since there was little change from using the heat gun and bending it the rest of the way did not over stress the material, I decided to go with what I had.
-
After the initial bend I marked the skid plate for downtube clearance, removed it and notched it. Then I attached it back onto the bike with the clamps and a strip of flat stock before more heat cycles with the heat gun. After sitting all night I removed the clamps and it sprung back about an inch. I realized then that shear size of the surface area make it difficult to get the material hot enough with the heat gun. So time for a new plan.
I drilled the holes for the front mounting bolts and wrestled it back onto the bike. I replaced the speed clamps with a pair of C-clamps, using the strip of flat stock. Next I heated the entire underside with a propane torch. Unlike the heat gun, you can’t leave the torch sitting in one spot too long, but even moving it around quickly gets the surface much hotter than the heat gun can. By being able to heat the whole surface I’m hoping it will finally form to the curve of the lower frame rails. This is the first of three bends, but the other two are not as large as this one. Going to leave it clamped and bolted up overnight again.
-
First attempt at bending the cutting board material. Used a couple of clamps and heated the underside with the heat gun. Took about 10-minutes to get it this far. Once it cools back to ambient temperature I’ll remove the clamps. The board will need to be notch for the down tube before I do any more bending. Once get the curve fitting tight I’ll draw out the basic shape and trim off the excess. This skidplate will be easily removable. Some of the areas we ride at don’t have rock gardens to contend with.
-
Last fall I cracked the primary cover on my M98 Sherpina when I hit a rock at a trial. Luckily I was able to repair the cover, but ever since I’ve been a bit nervous about going through rocky sections. The standard skidplate, or bash plate, on the M98 is just some a perforated sheet between the frame rails. It’s made contact with a few objects over the years, but it offers zero protection for the primary and flywheel covers. I’ve seen a few homemade skidplates, so I decided to try and make my own.
The material I selected was a 17” x 14” x 5/16” (432mm x 356mm x 8mm) cutting board purchased from Target for $15. Originally I wanted to use 1/4” (6mm) UHMW and may still build one from UHMW, but my local supplier did not have any available. Looking online, I saw a few people had previously used cutting boards and the end result looked better than one made from a manure shovel.
So far I’ve notched the back corners the match the width of the lower frame rails. I drilled two holes to temporarily mount it. Next I’ll be trimming the width and then use a heat gun to form it into the final shape. Attached are a few pics of my progress.
-
I would call Hugh’s Bultaco directly.
(518) 851-7184
-
On Monday I went back to a practice spot I hadn’t ridden at since before repacking the mid-box. This place has several long, steep hills with switchbacks. Normally I’d have to wrap out the engine just to make it to the top, but now the bike kept pulling with very little throttle. I was very surprised. It seems a properly packed mid-box does provide some low-end power to the 250.
Now I’m going to build some sort of a skid plate that will protect both the clutch and flywheel covers from damage.
-
Thanks, I wanted to be able to fully remove the core to clean it, pack it properly and be able to clean and re-pack it in the future.
The motor is definitely noisier than my old M206 Pursang, but at least the exhaust note is more acceptable for some of the places we ride.
-
Sorry for the late response. Other projects came first.
I removed the mid box to repair a small hole in the rear section. While it was off I got a good look inside. All the packing was long gone. I cut open the mid box about 3/4” of an inch after the taper in the front and removed the perforated core. Then I cleaned the carbon from the core and the inside. Using 22-gauge steel, I cut a strip 1.5” wide and put it around the inside of the mid box then brazed it to the rear section leaving about 3/4” sticking out to slip inside the front section. I drilled four 3/16” holes through the front section and inner strip. Next I wrapped the core with exhaust packing and put it back inside the rear section, slipped the front section over the strip using high-temp silicone sealant and fastened it back together with four pop rivets. It made a huge difference in the exhaust note. Now I can hear all the rattles in the engine.
As far as any impact on performance it’s difficult for me to judge that. I also installed an electronic ignition so the bike performs a lot better all around. At my last trial the bike never stalled and I only had two 5’s all day.
Overall I’m quite satisfied with the performance. If I rode it more than two or three times a year I might actually be competitive in the intermediate class.
-
A lot of the Japanese enduro bikes from the 80's and 90's had lighting coils in the stator that could only produce between 20 and 30 watts. Enough to power a headlight and tail light, but not enough for a brake light. To add a brake light we would wire a resistor into the tail light circuit and bypass the resistor with a brake light switch. The bulb would be dim until you hit the brakes. Some would also use the similar method for a hi/low beam headlight using a handlebar mounted switch.
-
Will do on the photos VN.
I just finished building an exhaust for my son's 74 TL125. That project started when we decided to replace the worn out stock shocks with a set of rebuildable Showa shocks off a Honda MR175. The shocks were larger in diameter and wouldn't fit with the stock TL triangular mid-box. So I built a new swan-neck piece and connected it to a small muffler that came off a log-splitter engine. Along the way I discovered the flange on the head-pipe was rotted out, so I had to fix that. Then I decided to make a whole new, re-packable, silencer from a bunch of scrap I had laying around. I can add the same spark arrestor tip that I have for my Bultaco. It's not whisper quiet like the stock TL exhaust, but my son enjoys the slight performance increase.
-
Thanks VN! Nice looking job on the triangle silencer and mid-box.
The inlet pipe on my stock triangle silencer broke away from the main body. When I went to repair it I looked inside with a borescope and found it completely full of carbon, worse than yours. The bike was just too loud without a secondary silencer so I looked for a clubfoot silencer since it is stamped as a spark arrestor needed for riding on public land. Even the used ones on e-Bay were quite pricey, but I found the banana silencer for $50. I did have to make a bushing to reduce the size of the inlet and fit the outlet on the mid-box. Sound-wise the bike is a bit quieter, but the biggest change I've noticed is in throttle response. I've also got a spark arrestor tip I can add to the end of the silencer. I'm going to modify the mid-box so I can easily open it up and repack it again. When I bought the bike it had an old Pirelli knobby tire on the rear that was too wide. The tire rubbed a small hole through the back corner of the mid-box which will need repair too.
Although my bike is an M98 (175) Alpina, it had a 250 top end when I bought it, but didn't have the correct tank and seat. I added the Sherpa-T slimline tank and seat along with low front fender brackets, plastic fenders, trials bars with risers and trials tires. Later someone gave me a basket case M91 that had been in a fire. I managed to salvage the primary drive and transmission gears which were swapped into the M98 cases. The only other changes I've made were adding a Mikuni VM26 carburetor and a Domino trials throttle. If you put my M98 alongside the M80 they look virtually identical.
-
I also replaced the triangle on my M98 Alpina with the later banana-style silencer and welded a tab onto the rear fender loop.
My next project is to open up, clean and re-pack the mid box.
-
During the poker run I was trying to catch Siege on his MT250 and my exhaust started to melt the rear fender. Pretty sure I cleaned out any carbon buildup.
-
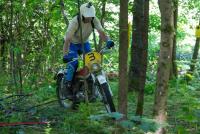
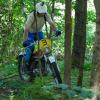
The trials I rode last weekend had two transfer sections through freshly cut hay fields. We also rode a poker run through the same terrain, except for a longer distance.
-
Agreed... already drained the fuel. Going back to straight non-ethanol premium unleaded in those bikes.
-
It's definitely something related to the fuel. It only happens when riding WFO pulling a load. I had my Go-Pro going when my bike started misfiring the second time. Showed it to my youngest boy and he said that's exactly what his bikes were doing. I can rule out the pre-mix as his MX bike is a 4-stroke. It's strange that my older son and I haven't experienced this in our vintage MX bikes, but those bikes aren't ridden WFO for long distances.
-
It was bouncing around in my tool pack with the spark plug socket and wrench. I set the gap to 0.020”.
|
|