Sorry for the slow reply, work has been crazy. I got to mess w/it more tonight and found that now any lead coming out of the rectifier is roughly 20v AC at idle up to 70v AC at high rpm.
It also looks like it's gotten hot and slightly distorted. Is there a way to test my regulator or should I just get a new regulator and rectifier? Is there a cheap alternative to oem parts?
I recently purchased an 01 280 txt and on my first outing proceeded to boil it over as the fan is inoperative.
If I undo the fan connector and jump 12v and ground to the blue and black wires, the fan will come on.
If I reconnect that connector and jump the yellow and blue wires at the thermo switch the fan will not come on.
The yellow wire coming into the thermostatic switch has varying AC voltage, about 24v at idle. Someone has cut this harness prior to me buying it, likely to eliminate the lights? I found a single yellow wire coming from a block under the steering stem bearing area. Thinking this may be the voltage regulator for 12v AC, (I circled in red on diagram) I spliced this into my yellow wire coming into the thermostatic switch but it still remains 24v + AC and I still can't get the fan to work.
Could anyone please help? I am pulling my hair out. Thanks so much!!
I can't help feeling it must be more complex than that. Surely you need to know what the flashing lights represent - what is being read? There must be a chip to allow the diagnostic to perform?
I'm not so sure. I suspect that if you put 12V to that ECU pin, it puts it into diagnostic mode and outputs the signal that the diagnostic tester displays as a flashing light. If I weren't afraid to fry my ecu I may play w/it
I am pretty good with wiring and such and wondering if anyone has made their own 4rt code reader?
I know there is a yellow diagnostic port and in the manual it mentions counting flashing lights on the code reader to determine faults. I am wondering if a 12V power supply and LED could be rigged up to do the same.
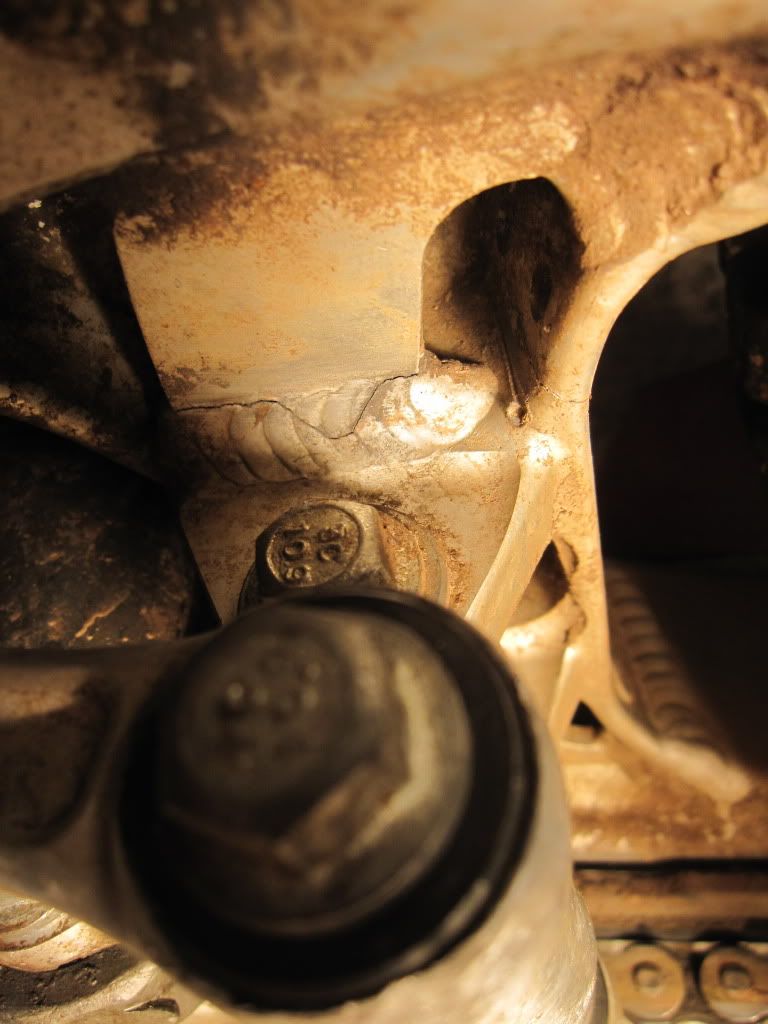
I bought an 09 beta evo and it had a cracked swingarm. The new one came w/o bearings and when I was tearing it all apart, the bearings in the dog bones are like powder.
I have to replace the dog bone bearings, seals, swing arm bearings and seals and am shocked at how expensive OEM parts are, as it is totaling up into over 200 dollars.
I'm travelling to Lyon next week for business but have a bit of down time. Does anyone know if there is a trials shop in Lyon? I tried googling but no luck.
If he takes it to his dealer i bet Beta will warrenty it. You would be better off with the newer replacement design. You will get a better side stand mount with the new swingarm too.
Think you're right! My local dealer is working on hooking me up with a replacement swingarm. Here is the crack:
The frame/gas tank where the upper motor mount bolts up is where the frame cracks. check it very closely. It will start leaking fuel when it gets bad enough.You may have to take the motor mount off to get a better look.
Hey guys,
I didn't see any cracks at the motor mount area but the swingarm did have a crack right in the weld near the linkage. It will be a simple job to re tig weld back together and the seller didn't even know it was there.
yeah, swing arms are vunerable on these, look underneath near the pivot bolt for signs of cracking.
Thanks guys, I will definitely check it out for cracking. I can tig weld it back together if needed but the guy said he was aware of the frame/swingarm cracking problems and doesn't have any on this bike. He did say the upper motor mount has come loose several times but I'm sure some red loctite can fix that.
We got 6" of snow/ice last night so I may not see the bike until tomorrow.
Some experts are easy on bikes and some are brutal bike wreckers..... as a few questions.
The 2009 was the first year of the Evo and they had problems with the rear wheel bearings dieing because they had reduced diameter to save weight. The next year they went back to the large'ns, so expect to replace them.
Check the fork leg (uppers) for rock damage.
The 09 & 10 Evo came out with way too soft rear (not sure of front) springs and most guys went for a heavier spring. If it hasn't got one already, budget for a fresh heavier rear spring.
There were a couple of minor first year issues with a few (only a few) frames, but the factory covered these under warrantee.
I converted an 02 290 using similar Pro Taper parts. With the adaptors and a factory Suzuki/ KTM bend bar, the grips come out in almost the same position as stock. I ran them for several years with no issues. The Protaper bar pad even covers up the adaptors. I did not put them on a scale but total weight was also less than the stock bar with cross bar.
Sweet! I have my stock bars off my 08 ktm 300 i want to put on, the only downer is I cut them down to 29.5" so it may be a bit strange on a trials bike. As a rule of thumb, how wide should bars be on a trials bike?
I need to put fat bars on my 06 sherco 290 because I keep destroying little 7/8 ones. Aside from getting a new upper triple clamp for 1 1/8 bars, has anyone done this:
I would ensure the small airway from the back of the carb is clear. This feeds the pilot jet.
Blow out with air from front of carb backwards through syatem.
The mixture at partial throttle relies on the pilot system operating.
Because you are having to turn in the slow speed screw and the macine is running lean I would certainly check the pilot system.
Geebee
I went through the entire carb again. It has a 35 pilot and 120 main...is this stock? Upon reassembly and test riding, it seems to be running pretty well but a tad on the lean side. I still don't understand why the air screw has to be 5 turns out for this thing to run right. How many turns out are you guys running?
I just rebuilt my 04 125 (it was seized when I purchased it) and used RYP for parts and other information. Given the issue of the fuel in the bottom end I highly recommed that you verify if your fuel needle seat has a rubber tip. If so contact RYP and purchase the brass needle and seat. After my rebuild I filled the crank case with fuel twice while trying to hop around in the driveway and came to the quick conclusion that the needle was worn and the up and down motion of hoping/ general riding was making the issue worse. Replaced the needle and seat and problem solved. Unfortunately I had to buy a stator/ flywheel shortly after this which was rather expensive.
The little needle that the float arms attach to does have a red rubber tip on the end of it so you are saying it is causing the overfilled crankcase and the brass ones are better? I just want to make sure I am referencing the right needle.
Hopefully you got your pilot jet clean, but I think this more related to the fact your crank seals are shot and sucking air so it is lean and you are unable to compensate.
Also hope you took note of the pilot jet number, as I think you need to get it in the 36 range or better on our crap fuel.
I will add other comments in your other thread re- the crank seals.
The pilot jet is clean and when I sprayed carb cleaner all around the engine cases, carb, air boot etc, I had no change in idle so I ruled out a "vacuum leak".
Ok, the US importer is Ryan Young at RYPUSA.com, click on the Sherco icon for info, parts , tech tips etc, or just call via the contact info. Ryan is there during normal business hours.
These bikes actually come with sealed and pre lubricated main shaft bearings. Hopefully they are still ok and not washed out by the fuel in the motor, only time will tell, yet for now you should be ok as long as the crank seals are done.
My standard pref at this time would still be the Viton, available through Splatshop UK, as compared to the standards for hopefull longevity, but the standard seals still work fine for years.
Big things here if you want a quick ang clean job are marking the shafts and nuts soo you can take things back to proper torque after repair using air tools.
They are hard, so it takes a dremel disk or summat to mark them on three basic pointes. Flywheelnut and shaft, clutch hub nut and shaft, and primary drive gear nut and shaft.
You gotta remove the clutch side cover which means possibly tearing that gasket, so have a spare, yes draininf coolant, removing pipe and cooling hose clamp as well. 23mm screw clamp as I recall. Remove clutch springs and pull plate, thin big nut(scribed) to move the basket so you can pull crank primary gear(may need a bit of knocking)as they are tight. Plop seal out then reinstall and reverse process! Easy peasy!
Watch washers, specially on water pump gear shaft opun re install, stick with grease.
You'll see it all, if not you are recco to find the dealer!
I called RYP.....damn they know their stuff. They said that the gas in the ignition side case leaked past the crank seal but they thought the crankcase was just overfilled. They said if the seal was bad it would suck air in and pull the plastic igntion cover into the flywheel and wear a hole in it. There are no signs of contact on my ignition seal and after draining/filling the transmission I am not getting any fluid in the ignition case any longer.
I am going to ride it this weekend and will periodically pop the ignition case loose to see if I have any drainage. RYP said if the crank seal went bad on the clutch side it would smoke like a freight train and have no power. That doesn't seem to be the case on this bike but it is running very lean right now.
I just bought a used 06 Sherco 290 and am going over the bike inspecting everything. I pulled the carb apart and cleaned all the jets and made sure they weren't clogged. I put the bike back together and the bike runs really lean. The large screw on the carb that is supposed to adjust the idle actually seems to lean the bike out the more I turn it in. The RPMs will start to race high and it pings really lean. I found a happy place for it and have the air/fuel screw next to it 5 full turns out. This seems excessive and I feel like by turning it this far out (richening it up) I am compensating for a lean condition.
-What is a normal setting for the air/fuel screw? (how many turns out)?
-Why does my idle screw seem to be messing with my air fuel ratio as well?
I don't know enough about this bike since I just bought it to know if it has been running this way for a long time or what. The plug looks good and I sprayed all over the carb, intake, etc. with carb cleaner to listen for an RPM range indicating a vacuum leak but none were found.
I don't have jet numbers but can take the carb back apart tomorrow if need be.
I am pretty seasoned when it comes to wrenching on things and have all the basic hand and air tools to do the job. I will need to get a flywheel puller it sounds like though.
I am positive it was old fuel that had contaminated the ignition side case cover and once we drained the fuel out, air would puff out a tiny bit. In my head the only way I can make sense of this is that the fuel drained out of the carb since the fuel valve was left open, made its way past the reeds into the crankcase. From there it sat until it made its way through the crank seal into the ignition case. I am a bit worried about the lower end bearings but so it goes.
I will try and find some old posts on crank seals but all the ones I've found this far are on the clutch side, not the ignition side.
I pulled all the jets out and they have a green varnish that when scratched, becomes dry and powdery. 1/2 the jets were plugged partially or fully and everything is taking a bath in carb cleaner all day today.
On a positive note, I pulled the exhaust and reeds to look at the crank, cylinder and piston/rings and everything looked really good in the cylinder. The crank, from what I could see with the reed cage out looked good but had some discoloration on it. Probably from fuel sitting in there.
I'm going to put some fresh motul 10w40 in the gearbox, some engine ice in the cooling system and put the carb back together tonight. Next up...dreaded crank seal.


Ac Dc Voltage And Fan Inop, Please Help
in Gas Gas
Posted
Sorry for the slow reply, work has been crazy.
I got to mess w/it more tonight and found that now any lead coming out of the rectifier is roughly 20v AC at idle up to 70v AC at high rpm.
It also looks like it's gotten hot and slightly distorted. Is there a way to test my regulator or should I just get a new regulator and rectifier?
Is there a cheap alternative to oem parts?