
denisesewa
-
Posts
31 -
Joined
-
Last visited
Contact Information
-
For my brake lever I ended up having to use a steel one mounted to the inside of the frame , steel so I could cut, weld, heat and bend it into shape , is it possible to mount on the inside?
-
if I remember right my Beta Techno was 12 volt, I would think the Zero was 12 volt as well, nothing special about the Motoplat coil , one off a 90's era KTM should work , ( probably any 12 V coil would produce a spark for a test ) Keep up the progress
-
Thanks to all for the positive comments , Glynn, that is exactly the intention , so far the performance is just what I wanted.
-
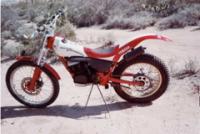
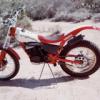
So its been a while , winter kinda shut down the build then I went on a 3 month kiteboarding trip, then picked up a TL 125 and did a rebuild on the entire bike, so, last week I tore down the trials build, finished all welding , sandblasted/ grinded the chrome off and painted, went after all the little details on reassembly and couldnt be happier with the final result , just waiting on some paperwork to get it titled and my foot to heal so I can ride. Seat is installed so just one thumbscrew removes it in about 10 seconds , street electronics can be removed in about one minute.
-
Making/buying A Removable Seat For A Gas Gas Txt Pro
denisesewa replied to glynn's topic in General Trials Talk
Good job Glynn !! kinda cool getting something for a trials bike for cheap eh? -
Making/buying A Removable Seat For A Gas Gas Txt Pro
denisesewa replied to glynn's topic in General Trials Talk
BTW, another example is the Magura Hydraulic clutch conversion kit for around $300 , I bought a chinese copy just to try it out for $50 shipped, works great, I am not advocating buying chinese stuff and try to buy from/support local shops, but I am on a limited budget and cant throw away $250 just to try something out. on the other hand I am sure this stuff wont last as long and the quality of the alloy is poor, but a seat for $22 verses $200 to $300? -
Making/buying A Removable Seat For A Gas Gas Txt Pro
denisesewa replied to glynn's topic in General Trials Talk
Pitbike = China , and a saturated market -
Making/buying A Removable Seat For A Gas Gas Txt Pro
denisesewa replied to glynn's topic in General Trials Talk
Plenty for sale on UK ebay http://www.ebay.co.uk/sch/i.html?_nkw=pitbike%20seat&ssPageName=GSTL -
Making/buying A Removable Seat For A Gas Gas Txt Pro
denisesewa replied to glynn's topic in General Trials Talk
This is how things are going with my bike ( Same way I did the Techno) , I made a * mushroom* with a small spacer and plastic washer along with a longer screw for the mount on the front of the fender, then trimmed off all the protruding plastic from the seat base along with the rear mounting brackets, cut a * keyhole * in the appropriate location, I have to bend the seat base to get it to go on and the seat now snaps in place, it actually fits well enough that I probably dont need a mounting screw in the rear but I'll probably put one in anyway. So, one or two screws and it goes from trials to trail. Looks pretty good IMO and cost a total of $22 plus a couple screws. -
Leaking Fork Seals , Tool That Works
denisesewa replied to denisesewa's topic in General Trials Talk
That seal doctor does look like a nicer unit, gonna have to get one. you have a cool website, lots of familiar pictures , I'm just down stream in Canon City -
So when I bought the 2006 TXT forks for my project bike I knew they had some nicks in the stanchions and the seals were leaking so I ordered a set of seals and with them came a " seal mate tool" ( figured it was a gimmick) , the seals on the forks were leaking bad enough that pumping them a couple times would leave oil film on the stanchions and after a trail ride there was oil down the leg and on the brake rotor. I used a " Lanski" knife sharpening kit which has small super fine stones and honed down the nicks and then just because I had it used the Seal mate tool to clean the seals, the amount of crud this tool removed is amazing and after following the info in this video I am shocked to find they no longer leak >> <<.I will change the seals and oil before assembling the bike for the final time but thought I'd share this in case anyone is interested , one thing for sure is I will use the tool occasionally to clean the seals on all my bikes.
-
Making/buying A Removable Seat For A Gas Gas Txt Pro
denisesewa replied to glynn's topic in General Trials Talk
on the Beta I made a "keyhole" in the plastic base for the front and installed a raised screw in place of the screw for the front of the fender , then one screw from under the rear part of the fender into the seat base, so only one extra hole in the fender was required , havnt figured out how I am going to mount it on the supermini yet. -
Making/buying A Removable Seat For A Gas Gas Txt Pro
denisesewa replied to glynn's topic in General Trials Talk
You do have to do a bit of trimming of the plastic seat base and get creative on mounting it , I am presently working on doing the same for my Super mini build which will require relieving quite a bit more seat base than the Techno did, you will likely have to do the same on your TXT -
Making/buying A Removable Seat For A Gas Gas Txt Pro
denisesewa replied to glynn's topic in General Trials Talk
Pitbike seats can be purchased cheap and have a shape that makes them ( relatively) easy to fit >>http://www.ebay.com/itm/381211921247?_trksid=p2060353.m1438.l2649&ssPageName=STRK%3AMEBIDX%3AIT. I put one on my Beta techno for mountain trail riding, its still pretty low compared to an MX bike or enduro but helped -
Thanks!! You sending the old tank along sure made it easier to make a mold for the new one, Much appreciated !!
