Check that the clutch operating mechanism is actually giving you the full operating movement. From your description it reads that the clutch must be dragging from the start and is not fully clearing, this could all be down to the incorrect cable or adjustment process needs re setting. Double check everything is installed as it should, parts diagrams can be misleading.
Make sure the fan blades aren’t touching any of the cowling, nothing lodged close to the blades. If the fan housing is distorted that can create the issue you seem yo have.
Get the same sealant that Honda,Yamaha or the other two Jap manufacturers use. I prefer to use Yambits who will supply decent sealant its grey and does a good job. Like you its years since a I did a Villiers engine cases, just ensure that the mating faces are flat and go easy on any sealant you use. Too much and it will squish out and inside the crankcase which you don’t want to happen. Apply the thinnest of beads closer to the outer face sealing areas, leave to skin over say 4-5 mins then go for assembly. As an aside I use the Yamaha sealant on Caterpillar V-8 marine engines at service and repair intervals and also on the heat exchanger flanges, used it on Bultaco and of course Yamaha cases. Hylomar mentioned by nh014 was used by Rolls Royce and is good stuff if used correctly and might be more in keeping for your Villiers engine. Give Villiers Services a call they may recommend what they use. I’m fairly sure the crankcases are the only area where there is no gasket. You may need more than one gearbox to crankcase gasket as thats the way to correctly set the primary chain tension. Out of interest what model Villiers are you working on?
Note if you use Hylomar it tends to separate out in the tube so try to mix it by squeezing the tube a few times, capped of course, to mix up the contents otherwise what comes out is runny liquid and no main constituent.
I currently have a length of flexible steel hose joining a motocross tailpipe and normal bantam exhaust. I would like a middle silencer box to fit roughly where a traditional airbox would go. Any recommendations
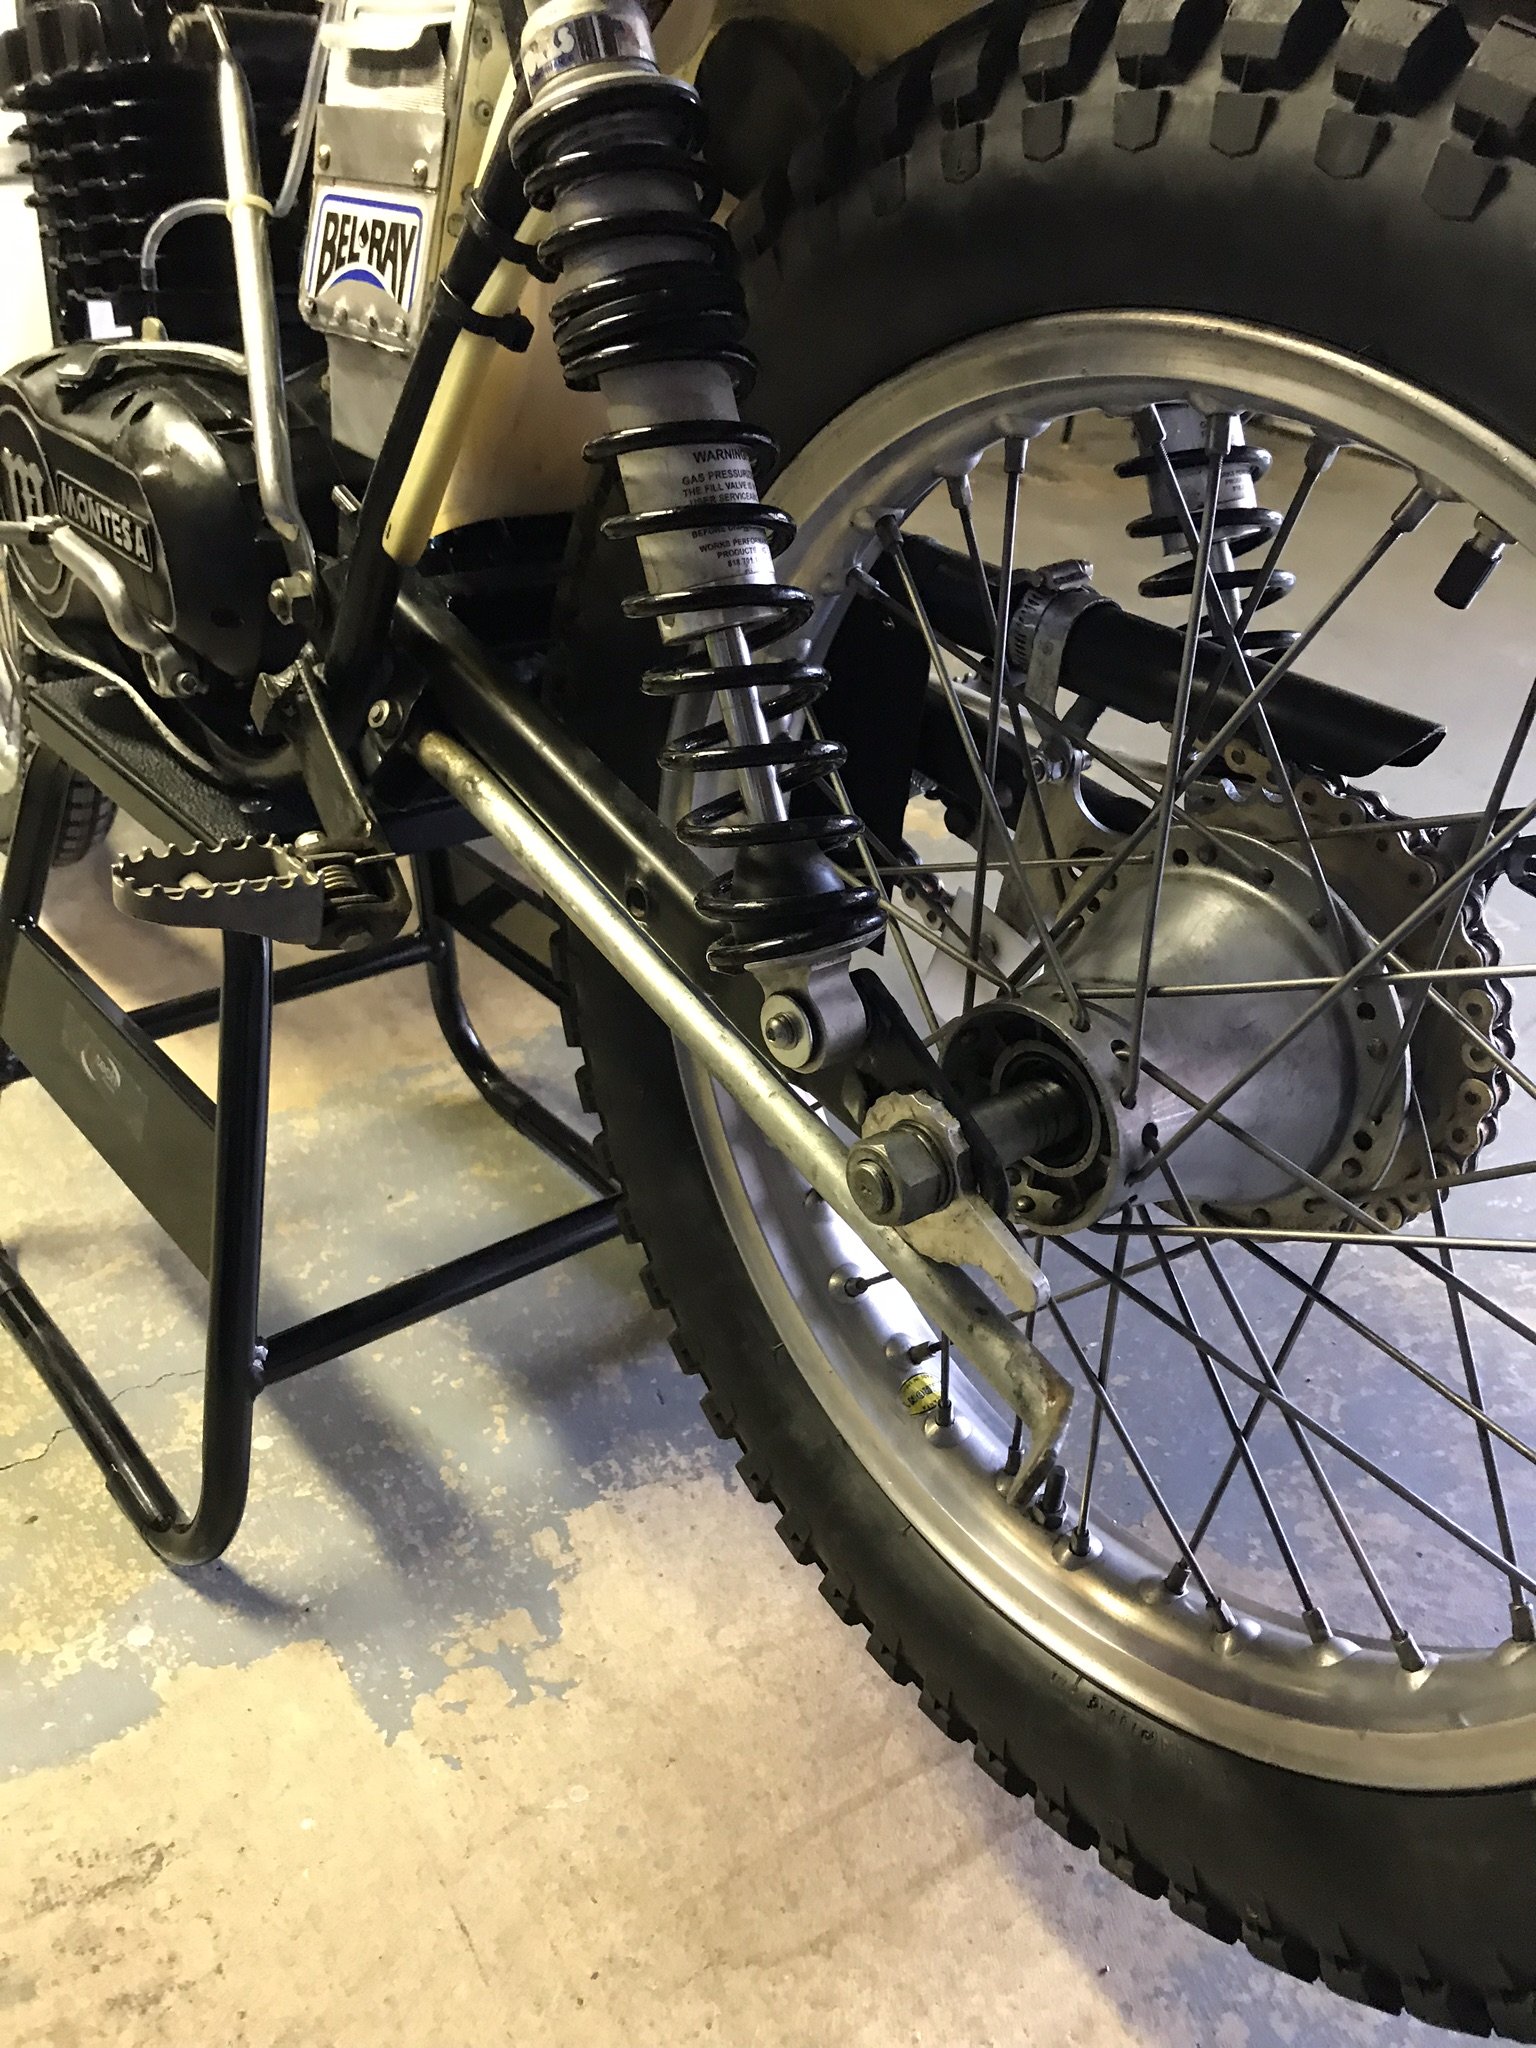
Only just seen your post on side stand, here is a pic of my 348 standard side stand with lowered and back foot rests. Side stand functions as normal with no fouling.
That brake pedal pivot needs looking at as the washers not central. If you grind away at the lever it will be weakened, if you grind the footrest mount it will be weakened. Heres my 348 rear brake
I had a 325 Sherpa T that never ran backwards, my mate had a 325 Sherpa T that was virtually identical and it ran backwards on a number of embarrassing occasions. The reason my 325 never misbehaved was that the ignition timing (cb ignition) was set as Sammy Miller suggested, instead of the 2.5 mm btdc it was set at 3.25 mm btdc this made the engine feel more docile and softer in sections. Easier to ride if you will, thank you Mr Miller. My mate’s bike was always set to spec and hence various trips into people in reverse or backwheel up a tree scenario....he never changed to Mr Millers timing suggestion...silly boy!
With the Yamaha TY250 ignition set to spec. you get a peppy engine....something some riders didn’t like. Set the ignition slightly more advanced and there is less chance of kicking, spitting back....worked on my TY250 E. As for starting if you pussy foot about it will bite back, wear stout footwear or better still trials boots and go at it like you mean business, be positive and think about what you are doing. As for the chainsaw thats not going to be more than 110 cc and the recoil action should negated any kick back.
Most Twin shock single cylinder two strokes have their ignition timing around about 2-2.5 mm btdc and most will kick if you kick start in a half hearted way. The closer to tdc the more likelihood of kick back.
I am assuming that since we are in the Yamaha section of the forum that there is some chance that you may have re-built a TY 250A? IF so, are there any tricks to getting everything re-assembled properly? I will have the Tusk puller and probably warm up the cases in my old barbbeque and freeze the crank with some dry ice before I try to put things together, but if there was anything unusual or noteworthy that you remember about your experience, I would love to hear about it.
That sounds like a good plan. Just ensure that the crank is exactly centred in the crankcases. When the engine is running there will inevitably be a slight amount of movement due to hear expansion and contraction, Yamaha design allowed for this but if you are worried you could always use roller bearings as opposed to ball bearing mains on the drive side. Leaving the crank in the freezer is a better bet than using dry ice, less shock to the crank. I believe the factory assembly method is to fit everything at room temperature. As soon as you fit the heated crankcases and frozen crank together there is going to be some fairly rapid expansion taking place so just be sure you have everything carefully lined up with no score marks in the bearing housings....oil the bearing outers before assembly. Believe it or not, some works motors had the bearing housings sized so that only a slight pressure was needed to push the crank mains into the casing, thus stripping and rebuilding was mush less fraught!
Try just ‘feeling’ the engine over compression and then kick the engine over purposefully. Simply fitting another kick start lever; and the one you mention will not be cheap, may cause other fouling problems.
If you have access to a hydraulic press rated at 10 tons you might be able to press out the crank pin, but it may need a press rated higher. I use a 40 ton press and it can struggle on some cranks, there are some so people that have wrecked their presses before now. Then you will need a surface table and vee blocks along with at least two dti’s and stands. As teamferret suggests, use Villiers services as they know these cranks well. Unless modified your crank will be of the bob-weight type and not full circle.
Is this bike new to you? Seeing that you are an advanced member please read on in the spirit of my post being helpful and not critical. Are you looking down at the front wheel or as you should be looking where you want to go. If you focus on a point you will steer towards it, but looking where you are going will get you there. You might be applying the front brake which may indicate you approaching the tight turn too fast, this can be a reflex action. Gentle use of the rear brake can put a bit of weight onto the front tyre to make it grip more. If you are clutching around tight turns loading and unloading the drive is not going to help you make the turn, this could be down to an unreliable steady idle and/or snatchy throttle action. Try tight turning without using the clutch. It could be that your bikes clutch is a bit snatchy and this will unsettle the front end. Other things to bear in mind are:
Handlebars not set correctly, too far back.
Riders weight too far back.
Riding kit too restrictive.
Head bearings notchy....too tight or slack.
Rider not positioned to balance bike.
Tyre pressures not set to conditions.
Beta’s can be a bit difficult for some to get on with, like everything. Maybe try a friends bike to see if there is a marked difference.
You asked for any ideas, I hope you master the problem?
The last crank that I rebuilt needed a hydraulic press rated at 40 tons! This started the crankpin moving with the usual and expected load clang...scattering two onlookers... and from then on in until pin release the pressure was showing at 25 tons. Crankshaft realignment using vee blocks and dial gauges on a surface table, but some get a good compromise using eye and copper (dead blow) hammer to nudge one flywheel half a tad or more on the crankpin.
Reasons for flywheel half misalignment can be down to sudden shock being transmitted to the drive side of the crank. Air gun/ rattle gun tightening of crank nut. Excessive leverage against either side of the crank when tightening either the flywheel or drive nuts, over-torquing without using the correct flywheel locking method. A good reason to not lock the engine by the con-rod.
Bouncing or smacking one half of the crank assembly to bring it into tolerance is a standard practice, its quicker than setting up on a press which could cause too much movement. Welding the crankpin in place is a belt and braces protection against high engine rpm sudden seizures spinning one flywheel half on the pin.
Remove the exhaust and see if it drains out unburnt oil. If the exhaust is partially holding oil this could be your problem. Really a photo of more of the cylinder bore would be good. Did you have the engine running when you saw the bike to buy?
Hello Rob and son. Hope you enjoy restoring the Fantic, more importantly enjoy being with your son doing something together. They all too soon fly the nest.?
It sounds like your shoes are only making contact with a small area of the brake drum. Its common to find bits of sheet metal wedged in between the shoe and brake cam, it means the drum is worn...a lot! Oversize brake linings is a way forward. I would measure the i.d. of the brake drum and then the o.d. of the brake shoes, thats shoe and not the lining. Now contact Villiers Services or your chosen brake reliner and ask for oversize brake linings. These will then give you more surface area contact with the lining and drum. I’ve done this on a few Bultaco’s that had steel drum liners to good effect.
That's a small rear sprocket which will make the gearing very high, standard gearing is 11/46 on a 520 chain. It looks like a later wheel with conical type hub is fitted along with later forks and yokes. Shock top mounts have also been re-positioned slightly lower and forward and gussets added in front of them (not criticism, just observation)
You might want to consider re-routing the wiring out of the casing bottom and move it higher to the front as on later bikes as there is always a chance it could get crushed between the bashplate and engine and break with a hard hit on a rock (common on Ossa MAR)
Lower frame tubes have been removed, check the engine cases for damage due to frame tubes being forced into contact. With vibration this can wear the cases on the undersides or even crack them. Convoluted air hose not good for uninterrupted smooth air flow. None of this is criticism just my observations. Good luck with your Bultaco enjoy the ease of working on her.?
I don’t think there was ever a manufacturers sticker on the air box...I could be wrong. Try doing a search on line as there are people reproducing manufacturer's logos and information labels.
Unless its been modified the condenser lives next to the contact breakers (points). These are behind the flywheel. Check that the contact breakers are not stuck open they tend to stick if left for long periods. If the ignition had been modified then the condenser may have been relocated, usually under the fuel tank and mounted to the frame.
Check the frame tubes that curve under the engine, these tend to get flattened if the bikes ridden carelessly or over lots of rocky sections. The tubes get pushed up until they touch the engine, then vibration takes over and wears the engine cases. I have had to replace these a few times. Some bikes have near on perfect tubes, lets hope yours are good. Also check the frame around the middle section where the seat covers the frame. The main tube is usually ok but the smaller frame tubes can crack where they meet the main tube, very likely if the bottom tubes are distorted. Whats the inside of the fuel tank like, has it been attacked by the dreaded ethanol? The contact breakers can stick if the engine has not been turned over regularly, causing difficult to no starting. Good luck with your restoration, I like Bultacos and have had a few in my time. As already mentioned In Motion (Bultaco UK) are an excellent source of spares for your bike, they know then inside out. You will need to make allowances for the current world issue but they give good advice on the Bultaco and other makes if needed. If its not on the website don’t be afraid to ask. Feked is another source of parts probably a bit more expensive. There are some French suppliers too, well there were I’m not sure about now, due to Covid-19. There's so much info and advice available on this forum that I doubt you need to get a manual. A parts list with diagrams is more useful and available from In Motion or as a down load. A mod for you to consider, the front brake operating arm is slightly longer than the clutch operating arm. They both look identical except for the length, fitting a brake arm in place of the shorter clutch arm lightens the clutch operation. The brake drums if not lined with a cast iron or steel liner should be chrome plated, this can wear off and leave you with poor brakes. The bakes were never that good any how, but Villiers Services offer (cheaper than most) a brake shoe relining service, about £20.00 for their special trials material. They do oversize linings to compensate for drum wear, you will need to provide the drum i.d. and the metal shoe o.d. from this they can work out the lining thickness to use. The lining material is very coarse but in my opinion quite good when compared to the standard offerings.


Some videos for you to watch
in Trials Videos
Posted
Very watchable, ‘proper sections’ that can be ridden and not acrobatically challenging.