bob Posted February 22, 2005 Share Posted February 22, 2005 Well don't lose any bits you take off whatever, keep em in a pile which you know where it is or even better freezer bags are something like that. This is where doing one bit at a time is helpful aswell. Quote Link to comment Share on other sites More sharing options...
craftypiggy Posted February 24, 2005 Author Share Posted February 24, 2005 All my bits and peices arrived for the weekend ready for the rebuild... Front and rear brake pads, Front and rear bearings, Rentham grips, Dot5.1 brake fluid, TL grease, degreaser(for the chain), syringe for bleeding brakes, air filter, spark plugs and a nice shiney new mudguard.... Most of it was ordered from Trialsbits and my god are they quick! Anyways looking forward to getting started on it with all your advice in mind, and I'll let you know how it goes. Lloyd Quote Link to comment Share on other sites More sharing options...
craftypiggy Posted February 24, 2005 Author Share Posted February 24, 2005 When I grease the swingarm bearings do I coat the whole thing or just around the middle etc...? Lloyd Quote Link to comment Share on other sites More sharing options...
bob Posted February 25, 2005 Share Posted February 25, 2005 (edited) I dunno as I have not done swingarm bearings on a beta before. If they are not sealed on both sides then you should push some grease in to them, you can sometimes carefully remove the plastic seal with a pin and push some grease in if they are sealed. I would put some grease on the shaft, infact grease almost everything! Plus when you bolt stuff back together, apparently it is good to use grease rather than copperslip on any places where steel is in coltact with aluminium. I will get you a pic tomorrow of the grease nipple i put on the headset Edited February 25, 2005 by bob Quote Link to comment Share on other sites More sharing options...
craftypiggy Posted February 27, 2005 Author Share Posted February 27, 2005 I started the rebuild today and I felt it went very well. I have taken everything out, cleaned it and replaced some of it. I have got the engine and the rear end back on, so only the radiator and the front end to do The only thing is that I am slightly unsure of is the arrangmet of the headstock, if someone could post a picture of their headstock part, the top and the bottom that would help me out loads, and I would know that I'm putting it back right .The headstock bearings were good apart from quite a bit of moisture, so I am gonna get the mod done with the grease nipple so it pushes out any moisture in there. So apart from me being a little confused with the headstock part its gone far smoother than I expected... The swingarm bearings were in great condition and so I just gave them a clean up with WD40 and a blast of air then carefully greased them and put them back in, the shock bushes were good too, the engine just had a bits where the jet washer couldn't get to so just needed a little clean up, and the carb has been cleaned in and out, jets and all The front and rear wheel bearings were shot due to jet washing, they were starting to corrode and rust, so new ones went in. Brake pads are a bit worn so they will be replace after its completely back together. I found it really helpful putting a dab of grease on every nut or screw that went in, they went in far easier and should keep out moisture. Just an update so far..... Lloyd Quote Link to comment Share on other sites More sharing options...
lukass Posted February 28, 2005 Share Posted February 28, 2005 The two things on the stem are the dust seal and the locking ring, take these off and slide the stem into the frame, the bearing at the bottom will sit in its race. Put the top bearing in (not shown) it will also sit in its race flush with the frame. Put the dust seal on (lip down) and wind the locking ring on to tighten the whole thing up, make sure it all moves smoothly. You want to tighten that ring until the steering starts to stiffen up and then back it off a little. Put the top triple clamp on and then the big nut (not shown) on top of that, dont forget the top pinch bolts. Quote Link to comment Share on other sites More sharing options...
craftypiggy Posted February 28, 2005 Author Share Posted February 28, 2005 Cheers Lukass, I have done it tonight.... It is slightly stiff though, well when I say stiff it doesn't turn by its self, it needs a little bit of force to swing from side to side, is this OK? Or have I done something wrong, I backed off the nut as you said and it didn't seem to make any difference? Thanks again for the pic, Lloyd Quote Link to comment Share on other sites More sharing options...
lukass Posted February 28, 2005 Share Posted February 28, 2005 Does it turn free before the top triple clamp goes on? If so it might be that when you tighten the big nut at the very top it pushes the locking ring down that bit extra and starts sticking. You can try loosening the lock ring a little more then put the clamp back on and tightening it all up, as long as there is no play in the stem your all good. Quote Link to comment Share on other sites More sharing options...
charliechitlins Posted March 1, 2005 Share Posted March 1, 2005 Grab the forks by the lower legs and try to push and pull them toward and away from the bike and check for play at the neck. The trick is to *just* get rid of the play, and add a bit of tension. It's hard to explain, but there is a sweet spot between play and binding. Quote Link to comment Share on other sites More sharing options...
bob Posted March 1, 2005 Share Posted March 1, 2005 (edited) Dunno if this is still relevant but here is a pic of where I put the grease nipple on my beta. Hope the pic quality is ok, i had a right going on getting the file size down. Bob Edited March 1, 2005 by bob Quote Link to comment Share on other sites More sharing options...
craftypiggy Posted March 1, 2005 Author Share Posted March 1, 2005 Yep Charlie I know exactly what you mean and when I carry on with the bike tommorow night I will do what you said...........Finding the happy medium between play and stiffness. Thanks to you too Bob, looks good to me, I'll get the right size nipple and get it in, and I like the the idea of pushing out the moisture. Thanks again everyone, Lloyd Quote Link to comment Share on other sites More sharing options...
craftypiggy Posted March 5, 2005 Author Share Posted March 5, 2005 Hi again everyone, The bike is back together completely, and it went really smoothly, no problems just a few new Nuts n Bolts,Brake pads and the usual stuff that needs replacing after a year or so. Thanks very much for your help everyone I would have been a bit lost otherwise!! Thanks again, Lloyd Quote Link to comment Share on other sites More sharing options...
bob Posted March 5, 2005 Share Posted March 5, 2005 Are you conna show us a piccy? I like that sort of stuff, and i have nothing else to do except look at ther peoples bikes. Quote Link to comment Share on other sites More sharing options...
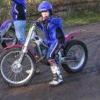
craftypiggy Posted March 5, 2005 Author Share Posted March 5, 2005 (edited) As you requested Bob. Lloyd Edited March 5, 2005 by craftypiggy Quote Link to comment Share on other sites More sharing options...
craftypiggy Posted March 5, 2005 Author Share Posted March 5, 2005 And another. Quote Link to comment Share on other sites More sharing options...
Recommended Posts
Join the conversation
You can post now and register later. If you have an account, sign in now to post with your account.