zoolord Posted September 20, 2011 Report Share Posted September 20, 2011 (edited) i have been working on this for a bit, but must knock on now so thought i would show a few bits i done.. As you can see, some of these i have not done them as well as i could, and the reason for this is the bike is going to be my first go at trials, so its going to get abused and on top of that i did't want a bike i would be scared to use. The bike is all there just needs bearings and a tidy up as well as a bit of welding and its on to the paint. Doing the forks at work in the next few days and will hopfuly put a pick up.. next is the swing are which i have removed the bearing and need to get new ones. then paint for that and the frame.. forgot to say the bike is a sherpa t model 150 slimline 250. the year is 1975 Edited September 20, 2011 by zoolord Quote Link to comment Share on other sites More sharing options...
zoolord Posted September 22, 2011 Author Report Share Posted September 22, 2011 Done a few bits today. and hoping to break the wheels in the next few weeks for anodising Quote Link to comment Share on other sites More sharing options...
pschrauber Posted September 25, 2011 Report Share Posted September 25, 2011 Very nice paint work! Just my 0,02 Quote Link to comment Share on other sites More sharing options...
zoolord Posted September 26, 2011 Author Report Share Posted September 26, 2011 The top and bottom yokes are painted because they was in a bad state and to polish them would have took to much off them. The bottom of the forks was pitted and had deep groves in them. Also i want to use and abuse the bike, and the paint on there being aero/space will stick most anything and any weather. The brackets started of black as i was going to do the bike in the red and black paint job. . only because i could get the paint for free... but looking at the bike again i desided to do it in the same silver and blue with most of the ally anodised.. In all i cant follow the rules and make it how it was, as it has lots that need doing.. but i can still make it a very nice and tidy sherpa that i'm not afrade to use. A few years back i had a gsxr 7/11 streetfighter which had all its ally polished, and to be honest it was a nightmare. I do all my own painting and anodising so just a good loooking bike will do me for my first time at trials. Hope this helps anyone that has been looking and if anyone needs to know anything feel free to ask Quote Link to comment Share on other sites More sharing options...
zoolord Posted October 1, 2011 Author Report Share Posted October 1, 2011 just putting a few bits together ready for when i do the rest Quote Link to comment Share on other sites More sharing options...
zoolord Posted October 5, 2011 Author Report Share Posted October 5, 2011 (edited) still doing bits and bobs as you can see. bars and rims are going to be black anodised for the time being. The wheel spindles have been treated and plated and the threads have been coated in dry film lube. the rest of it it just tarting up the paintwork.. still waiting for the swing arm to be sorted. then its that and the frame.. Edited October 5, 2011 by zoolord Quote Link to comment Share on other sites More sharing options...
zoolord Posted October 7, 2011 Author Report Share Posted October 7, 2011 (edited) still trying to get as much done as pose. this is the air filter as it was, bit rusty and the paint was flaking off, the spring and plate was rusty and the sponge was breaking up. This was done today.. been blasted and had a few coats off primer and loads of paint,The plate under the filter sponge, and the spring have been stripped and plated as well. i could see these getting covered in mud all the time so both paint and plating are over the top as protection, and a new sponge was added. Edited October 7, 2011 by zoolord Quote Link to comment Share on other sites More sharing options...
bondy Posted October 7, 2011 Report Share Posted October 7, 2011 still doing bits and bobs as you can see. bars and rims are going to be black anodised for the time being. The wheel spindles have been treated and plated and the threads have been coated in dry film lube. the rest of it it just tarting up the paintwork.. still waiting for the swing arm to be sorted. then its that and the frame.. hi ive just been looking at your headsteady can you tell me what the 2 bits of metal are thats been welded on? Quote Link to comment Share on other sites More sharing options...
zoolord Posted October 7, 2011 Author Report Share Posted October 7, 2011 (edited) For some reason not known to me, its to far foward on the frame. the engine and frame are the same number so... aint got a clue. will post a pic of it where it came off. Edited October 7, 2011 by zoolord Quote Link to comment Share on other sites More sharing options...
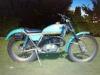
zoolord Posted October 7, 2011 Author Report Share Posted October 7, 2011 (edited) hope this might help. i have only stripped the bike and do not know the history or anything about it. the engine and chassis numbers are the same, and its a 1975 model, 150.. 250 slimline. and thats all i know realy. its not a bad bike and i got it cheap to do up and to use for my first trials. The more i look at this now the more i think i'lll change it. Would't be over hard to make a T piece and a bar from the T piece that would bolt to the head and a bar to go from the head to the frame.. Have to leave this one with me for a bit... Edited October 7, 2011 by zoolord Quote Link to comment Share on other sites More sharing options...
sadlotus Posted October 8, 2011 Report Share Posted October 8, 2011 Hi, you say: the paint on there being aero/space will stick most anything and any weather. tell us more, what is the paint? any names? Ta Quote Link to comment Share on other sites More sharing options...
zoolord Posted October 8, 2011 Author Report Share Posted October 8, 2011 The primer is is a two-pack,epoxy resin based, strontium chromate primer, salt spray test @ 600 hours and and a two-pack epoxy top coat for good adhesion and high chemical and water resistance, tested @ 1000 hours fluid Quote Link to comment Share on other sites More sharing options...
bondy Posted October 8, 2011 Report Share Posted October 8, 2011 hope this might help. i have only stripped the bike and do not know the history or anything about it. the engine and chassis numbers are the same, and its a 1975 model, 150.. 250 slimline. and thats all i know realy. its not a bad bike and i got it cheap to do up and to use for my first trials. The more i look at this now the more i think i'lll change it. Would't be over hard to make a T piece and a bar from the T piece that would bolt to the head and a bar to go from the head to the frame.. Have to leave this one with me for a bit... hi again i dont think you have the right fram for the engin seems weirod theres somthing wrong somwere there is only to typs of headsteadys one for the 350 witch i have .and one for the 250 both look same but there not the to holes witch fasten to the head are diffrent closer together on the 250. and wider on the 350 the lenth is the same i think not 100% sure but if your saying the frame. and engin numbers match it must be the right frame. hope this is of help Quote Link to comment Share on other sites More sharing options...
zoolord Posted October 8, 2011 Author Report Share Posted October 8, 2011 (edited) i just sorted out the paper work and the engine and chassis number are the same. as well as checking the frame and engine.. It's not a great problem as i'm keeping the bike for myself. as long as its 90% i'll be happy with it, and the few bits that i have done i'm happy with.. so i'll keep building and improving it. i'm working on making a new engine steady this week, and the frame does need work, so the little changes i'll be happy with. if anyone can tell me how long the head steady should be i would be grateful.. Edited October 8, 2011 by zoolord Quote Link to comment Share on other sites More sharing options...
bullylover Posted October 8, 2011 Report Share Posted October 8, 2011 (edited) Hello zoolord, If the headstay you have fits you should just measure it, it will be the correct length. There were many lengths of headstays on Bultaco`s as the Pursang ones were different from the Sherpa`s of the same year. Different models had different lengths. Bully Lover. Edited October 8, 2011 by bullylover Quote Link to comment Share on other sites More sharing options...
Recommended Posts
Join the conversation
You can post now and register later. If you have an account, sign in now to post with your account.