contact details of the guy who is the go to for parts for the cotton trials bikes
I have to ask, Is there such a person ?
I had a Cavalier when it was a relatively new bike ; parts were not easily obtainable back then, and the situation has deteriorated steadily since.
It would probably help you to bear in mind that much of the bike is an assemblage of proprietary parts :
Engine (Mexican) Minarelli / (Italian) Dellorto carburettor, CEV magneto, Grimeca hubs / (British) MP forks, Dunlop or Jones rims, Girling shocks, etc. and so main sticking point would be engine parts, I would think.
My bike, back in the day :
I wish you the very best of luck with your machine.
I have two matching numbers Bultacos (earlier) mod. 199. There is no dash / horizontal stroke after the serial nos. of frame and engine stampings on either machine ; the dash after the frame serial no. in the steering head pic of your bike convinces me that there is (or at least there was intended to be) an 'A' following. HTH
John Healy is a recognised authority in setting up and using Amal Carbs. Here's what he had to say to a user with the same problem as yours :-
"First you must establish that the float level is proper.
The tickler travel is determined by how far the roll pin is pressed into the button. The travel is adjustable. To increase the travel pull the pin out of the button a tad.
This is easily done with a diagonal cutting pliers (not electricians pliers!). Push the button to exend the pin out of the body as far as it will go. Grasp the pin firmly (it is hardened steel) at the point it is just exiting the body with the diagonal pliers and lever the pin out. Be careful that you don't mark the float bowl gasket face. You should be able to get another 1/8" or so of travel. This should solve your problem. "
(I'll add that I haven't actually tried it myself as none of my carbs have ever displayed the problem.)
In the UK/NI a 1975 Sherpa supplied as an observed trials machine would not have had lights fitted. Brochures of the period featured machines as supplied to other than the UK/NI market.
The machine may or may not have had a lighting coil as supplied, but this is irrelevant to the stoplamp question as the stoplamp was powered by the ignition coil on machines supplied to other markets with full lighting equipment.
To quote from the UK M.O.T Testers Manual (excerpt from the relevant section) : -
Section 4.3.3 states stop lamps are not needed on motorcycles that : do not have front and rear position lamps.
Ratchet appears to be correctly assembled, although I can't see ratchet spring. To ensure correct return spring tension, the kickstart shaft also needs to be in the correct position in rerlation to the ratchet. Viewed from the left side (outside the crankcase) the chamfered hole for the spring should face forward i.e. at 9 o'clock when the ratchet is fully disengaged against its stop.
woody's earlier response gives an excellent overview of what to look for.
While your engine is apart, now would be a good time to attend to the crack in the crankcase above the ratchet ......?
Left hand gear change would have been better for sure. Wonder if it's possible to mod the gear change and brake, with a shaft across the frame for gear change?
I would challenge the idea that it's "better" ; right side brake would operate by cable - definitely not better in terms of feel or effectiveness. Modification : anything is possible with the necessary skills and financial wherewithall, but why would you even bother ? It's an old bike ; just accept it and enjoy it for what it is.
On 1/31/2024 at 10:27 AM, halfway said:
I used to own the bike when I was a late teen
Did you struggle with left foot brake / right foot gearchange, and did you consider changing over control sides when you last owned it ?
Why not retrain your brain and feet to operate the bike as it is - definitely the more practical (and cheaper) option !
New stanchions the way to go, as others have said. What many users don't appreciate is that the unplated insides of the stanchions are also susceptible to rust.
I'm not sure how much left-handedness / righthandedness plays a part in how natural either set up feels.
In my own collection of bikes I have both right change / left brake and left change / right brake ; the gearchange of these also varies between up-for-up and down-for-up. In use, after the first brake use or gearchange I can usually cope once on the move. I also have one twist-and-go bike that can sometimes feel quite strange with no foot controls and handlebar levers for both front and rear brakes.
I once asked a very capable rider with great experience in trials, motocross, grass track racing and road riding what was his most memorably testing bike to ride. His answer ? A pre-war Indian........with left hand throttletwistgrip - hand operated gearchange and foot operated clutch.
It's quite possible that the fibre heel on the points has worn excessively (particularly if the cam/flywheel centre has been run dry) ; this can have a big effect on timing.
Cam and fibre heel need a light smear of HMP grease to prevent this
2.5-2.7mm. BTDC is the measurement of piston travel at which the points begin to open. First, you need to set the maximum points gap by rotating the flywheel......
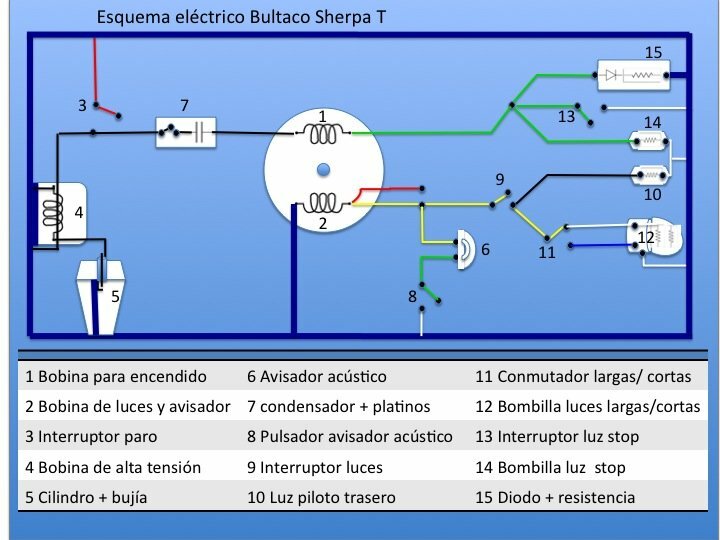
If it's an original tail lamp, this would have separate bulbs for stop and tail functions. Yes, it's true that green wire is for stop lamp bulb, black wire for tail lamp.
Thanks, mcman56. Can't see why universal regulator should not work on an Alpina.
LSMO - I don't have any accurate means of measuring resistor/diode performance. Is polarity an issue ? - this is AC, after all.
Additionally, if I understand its function correctly the resistor/diode affects only the stoplamp / LT igntion coil circuit. I believe there must be other ways to provide a stoplamp : LEDs and a small battery, maybe ?
"3 wires from the engine" - what are the colours of these ?
I'm assuming red, green and yellow. If this is the case, the black? wire from the HT coil should be connected to the red. Green (originally feed to stoplamp switch) needs to be connected to a reliable earth. Yellow you can insulate and ignore - this is the wire from the lighting coil. This applies to the original Femsa wiring.............which may have been altered in the last 50 years.
The foregoing is simply to provide a spark and get the engine running. HTH


.jpg.8df8ca57372bdc48dd9197b9222fa879.jpg)


.jpg.b37fb6aa51704a4c2e2c8500fd696ef1.jpg)
Tank repair
in Bultaco
Posted
Here's what I think : It isn't a Sherpa tank, but late Alpina.