The zero position for fork sag is with the front tyre off the ground.
Your damper rods are early TY250A (welded-on bottom end). Later TY250 damper rods have the bottom end reduced diameter section made using a swaging process.
Yamaha commonly change the design of something but retain the same part number if the two designs are interchangeable.
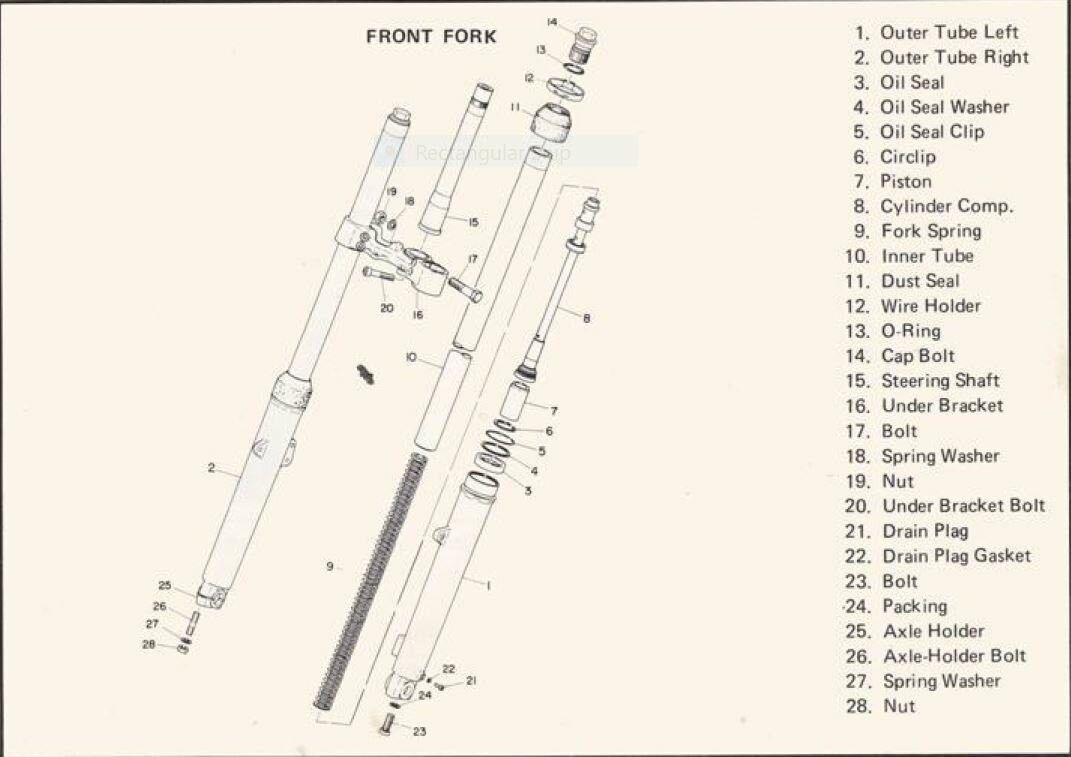
Yamaha didn't make TY250 forks. They were made by Kayaba to Yamaha specs. Kayaba changed the design of TY250 twinshock forks in many ways between the first and the last version but they are functionally the same and the parts are inter-changable.
Majesty kindly provided me with a service manual and parts list for the TYA. These documents include a completely different diagram of the forks that do not include a spring seat or a spacer (see below).
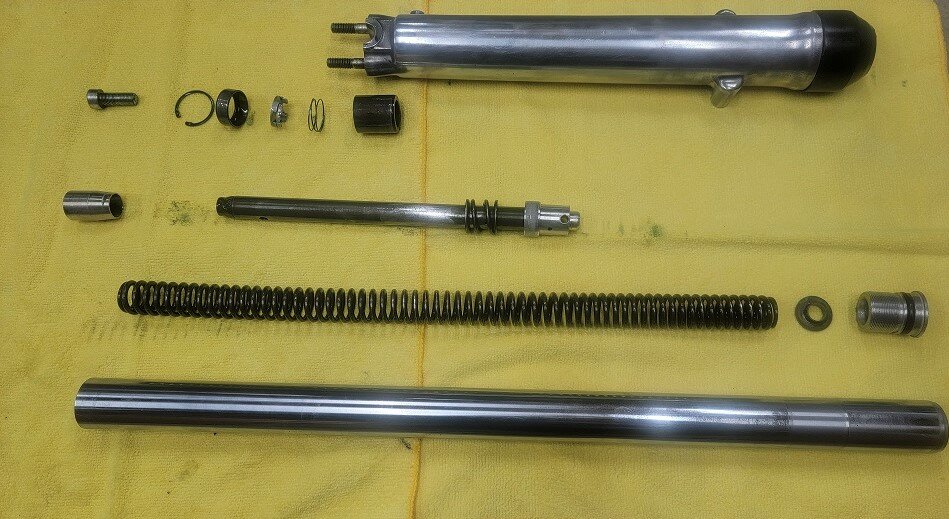
The Magical springs are 443mm long. I just pulled my forks apart and discovered that my fork springs are 450mm long. This looks similar to the service manual diagram than the online parts diagram as it does not have a spacer but, unlike the service manual diagram, it does have the spring seat and a second small spring on the dampen rod. There appears to be some extra pieces below the piston not shown in any of the diagrams so I'm now wondering why these parts diagrams are different and why neither matches what If got inside my forks (see picture below). Are these TY forks?
Your photo shows TY250A forks apart from the fork spring which is single rate and longer than standard. The standard spring is dual rate, thinner wire, shorter and the ends are tapered on the OD.
The spring in your photo looks like what I bought from B&J Racing about 15 years ago to try in a TY250. The B&J set I bought were exactly the right length to use without any preload spacers. In my opinion, the Magical springs provide a superior action for most riders compared to both standard springs and the B&J Racing springs.
The parts diagram you said is from "Majesty" is not showing TY250A forks. It is from the TY250 Owners Manual but sadly is not what TY250 forks look like.
The TY250 fork diagram from the TY250 parts book also has a few mistakes which can cause confusion. Your forks in your photo look standard except for the fork spring.
If you are using Magical springs with original damper rods, for your weight, 10 weight fork oil should be OK. You didn't mention buying the aluminium damper rods so I'm assuming you are going to use the originals.
To start with, set the total Magical spring+spacer length the same as the original spring + spacer length. That will be a few less mm preload than original because your original springs will have sagged a bit over time. For reference, standard A model fork spring free length is 400mm. When you have done that, measure the sag with you aboard and adjust the preload until you get about 60mm sag with you with all your weight on the pegs. Once you have set the preload, go for test rides to see if you want to change to 15 weight oil. Standard TY250 forks have very light damping so I wouldn't go below 10 weight fork oil.
If your forks have the drain holes on the sides (early A model) then the standard oil quantity is 175 ml per leg.
If your forks have the drain screws at the back (everything after early A model) then the standard oil quantity is 162 ml per leg.
The two types of forks have different design (different volume) damper rods.
I still need to pull it apart but have never looked at the cam. It looks like they are unavailable. Can they be refinished?
Do you have any experience with different brands of friction plates? Yamaha, EBC and Vesrah are available in addition to non branded probably Chinese ones.
Do you have any idea what kind of grooves can be put in the metal plates? Are there any pictures out there? It seems like they would encourage warping. IIRC, the OEM plates are dimpled.
The cam face can be refinished by welding and machining. The cam end of the pushrod may need to be refinished too. It's meant to be hemispherical.
I've seen NOS cams advertised on eBay.
Yamaha and EBC and Goodridge are good. Haven't tried Vesrah.
Yes milling the grooves is a warping risk but some people do it.
I would think you can buy new steel plates from Yamaha if you think there's a problem. I use wet-and-dry paper on mine. I'm still using the original steel plates after four rebores and two new conrod kits.
A lever arm extension reduces how far the plates move apart so can make disengagement worse.
Old friction plates can make disengagement worse. If they are more than few years old I would replace them.
It usually takes quite a few hours of serious clutch punishment to polish the roughness out of the steel plates.
Yes bead blasting is a good thing for the steel plates, as is 120 grit wet-and-dry paper lubricated with kero. Some people mill grooves in them with a milling machine. Anything that helps the air to get in between the plates without bending the plates is a good thing.
Is the pressure plate staying parallel with the basket as it moves out?
Next up, I seem to have just a coil and the 3 wires from the engine. I'm not have lights at this stage and when I do I'll go for an Electrex kit. At this stage I just want to assess a running engine. The coil was in a back with a black block connector, which wire goes where? or a photo if anyone has one.
The LT ignition wiring from the magneto to the HT coil is usually black coloured. The other wires from the magneto are for lighting and should be insulated from each other and the frame. It doesn't matter how you make the connection for the LT ignition wiring as long as it is secure and electrically insulated from the frame. Bultacos usually have a wiring connector strip near the front downtube but using it is optional.
One wire from the kill switch connects to the LT ignition wire. The other kill switch wire connects to the bike earth (frame/motor/stator plate)
Thanks for that information. I have posted this same questions on the TY Yamaha forum, which I believe is out of France, and I have been corrected as to my thoughts about what coil was the source (ignition) and what is the lighting. It seems from all the info I got from them that the damaged coil is actually one of two lighting coils, and what is confusing to me is the left side stacked coils has the ignition on the bottom ant the top is the second lighting coil. If that is the case, I don't need to do anything with the damaged coils because the bike has no lighting circuit on it. I know that when my son bought it there were no lights, and no sign of ever having any lights or brake switches etc. When talking with the folks on the other forum I got the impression that perhaps Yamaha had lights on all of the TY250s. I'll have to talk to my son about what he wants me to do. I've already bought new points and a condenser so getting the original magneto vs. a CDI unit would be less cost. I still have a while before I get to that part of the restore. Thanks again.
The "American" stator coil and the "European" stator coil are probably the same item and the difference in resistance values you are seeing in the reference material is probably a typographic/transcription/translation error.
I have looked at my reference sources for that resistance value and found the same error as you found.
If it was me I would just rewind it with the same number of turns, using the closest wire diameter I could find to the original. The resistance value of the stator winding is not a critical value. It is provided in workshop manuals for fault-finding purposes.
I have the same exact issue. Which circlip are you referring to?
Thanks
There should be a circlip on the shifter shaft on the left side of the motor. The circlip bears against the shifter shaft oil seal and prevents the shifter shaft from moving towards the right. It may not be immediately visible because it may be concealed inside a plastic roller/wheel that protects the shifter shaft from the chain rubbing.
I may be a little old fashioned but when a multi million ££ company develops a machine and plough millions into getting it right, why would someone with a couple of hundred quid spare think they can improve it for the better ?? just my thoughts Like people who put stickers on cars I do think you may be right though.
Maybe one of the gudgeon pin clips came loose and put a big groove in the bore and it needed a 2.0 mm oversize re-bore to clean up the bore so they could keep riding it?
The OSET 24 is smaller than an adult size trials bike so is not as comfortable to ride for an adult-sized person as an adult-sized electric trials bike is.
Electric Motion trials bikes and free-ride bikes are adult sized and are popular. Google "electric motion trials" or "EM trials"
I'm always interested in the way Bultaco changed things on some models without changing the model number. The model numbers that had the most changes are the most interesting to me. I have a fair handle on the changes through model 49 and through model 91/92 but not the others.
I'm rebuilding a model 85 at the moment so am particularly interested in knowing at what production numbers the model 85 changes happened? I'm most interested in when the footpeg mounts became welded on, the swingarm pivot nuts were recessed into the frame, the steering security lock was fitted, the chain tensioner became rearward-facing and the chain oiler was incorporated.
I only have two model 85s to refer to, one in the 2000s and one in the 5000s, so I'm hoping others can reveal what is on their model 85s.
I've seen the sales brochure for model 85 Alpina and that bike has bolt-on footpeg mounts so I assume that bike was early in model 85.
My model 85 in the 2000s has welded-on footpeg mounts and recessed swingarm pivot nuts, forward facing chain tensioner, no steering security lock and no chain oiler.
My model 85 in the 5000s has welded-on footpeg mounts, rearward chain tensioner, steering security lock and chain oiler
I figure that the footpeg mounts became welded-on type at the same time that the swingarm pivot nuts were recessed.
The tank/seat is from the first series of Alpinas (models 85/97/98/99).
Being a model 97 (Alpina) frame it will have an identical frame and front end and wheels to the series 2 model 80 Sherpa T.
The model 85 internal Alpina gear ratios will be a bit of a pain for trials use because you'll need a very large rear sprocket to get first gear slow enough.
Hi looking at replacing my brake pads on my 2014 beta evo 250. Which ones are the best for general riding. Also which spark plugs are people using it has a bp7es currently in it which is not standard, will there be a reason for this.
Two stroke trials bikes ridden in trials type riding go well with a 5 or 6 heat range plug (NGK heat range numbering).
If the two stroke trials bike is used for sustained/continuous riding, like along a road or at the beach, or in desert sand, or trail riding that involves long climbs, a 7 or 8 heat range plug will work better.
anyone have any tips on my 76 Sherpa rear wheel bearing removal they appear to be solid in the hub, tried a heat gun with no joy at all
all input gratefully recieved
What point are you getting stuck at?
Are you having trouble getting a good connection between the drift and the bearing inner?
Is one bearing any easier to connect with than the other?
If heating didn't help, then whatever they used is probably not loctite so may be an epoxy. If it is epoxy then the aluminium will probably melt before the epoxy burns.
In the worst case you can remove bearings with grinding tools.
I don’t see how without that forging on the top end. It’s not just drilling a hole.
While the one in you photo may well be a one-piece forging, if you were to make one starting with a standard lever, the bush at the top end could be welded on.
Hi Folks, this is probably rudimentary for some of you, but I just want to get it right. Bought a new PBI dished rear sprocket (428x55T) and replacing what was on the bike (flat with no spacer, 428x52T) as it came to me. So when installed, teeth are dished away or outward from (to the left) the wheel correct? Chain alignment looks straight to me this way. Searched the original manual and could not get a good visual or printed verification from it. BTW replacing 14/52 with a 13/55 and new chain setup. Will be used mainly for vintage trials and general plonking. Thanks in advance.
Yes you have the dish the correct way. Yes 13/55 is a good choice for competition riding.
The type with the sliding bar shown by MikeS300 could be easily made by modifying a standard kickstart lever, but it doesn't move the top end of the lever out of the way of your shin any better than the standard lever. I feel that a lever that swivels at the bottom (like a Beta lever) would provide better leg clearance.


Trials rules and flags.
in ACU Discussion
Posted
The spam post has been reported