| |
-
Hello All,
I'm hoping for some suggestions on how to proceed with the exhaust on my latest project...
I'm presently in the midst of an early M80 Sherpa T rebuild and am striving for original appearance yet with increased performance in the effort. I had one of these years ago and, like many, replaced the triangular muffler with an "S" pipe to a modern aftermarket spark arrestor which did perform better than stock but, to my eye, didn't look nearly as good - certainly not period correct, anyway. I eventually sold her to a friend to entice him into riding vintage trials with me and have missed the bike ever since. Such a beautiful tank design - truly a classic.
Anyway, I found another m80 - mostly in parts - but thankfully came with some extras including two triangle mufflers. So... desiring a quieter, less restrictive muffler, I decided to open one of them up to have a look inside and modify. Which brings me to my question...
Now knowing for sure the internal layout of this box, how would you suggest I proceed?
Remove the internal baffles and connect the inlet/outlet with a perforated tube and surround with heavy packing? What do you think of replacing the existing outlet tube with one of a larger diameter for even less restriction? Or instead maybe adding a second outlet tube of the same diameter below the first, similarly connected? A twin exhaust might be kind of fun.
Additionally, I may slim the unit down somewhat while I have it apart. With the internal baffles removed, there's really no need for the housing to be quite as deep. Nothing too drastic... just enough to tuck it in a bit further. I've already repacked the mid-box so I hope, once done, she'll flow more freely and run more quietly than the day she rolled out of the factory.
Your thoughts would be greatly appreciated!
Best regards,
Christian
-
Hi Herman,
Just happened to try this experiment today as I had a bare m159 frame and a couple of slimline tanks within easy reach.
Sorry to report, the slimline will not fit onto the frame for the reasons rcgods stated. The support tubes that form the triangle rc mentioned make solid contact with the bottom of the tank, preventing the tank from fully resting on the backbone of the frame. You'd have to significantly modify the bottom of the slimline by cutting out sections of the tank and re-working the fiberglass to accommodate for those support tubes... or cutting/re-shaping the tubes themselves to squeeze inward further and, even then, it might still not sit correctly once the seat base finally comes to rest against the subframe seat tubes. There might be additional shimming fore and aft to get it all to sit properly. Then, as mentioned, you'd still have to add the welded bolt near the steering tube and mounting tabs at the rear. And who knows?... we're not even addressing pipe clearance once the tank has settled correctly into position. Hate to ruin your idea but, as sweet as it might seem, it would certainly take a good deal of effort and skill to accomplish the task.
That said, I do fully endorse your idea of this being a good excuse to buy another Sherpa T! One for every day of the week should just about do it!
Cheers -
Christian
-
Congratulations, Jerry! Very cool to see the photo of your son taking her for a spin, too! Glad you were able to get this sorted out.
Cheers -
-
Hi Jerry,
Sorry to hear you're having such a difficult time with this. And working in a shed doesn't make the experience any more enjoyable either, I'm sure. When I was between places I used to work on my projects in a storage unit the size of a walk in closet. It was cold (by California standards, anyway), crowded and agonizing with limited elbow room and lighting. The absence of a proper workbench meant having to work on the floor which made for a really miserable time! Hopefully your project will be sorted out very soon!
So when reattaching the fuel line, you actually see fuel enter the line when you turn on the gas, then it retreats back up the line to the gas tank? Weird. Have you tried removing the cap from your gas tank in case the vent line is blocked? I'm sure that's likely not the issue if you have good, consistent flow from the valve when draining into a can but it's worth a quick check.
Disconnect everything and remove the carb, empty it entirely of any fuel and dry, then put a spare piece of clean fuel tube onto her and, while holding the carb as it would be oriented on the bike, try blowing a breath of air into the line. Can you feel and hear your breath moving into the bowl? Do the same with the bowl removed and repeat - this time moving the floats through their travel to determine when the valve needle contacts its seat to close the valve. If the slightest movement upward closes them too quickly, bend the adjustment tang slightly to increase travel allowing more flow into the bowl.
I'm sure you've likely tried much of this already but, being in the midst of a similar process over here with an old Bing, I'm just tossing out ideas as I try them myself!
Best of luck - I'm sure you'll conquer this soon!
Cheers!
Christian
-
Hi Jerry,
Just read your post and am in the midst of a similar problem with a Sherpa T I'm working on.
A couple of thoughts if you haven't already sorted this out...
1. Are you sure fuel is flowing freely from the tank fuel valve? Drain a bit into an open container and check that your fuel from the tank is unobstructed.
2. Further down the line, check the filter screen located behind the 10mm bolt securing the fuel inlet housing (my term) that your fuel line from the tank connects to. If the filter screen is blocked by residue or debris, no fuel will flow into the bowl. Clean and replace.
3. Still no flow? With the bowl, floats and rubber tipped fuel valve that you cleaned up removed, re-connect your fuel line from your tank to your carb and, over a fuel-safe container (like I need to even say that), see if you get fuel to flow freely into the container. If not, you have blockage along the passageway between the the fuel housing beyond the screen (mentioned in #2 above) and the fuel valve housing where your rubber-tipped valve lives. Remove the adjustable fuel mixture screw on the outside of the carb, remove all jets, remove the fuel housing and screen again and spray all passageways liberally with your favorite aerosol carb cleaner until you get cleaner flowing from the fuel valve housing into your container. Also spray any overflow tubes that may reside in the bowl itself. Reassemble all including the bowl.
4. Still no flow? Did you follow up on Grib's recommendation? To test, remove that yellow vent tube you replaced and give it a shot. You can run without any tube whatsoever or a pair of tubes open to atmosphere but if you connect both vents with a single tube (a common setup) you HAVE to drill a hole in the tube at the height of its arc (the mid point of the tube) for air to pass through or fuel will not enter the bowl of the carb.
Finally make sure your floats aren't getting hung up in some way when you reassemble your carb. I once had a carb that a previous owner had replaced with the incorrect float. It physically fit but wouldn't move once the bowl was in position. If you're sure the correct float height has been achieved, give the carb a gentle shake to see if you hear float open/closed movement within the bowl. With such a tiny carb, it won't be much but you should hear something moving.
Hope this helps. Best of luck!
Christian
-
Much appreciated, Grib - and thank you, too, Alberto!
Interesting that Fantic would choose a roller bearing for that application. Considering the cost of replacement (US $45.00), I can understand why substituting the NU305 for the 6305 may be a viable cost-cutting choice. I wonder if there's any notable performance or reliability difference between the two? (Not that I'd be able to tell given my unfamiliarity with the bike. At this point I'm still uncertain if she was even a runner at the time it was disassembled and boxed up in the early 1990's.) I'm also contemplating replacing the big end bearing with an In Motion or similar con rod kit while I'm at it. If either of you have any familiarity with the quality of these replacements, your thoughts would be most welcome!
I'll be ordering some seals and outer bearings very soon and, after tearing into her, will definitely report back with my findings.
Thanks again and have a great weekend!
-
Thank you, Grib - much appreciated!
Yes - I do have a bit of motor experience - Bultacos, CanAms and a few Japanese motors - but, as mentioned, none with Fantics... and always had a manual to refer to when the work goes into the early hours when concentration and patience begin to wear thin. Guess there's no better time than the present to jump in and trust some of that experience to see me through!
Hey - just to clarify on your earlier reassembly tips (seating the right side bearing and case together onto the crank), is there any crank end float measurement I need to be concerned with in case the replacement bearings aren't exactly of the same width dimension as the OEM bearings? I didn't see any crank shims in the parts manual so hopefully not! By the way, which replacement bearings have you used that you might recommend?
Thank you again - truly helpful!
Christian
-
Hey Grib - thank you for your detailed tips in answer to Dan's questions.
I picked up a severely beaten 240 parts bike recently that I'm hoping to rebuild sometime soon. What I'm wondering is if there was ever a shop/repair manual available with complete motor teardown/rebuild procedures, tool use (I was fortunate to acquire some Fantic specific tools of late), and engine specs/tolerances etc. ? Sadly, I'm very manual dependent when it comes to my rebuilds and attempting to fly without one can mean all the difference between doing the job right the first time and having to repeat the process because of a silly mistake! I've scoured the internet but, to this point, haven't seen any reference of one. If anyone has a lead or copy available, it'd certainly be a great resource for us budding mechanics trying to keep these old bike alive and well!
Thanks again for all of the information you've provided here. Very much appreciated!
Best regards,
Christian
-
Thank you, Woody! I'll take a look at what the carb comes loaded with and will aim toward what you're running. It's super helpful to have a good starting point! I appreciate the info and will report back soon.
Best regards,
Christian
-
Hi John,
New poster here! I've been following this topic with great interest for awhile now. I just recently picked up a PHBH28BS for my 199A to replace what I believed was a worn out, untuneable OEM Bing. Turned out it was a damaged intake rubber that had split beneath the clamp which I discovered, of course, AFTER I placed the order for the Dellorto! Ah well...
Anyway, I'm going to give the shiny new PHBH28BS a try and was wondering if you've had a go with one on your 199 just yet? I'm hoping the jetting won't be too far off the mark but won't know for certain until this coming weekend when I have a chance to mount her up.
Any suggestions or advice here would be greatly appreciated. Love this forum!
Best regards to all -
Christian
-
Thank you for your wonderful advice on the modern bike! I had a feeling that I should err on the side of under than overpowered motor selection... particularly given the extreme lightness of these bikes and myself, for that matter (165lbs). Hearing your sound recommendation definitely cements that decision. A 350cc bike from yesteryear is simply not in the same league and would, indeed, quickly get me into unwanted trouble or sour me on the whole experience!
I'll keep an eye out for a good 200cc ride and happily take it from there. Now all I need to do is develop a compelling enough story to convice my wife of my "need" for an additional bike!
Best regards -
C.
-
Hello copemech -
Thank you for saying hello!
Yes, there is a fair bit of quality trials riding still available here in NorCal. Try as I might to limit the number of bikes and unrelated other interests, I do inevitably find myself coming back to riding trials. It's truly a full-concentration activity... not too unlike playing a competitive round of golf for us motorcycle-minded enthusiasts... and so is fantastically cathartic when looking for an escape from everything else. Also, it doesn't hurt that it's simply a blast to pull unnecessary wheelies and practice near-vertial climbs which can be a bit tough in a golf cart.
You a vintage trialer or primarily modern? Curious as I'm considering getting onto a modern trials bike at some point in the near future (wife permitting, of course.). It's certainly look nice parked beside the vintage Bul!
Cheers -
C.
-
Hello All!
Just wanted to say hello, introduce myself and express my appreciation for such a great site!
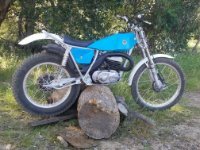
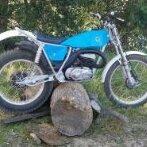
My name is Christian Otero, been living in Northern California's San Francisco Bay Area all of my life, have raced vintage MX with AHRMA since '93 and am presently infatuated with getting back into riding trials (vintage for the moment) as, with each passing year, the prospect of serious injury due to riding over my head in MX becomes considerably less and less appealing! I'm presently getting a Bul 199a competition-ready and have been quite busy combing the forums looking for ideas and guidance to make my new (old) ride as efficient and reliable as can be.
This really is a excellent website for everything trials related and I'm looking forward to making some new friends living here in the states and abroad who share this wonderful, all-consuming passion!
Best regards -
C. (aka vintagenut)
|
|