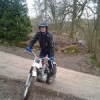
hendrik Posted February 14, 2014 Share Posted February 14, 2014 (edited) The explorer is based on the trials bike and I made the conversion.... 4 screws for the sub frame, one in front of the tank and a hidden one under the seat, two cables, open the fuel line with snap closing and you can take away the Explorer kit. Trials plastics can be mounted on the normal fixing points, for better slow motion trials I prefeer changing the front sprocket from 11 to 10 teeth. A real dual purpose bike Edited February 14, 2014 by hendrik 1 Quote Link to comment Share on other sites More sharing options...
lotus54 Posted February 15, 2014 Share Posted February 15, 2014 How long did it take you? The 2014 model has the Easystart box under the seat - that would have to be moved someplace, I don't think your model has that- yes? Quote Link to comment Share on other sites More sharing options...
hendrik Posted February 15, 2014 Author Share Posted February 15, 2014 I have the easy start too, engine even starts on second kick without the box, conversion needs about an half hour, easy job... Made the first trials training today, runs good, easier to handle without the Explorer Kit, only on slippery wet or muddy terrain the rear pirelli tyre is not the best choice, I let the headlight and ignition switch on its place, only a little extra weight... Quote Link to comment Share on other sites More sharing options...
lotus54 Posted February 15, 2014 Share Posted February 15, 2014 (edited) Mine doesn't see to start well without it. But I'll give it a go and see how it is. Was there anyplace to put it if you want to install the Easystart? (I think they changed it for 2014 also, it is energized with the kill button) Edited February 15, 2014 by lotus54 Quote Link to comment Share on other sites More sharing options...
hendrik Posted February 16, 2014 Author Share Posted February 16, 2014 The first edition ( 2012 / 13 ) has a battery pack behind the headlight and as a refitting by the dealers the easy start ( which is nothing else than a second battery pack ) in the case under the seat, so now I have only the small battery behind the headlight. I don't know how they made it on the 2014 model.... I mount today a layard kill swich for having more security when trying heavier things, won't kill the engine Quote Link to comment Share on other sites More sharing options...
lotus54 Posted February 16, 2014 Share Posted February 16, 2014 (edited) The 2014 is different, the box under the seat does it all (so I understand). Guess I'll have to see where it could be located if I ever do it. I'm not sure where they put it in the 2014 TR model. The rather high cost of the plastic is the issue after that! Be nice to find some used stuff, but probably not very likely, Isn't the stock lower' fuel cap,glued in on the Explorer? Maybe it is just sealer I see... Edited February 16, 2014 by lotus54 Quote Link to comment Share on other sites More sharing options...
andy1 Posted February 16, 2014 Share Posted February 16, 2014 Hendrik, beware: 2014 explorers have the new "seasy start system" under the seat. It is a black box that includes the capacitor. The 2012 and 2013 only had a battery behind the headlight... but the factory "recalled" all those bikes to install a capacitor under the seat!!! it is not a "second battery pack"! Hendrik, the fan will not spin at the right speed if the battery runs out and the result will be a seized piston... Quote Link to comment Share on other sites More sharing options...
hendrik Posted February 16, 2014 Author Share Posted February 16, 2014 (edited) Ok, I will take care of my battery, in normal trials practise the engine won't get so hot that I will have overheating problems and on road and trails use, the capacitor is installed ;-) My dealer, who is very engaged in OSSA, tolds that its no problem to trial without the capacitor, my Explorer is the third one which is used as trials bike and Explorer.... Where is the easy start system located on the 2014 trials bike ? It's normaly must be the same part as on the explorer, I don't think that OSSA will use different parts for the bikes..... Wether its a different part, it will be no problem to order it.... Edited February 16, 2014 by hendrik Quote Link to comment Share on other sites More sharing options...
andy1 Posted February 17, 2014 Share Posted February 17, 2014 The 2014 trials bike have the new "easy start system-capacitor" behind the headlight. All the 2014 models have the same "ESS-Capacitor". I think you will need a different electrical wiring harness if you want to install the new easy start system... By the way, who is your dealer? Quote Link to comment Share on other sites More sharing options...
hendrik Posted February 17, 2014 Author Share Posted February 17, 2014 my dealer : http://www.vollgas-offroad.de/ I wont't Change my electric, user lotus54 asked were to put the ESS-Capacitor when removing the rear subframe.... Quote Link to comment Share on other sites More sharing options...
thats_a_five Posted February 17, 2014 Share Posted February 17, 2014 Mine doesn't see to start well without it. But I'll give it a go and see how it is. Was there anyplace to put it if you want to install the Easystart? (I think they changed it for 2014 also, it is energized with the kill button) Hi Mark, Keep in mind that capacitors do not like heat so keep it away from the exhaust system. Bill Quote Link to comment Share on other sites More sharing options...
trialtrial Posted February 19, 2014 Share Posted February 19, 2014 (edited) he-he I am just doing this conversion on my 2012 Explorer. Almost done, just waiting for the airbox cover. My 2012 explorer - from brand new - came with a battery behind the headlight and a capacitor (the black box) under the seat. I moved the capacitor up behind the light and spliced it in there. Since my wife will use the bike from time to time, I'll swap the seat back on. It will take about 5-10 mins tops. I strongly advise to *not* remove the capacitor. It will help to remove transient voltage spikes which could cause problems with the CDI and other electrical devices. (I know this from experience) Edited February 20, 2014 by trialtrial Quote Link to comment Share on other sites More sharing options...
hendrik Posted February 19, 2014 Author Share Posted February 19, 2014 can you show me a pic of the new place of the Capacitor ? ( I want to keep the original headlight ) Quote Link to comment Share on other sites More sharing options...
trialtrial Posted February 20, 2014 Share Posted February 20, 2014 (edited) I cut the wings off the capacitor, wrapped weather stripping foam around it, then strapped it to the battery under the instrument cluster. I considered making a bracket, but wanted to test out this location first before doing something more sophisticated. I wired it in as follows: * Red lead on capacitor to red lead on head light connector * Black lead on capacitor to the black wire on a plug that had a black wire and black/wire wire. I wired it to the wiring harness side. I will permanently leave the capacitor here. It will make swapping the seat on and off easier. Edited February 20, 2014 by trialtrial Quote Link to comment Share on other sites More sharing options...
hendrik Posted February 20, 2014 Author Share Posted February 20, 2014 thanks, I will mount the capacitor before next Trials practise, this weekend is Classic trials seasons start and I will take my TL250 out of the garage.... Quote Link to comment Share on other sites More sharing options...
Recommended Posts
Join the conversation
You can post now and register later. If you have an account, sign in now to post with your account.