

kevin j
-
Posts
508 -
Joined
-
Last visited
Contact Information
Recent Profile Visitors
|
8,075 profile views
|


-
Yes. That will be my fallback plan. I used one of those quite a few years ago maybe I pushed it too hard because it had a pretty short life
-
Questions, angle grinder for port modifications. -I have modified several 2 stroke cylinders with Dremels with decent results, but never upper transfers because I don't have a small enough angle grinder. -I have a trials motorcycle engine TY250 Mono with 68 mm bore that I would like to work on the upper transfers. My 90 degree 1/4 inch angle grinder is too big. -I can't afford a Foredom cable operated with the assorted heads. -If I have to buy something, I'd like to be able to do saw cylinders as small as the 026 44 mm bore. -What is out there that could do a 44 mm bore? I can do electric or air. The low speed dental heads are cheap, but the drive portion is spendy. Are they terribly slow on metal removal? This would not be a business, and I have more time than money. I would hire it out, but it's not an easy option here. Advise?
-
thks all. Chris, not curt..... I got his packet of info 15 years ago, talked with him then, long before he moved. and Jon is awesome also. I will pursue. I have I think three flywheels, I have run with ring, with 60% ring, and with 40% ring. I have not tried without, as at 40% I felt the power pulses were becoming too abrupt. Running 1.6 BTDC timing instead of 2.0 smoothes it out a lot, so last ridden with 1.6 and 60% ring. Dug it out again last year (with the other engine), lowered the pegs, fixed a broken frame, and more interested in pursuing now. Put AJP/GasGas front disc on 10 years ago, love that. Next step is rear disc, not for braking reasons but to get to tubeless wheel. I first fought with bead locks in the late 1960's with British mc, and have no love for them..... thks all for info. I am on track, now just to find parts. kcj
-
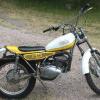
I have a TY350 mono that I rode several years before it blew a crank seal 10 or 15 years ago. I had the cylinder redone with NikaSil but never put the engine back together. I have started riding it again (on another engine) just for fun, but am thinking of building it as a 250 instead. I have never ridden a 250 as they were not imported here (USA) nor very commonly brought in privately. I understand they are peppier, rev higher, and more 'modern feel' compared to my old dinosaur. I have a well worn 250 cylinder that can be bored, but no head. So my questions are: 1. Will the 250 cylinder fit the cases with the existing studs? If I recall (it is boxed up), one engine used hex nuts and one used collar nuts down into the cylinder or head. Maybe the studs themselves are the same. 3. Are head gaskets available, or do I have to make one? I have soft copper available. I am running the 350 without a head gasket. 4. Wiseco has piston sets, but I plan on using the Wossner IT250 kit from Motoduro in the UK. I figure buy their experience and know it will work. 5. Anyone done the engine work per Stan Stephens in Mar 2017 Classic Motorcycle Mechanics magazine article? I will search out Jon Stoodley and (Curt Johnson?) the US gurus. I can do the work, just need the data. 6. Anyone used the OKO flat slide carbs? My old carb is pretty worn anyway. 7. Any other input, suggestions, or 'that's a dumb idea' comments? thanks, kevin j Minnesota USA
-
I would look for a set of ty250 forks and yokes, or you can have your existing yokes bored out to fit the larger 250 tubes. It makes a considerable noticeable difference in how stiff the front end is when you turn in rocks and also a softer suspension there seems to be a lot more volume of oil and damping in there I did this on mine last summer. Only rode one or two events but it was definitely noticeable better
-
save but still editing I meant to follow up on this as to what I did but pretty wild the last two weeks. I intend to post some pictures later when I have more time. I did get it ready for that weekend to ride, but ........ Cracks: The frame welding appears to have been Mig welding just by the quality of the welds everywhere. So that's what I did. The lower rear crossmember had quite a bit of rust and corrosion inside and had some expansion like it had water in there that had frozen at some point. I think there are holes in the frame tubing that allow water to get down there. Once I was done I drilled a couple drain holes at the very bottom. I took a piece of about 1 inch OD tubing, slit it lengthwise to give me about a 7 inch long half circle piece of tubing that fit well around the outside of the existing frame tube. I clamped everything up around the outside of the damaged tube and then welded. Seemed to work well, fairly easy to do, but did add several ounces of weight. Long-term reliability/cracking will remain to be seen Pegs: Since I was into it I added the plates and lowered the pegs. I used about 11 gauge material, which was way too thick and too much weight. I should've used 14 or 16 but I didn't have any. Since I didn't know what direction I was moving the pegs, I made a small triangle shaped plate that the actual peg clevis welded onto and then used three flat head screws to bolt that to the new plates that I added. The bottom screw is at the bottom edge of the peg, and by putting thin cone shape shims under the screw head in the plate I can adjust the peg contact to screw head to make the peg fllat to the world. That turned out to be an accident al benefit. it wasn't part of the plan. I lowered the pegs about an inch and a quarter or more. It makes a huge differencein feel. I did not move the pivot point for the brake lever but had to reshape the brake lever to bring the tip down considerably and for the lever to clear the new bracketry that I added. I don't like to feel the way is now but I didn't have time to re-locate the pivot. If I end up going to hydraulic disc in the back then I would do some changes at that point Overall the peg location makes a huge difference in how the bike feels, stability, and not falling into turns so much. It feels much more modern. Wider pegs much nicer. I would highly recommend the peg relocation. Unfortunately after being parked for three years, in the rush to get the frame repairs done, I forgot to rebuild the front brake caliper, and the pistons were sticking. I only rode about four sections and then had to put it on the trailer and switch to a different bike, we can do that in my class. brakes are fixed now and I look forward to riding it in a couple weeks thanks to all who gave input, and I will try and post pictures later
-
TY350 MONO FRAME QUESTIONS I've had this TY350 mono (I am in US) for 15+ years. I rode it quite long as the kids got the modern stuff, but it has been parked about 5 years. I want to get it going for a 'reunion trials' this weekend. Beyond the usual carb, fuel, fluids, etc,, what started out as 'I should check and redo the dog bone bearings' became 'this is really thick dirty greasy and needs cleaning' became 'I found a frame break under the gunk' became 'I may as well lower the foot peg mounts while I have the engine out.' I would do the Chris Johnson frame mods to bring the front wheel back, but don't have the money or time to buy a shorter shock that is a part of those changes. So, just lower the pegs at least. CRACK It is the crosstube under the left side rear of engine, outboard of the motor mount and inboard of the frame gusset for swing arm mount and pegs. It has been brazed, so has broken before, The rubber pad is under the engine over the skid plate, and I watch all motor mount bolts for tension. I assume others have seen breaks here, and it appears to have been broken quite a while. I ride low skill level and low obstacles. I would like to grind out the bronze, pull it back closer to alignment, and weld. Questions: -Is the frame mild steel or 4140 or other alloy? -No access to TIG. Can I MIG weld it? Access will be difficult, but possible. (Engine is out.) Edit: I could bronze braze it. -Can I MIG cold rolled or stainless tubing to the frame material to reinforce? -Any ideas about reinforcing? The outboard end of cross tube is tapered and welded closed, so I can't put a sleeve inside to back up the weld, although I think could grind open the end and plug weld it back closed when done. FOOTPEGS While apart, I may as well lower the pegs as planned for 'someday'. The TY feels SO tall as stock. My thought is to weld two thin plates per side, with tube spacers in between at bolt points, and use some sort of bolt on removable plate with peg clevis welded to that. That is extra weight compared to welding clevis mounts directly to the frame, but then I can move pegs around, or use different clevis/bracket dimensions if needed. Questions: -Frame material and weld questions as above -I will go as low as possible, staying maybe 1/2 inch (1 cm) above bottom of skid plate or cross tube, whatever is the lowest point. I will go where it mounts well, and was not intending to move front or rear, but I would if readers think I should. -I want to use modern wider pegs. -I have a 2003? Beta in the garage I could rob for pegs and mount brackets. Beta has a U shaped bracket one plate outboard and one inboard of the frame, and looks pretty sturdy. Has anyone used the Beta assemblies? -Are the Beta clevis dimensions 'modern' such that I can use any pegs? Beta pegs aren't real wide front to rear, but much better than the TY nails. I'd like to go wider later. -I'd like to make the changes without cutting loose and lowering the TY plates, or cutting the TY studs off the frame, until I know the new mounts work. (i.e. I want to ride it next weekend and may have to keep TY pegs in place if I don't use the Beta parts.) -Does the brake pedal pivot point need to be relocated down, or just turn the lever on the splines to move the tip down? It seems like it would feel strange with tip being well below the pivot point (the sine/cosine stuff), but I really don't want to get into relocating if I don't have to. However, if I need to do something to the new brackets to plan ahead to relocate later, or ideally to change to hydraulic rear brake and wheel (mainly so I can use tubeless wheel with obtainable spokes, that I have sitting in the garage), I would make the brackets planning ahead. MISC: -I have the needle bearing and seal interchange data for the dogbones, and am getting data for swing arm pivot area parts. -Has anyone modified the swing arm pivot bolt and sleeves to add grease fittings? Not so much for lubrication, but for purging out dirt and moisture more frequently than the complete teardown every 10 years….. -Anyone have sources for the sleeves/pins and bolts? Mine are ok. I am just changing bearings and seals, but eventually they will get pitted. Maybe not in my riding lifetime, so maybe it is a moot point. Thanks, Kevin J Minnesota USA
-
Doex anyone make weld on parts to relocate the upper shock mounts on TY175? I can make or buy plates to extend the swingarm easily, but the top looks like making four plates and a tube through it, so I am curious if I can buy premade and just MIG onto the tubing of frame.
-
Follow up: -I bought one of the $9 ebay china copies. Installed fine, seems to function ok. Not much time on it, will ride it next weekend. -Appears ok for a rider. Definitely not a restoration option. -The threads are fine. OEM Yamaha has reverse threads on the tap and the coupler nut pulls the tap to the tank like a turnbuckle. The China copy has a crimped swivel nut on the tap that just pulls it against the fuel tank and the rubber washer in the tap. -Lever positions are different. I just put the bike away, but I think OEM was back = off, down = run, and forward = reserve. China is up = reserve, back = off, down = run. -Hose connection appears a bit looser. Will see. -Overall, appears ok and I bought a second one for spare. For a really nice bike, I'd go OEM.
-
so he was originally fined for not notifying a government agency that his motorcycle was off the road? Does that mean parked and not being used? there must be something lost in the translation of words
-
I have two 175 yellows, front fork tubes 15 mm out, stock swing arm. FWIW, my stand is 13.5 inches, about 345 mm from pivot bolt to bottom of tghe foot roughly on the c/l of the tube. How far forward the stand goes makes a big difference. The stop surfaces of the bracket and stand wear, and as it rests further forward, the bike leans more. I've built several for TY80 as they were pretty unavailable and worn, and the 'blocks of wood under the old stand' is I think the best way to get a measurement.
-
Overall length I meant the springs only. I.e. How much preload once installed on the shock body. Or is there only one choice? Looks easy to modify swing arm, a bit tougher to move top mount, so I will start at swing arm end. I can weld thicker metal, but don't have TIG for top area thin tube and maybe chrome moly or higher carbon. I'll start on the forks next week hopefully. Just finished off a big 100cc chainsaw build and have another waiting. thks again. Kcj
-
Thks, great info. -250 forks, I will RB them stock and install as starting points. Good to know not need to start chasing parts or machining or welding, which was what I needed before tearing the bike apart. -125 mm oil level, is that 125 mm down from top, with legs compressed and all springs and dampers out of the fork tubes? -Rear, 50 lb springs. Meaning 50 lbf per inch of compression? What overall free length, or what brand preferred? -I didn't mean US made shocks, not much made here, but available in US. Bob G used to have Falcon and one other brand, but his webpages are all messed up now. No parts or prices or availability shown. Will have to call him. -Clutch, I haven't torn into yet. Would check all the normal mechanical, just wasn't sure of what the final goal was. If they were always lousy or not. Given Yamaha, I'd expect pretty good, which this is not, so hopefully the mechanicals will be answers. -Carb: I'll get it going again as is and refresh my memory form last year. The MidAtl site was where I first heard about the OKO. I think I was searching for 175 replacement carbs some years ago for another 175. I did find that a Mik carb from a (DT100 ?) was the same body but jetted a lot different, and ended up switching jets and parts over to that one. I also have a TY350, my first 'real' trials bike, with a rattly TK that I think I will try OKO. Trying to find a mono 250 head ( I have a cylinder) and build that bike to a 250 instead of 350, but that's another story. Thks again. Kcj
-
Same TY as I had the petcock question. Hasn't been ridden a lot in a few years, but getting it out and going again. I am 6 ft 0 inches, 200 lbs, ride pretty moderate easy stuff. Ride a 200 GG in modern, so I am used to minimal power, but motor is fairly fresh and surprisingly strong. Occasionally ride it, trying to improve it a bit but on a fairly low budget. Has the SM peg kit slightly down and back. -Front forks: I have a set of 250 yokes and forks to RB and install. Have had 10 yrs so not sure of shape. Beyond normal rebuild, what are the mods good for me. Preload spacer, oil viscosity and amount, tubes above top of yoke, possible replacement springs, any orifice modifications. -Rear shocks are spring retainers only, no damping left. I would relocate the upper mount. What dimensions work well for the move of the mounting point? What shock length eye to eye, and recommended brands. (USA stock, or someone who ships here.) Spring rates? -Carb is the original (TK?), not bad, but is worn, and not as crisp as I'd like. Anyone used the OKO flat slides? sizes, models, jetting, etc. Or, should I go VM26 Mik? -Clutch is not precise, lot of hysteresis from disengage to engage to disengage. Cable is fairly new, well lubed. I will check cable, adjust the tapered shaft thing on the left, and check basket and plates. Any other tricks? Granted, in the day, clutch in and out at the gates only, but I like to use it a lot. No rush but thanks for help. Kevin J, Minnesota USA
