markbxr400
Members
-
Joined
-
Last visited
-
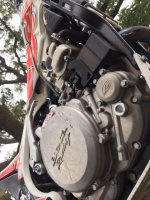
I believe I now own this bike (located on the Alabama gulf coast). Bought it, along with a spare NOS frame, and a spare motor. My son is doing a full build on it. Had a motor built in Germany, tubeless rear wheel and new front wheel built by Roy Thersby in the UK. Carbon fiber tank, new triple clamps for modern bars, new Cerakoted aluminum swingarm, new suspension front and rear, frame is now powder coated black. Should be purdy when he's done. We trashed the original frame and swingarm as we beat them to pieces getting things apart as everything was pretty seized. But I do think we'll have 2 leftover engines. Will post some pics as he is now putting it all back together.
-
Find a few experienced local trials riders and see if you can hook up with them. There are more than a few in your area. I come out a ride with a couple every year in Salida, Montrose and Moab. Trials riders are super friendly and helpful in my experience. Here in lower Alabama, there are not many of us. I bought a trials bike and then bought 34 acres to build stuff on and ride it on. Through word of mouth I met another newer trials rider who started coming out. We built obstacles from dirt, tires, landscape timbers, etc. I posted a few pics on a forum, and then the real help came. A nationals rider with over 40 years of experience who had a winter place a couple of hours away started coming over weekly during the winter. He started laying out sections and training and coaching us. We now have 6-10 riders that show up weekly. I bought a new 40 acre place a couple of years ago and have a great trials playground. This past year, my experienced trials friend introduced me to (now) 84 year old Wiltz Wagner (lives very close), who helped start the RMTA and NATC. He's in the NATC and AMA hall of fames. He has started coming out and coaching us as well - he focuses on the details of the basics, which has progressed all of our riding significantly. I also go to Trials Training Days every year in Tennessee. Top riders put on more than a dozen classes. You get a lot of practice on a lot of skills. Point is - I watched the videos and tried to do it on my own. It was fun riding, but I wasn't really learning to ride trials. Being around experienced riders who have the skills and desires to help coach you will take you much further and more quickly.
-
I gave up on trying to static balance on concrete for the same reasons you stated. I just started practicing it with the engine running on a slight downhill slope, and rather than eventually putting a foot down, I'd let the bike move to help me out, then stop again. Whenever I'm practicing obstacles or sections with a group of riders, I always will try to stay on the pegs while waiting, not focusing on my balancing, but rather focusing on what's going on with the other riders or looking ahead at the section/obstacle - helps to start making balancing become automatic. I've gotten much better, and just integrated it into my riding rather than practicing it alone for hours.
-
We have 3 Montesa's - 2 300RR's and a 260. Daughter in law learned trials on the 260. Her only experience before that was learning to ride on a CRF230F and KLX140 big wheel (which is also an awesome electric start beginner bike) on singletrack. At my property, I have a barn full of ranges of bikes to teach kids and adults (and wives) on. OSET 12R, Stacyc 16", 2 CRF50's for kids (one with training wheels), and a CRF110 and KLX110 - all no clutch, so a lot less to teach starting out - all have throttle stops as well so I can regulate speed. Usually, in just a couple of hours of riding the oval track on these, I can move them up to a CRF150F with a clutch (also electric start). For the larger ones, I'll have them doing the loop around the property on a CRF250F before the day is out. All of these bikes are ultra reliable, easy to maintain, bulletproof and easily resalable for what you paid for them or more. I wouldn't put them on a trials bike until they have good control on a dirtbike. Point is - a path could be to buy and sell, trading your way up as your wife progresses. This could all happen within a matter of a few weeks or months - again, you can quickly, easily sell and get your money out of any of the smaller CRF or KLX trail bikes. If she has never ridden before, adding the complexity of standing on a trials bike may be too much. Clutchless, throttle control with a seat would be my recommendation so as not to scare her away from riding from the start. One case of whiskey throttle in a panic has done quite a few in from my experience. JMHO
-
So giving some thought to how the offset changed as I was torquing the spokes, I think next time I would try this - instead of setting my torque wrench to the final setting (27 in. lbs), start much lower, say 15 in lbs. Get every spoke torqued to that value. Then move it up to either the final setting, or maybve a two step intermediate setting, then the final setting. I think the fact that one side reached the final setting way too early created the problem as I probably still put 2-4 more turns on the opposite side spokes, pulling the wheel away from the offset I had originally achieved. Another issue that may be present is that the spokes that reached the torque value early may now be at a higher torque value since they were pulled on further as I tightened the spokes on the other side. I'm not going to do anything further to adjust what I've got, but (per the manual) will go back after a couple of months and re-torque the spokes just to catch anything that may have stretched or otherwise loosened. Any thoughts on this are appreciated, just so that this thread can provide a good guide to others that may be tackling a wheel build in the future. Thanks.
-
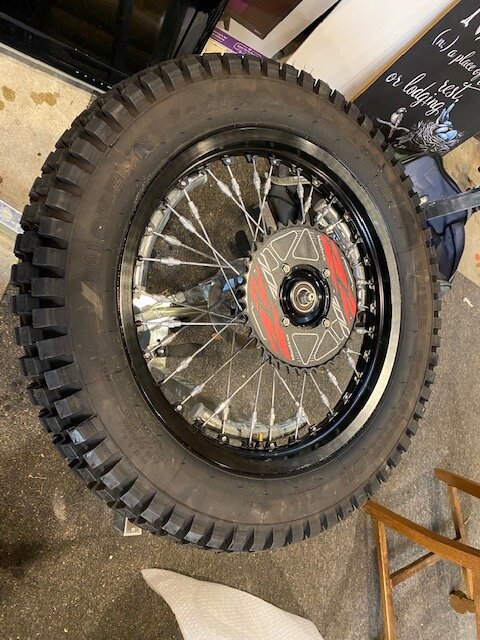
Finished torquing the wheel to spec. One thing to share. As I was torquing the wheel, I noticed all the spokes on one side (disk side in my case) reached the torque spec sooner than the spokes on the sprocket side. The overall impact was that as I continued around the wheel tightening the spokes that hadn't reached spec yet (sprocket side), the rim began to pull closer to the sprocket side. At the end of the day, I was slightly off spec for the offset. Instead of of 30mm (1-3/16") offset that I had already dialed it into pre-torquing, I ended up with 1-5/16" offset. The tolerance on the spec is +/- 0.5mm or 0.02". I ended up off by 0.125", so 1/10" over spec. I didn't try to dial it back in. Don't think it will have any impact. The wheel mounted back to the bike just fine with plenty of swingarm and chain clearance. If it creates any issue, I'll report back. Now just waiting on the rim decals to arrive.

-
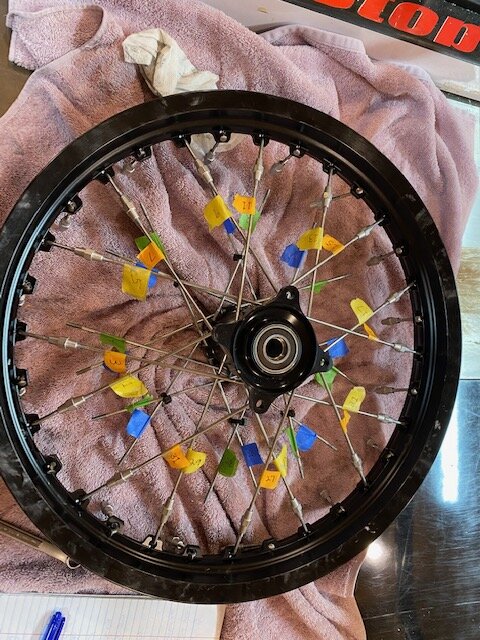
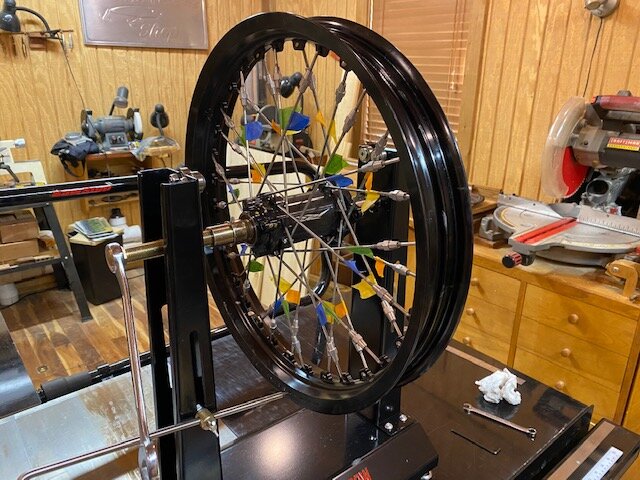
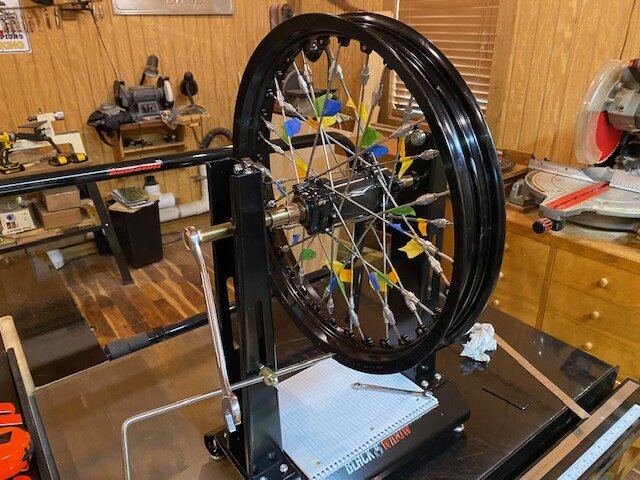
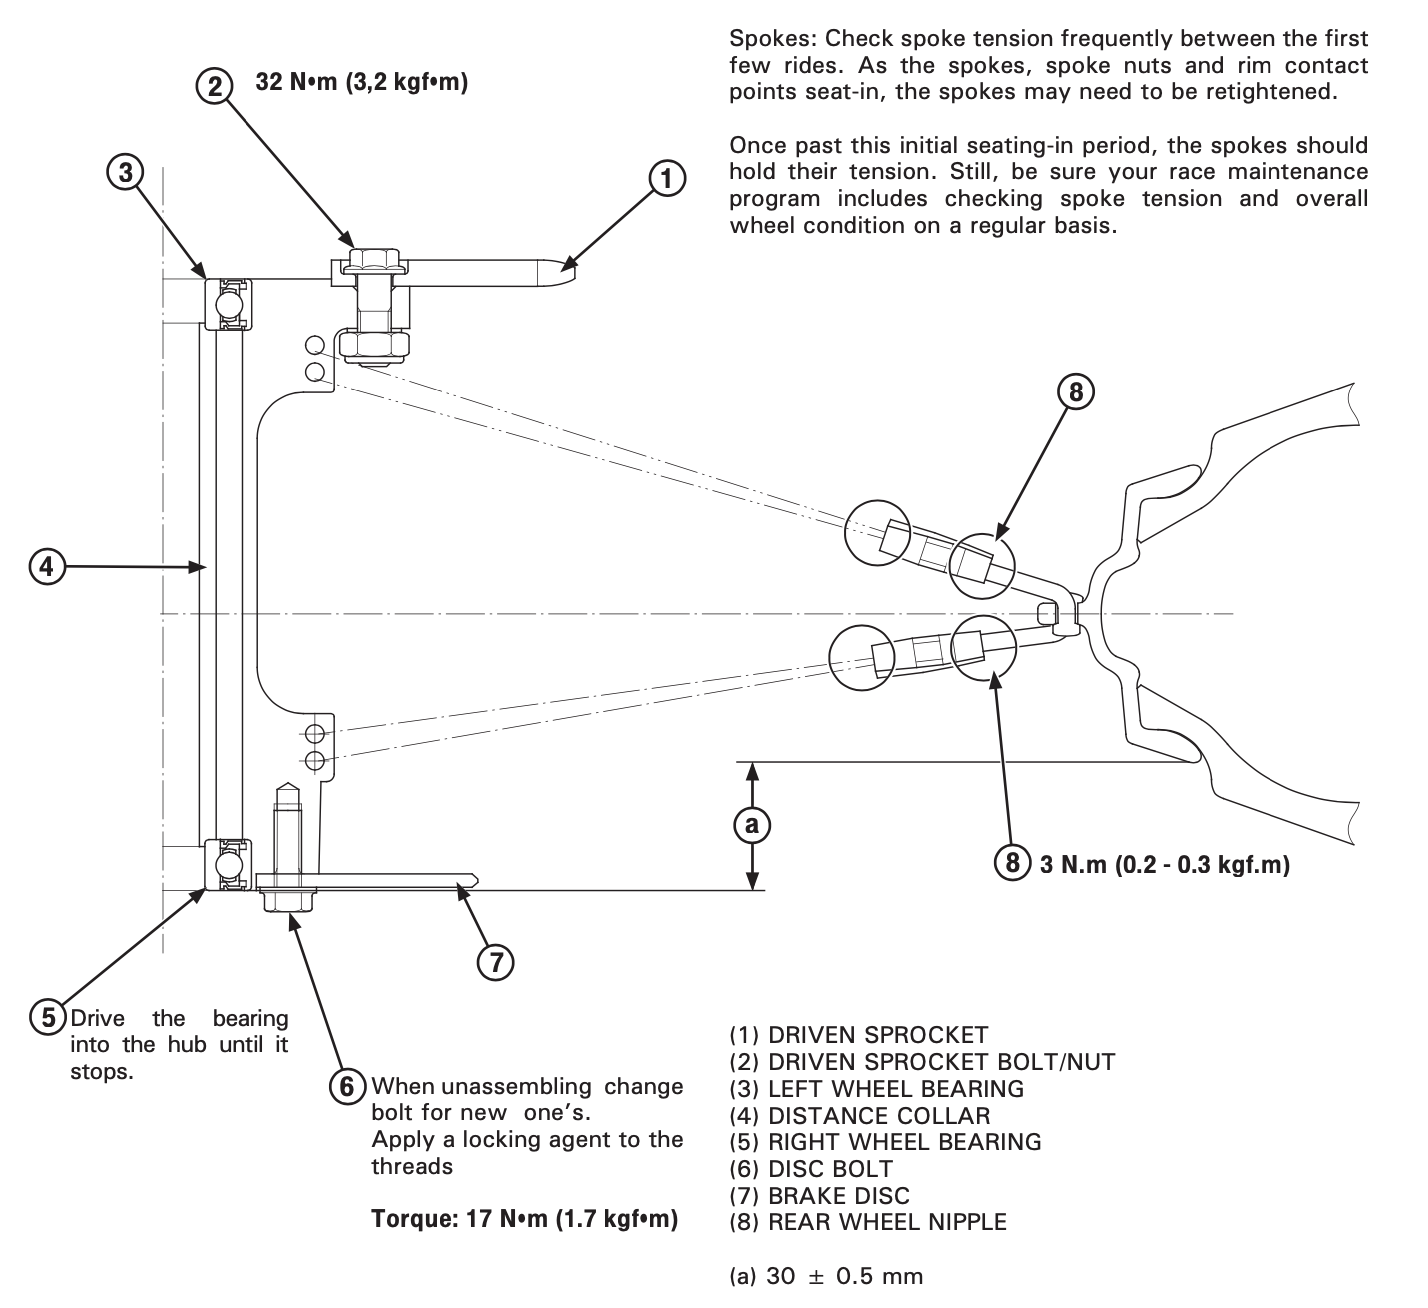
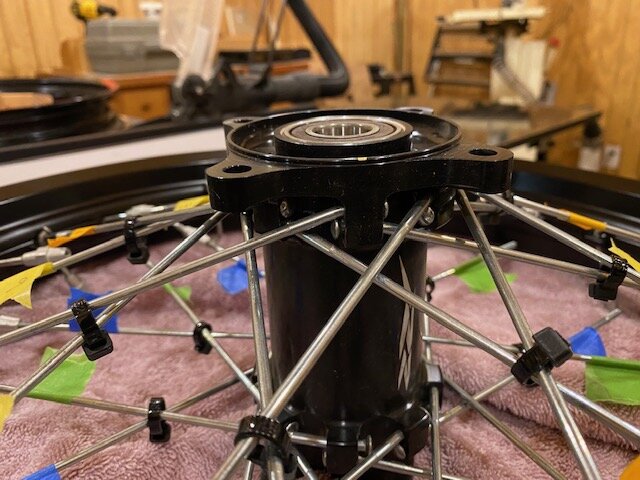
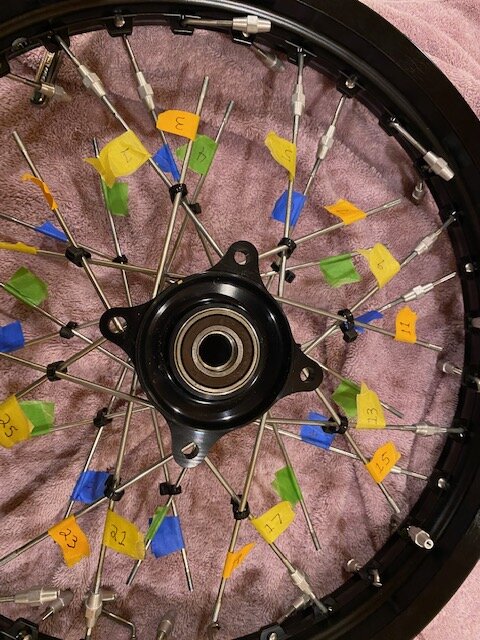
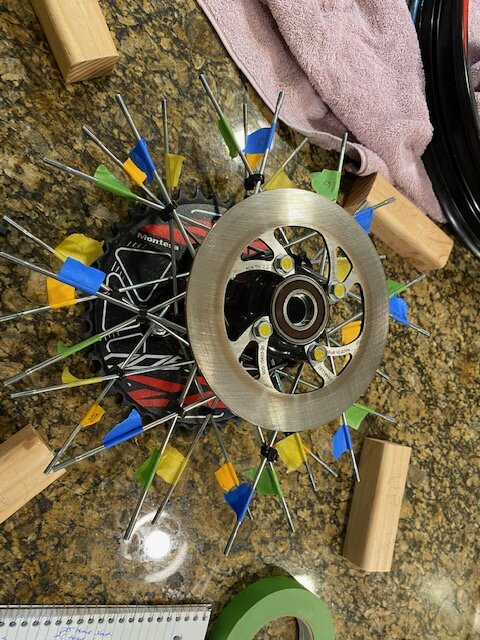
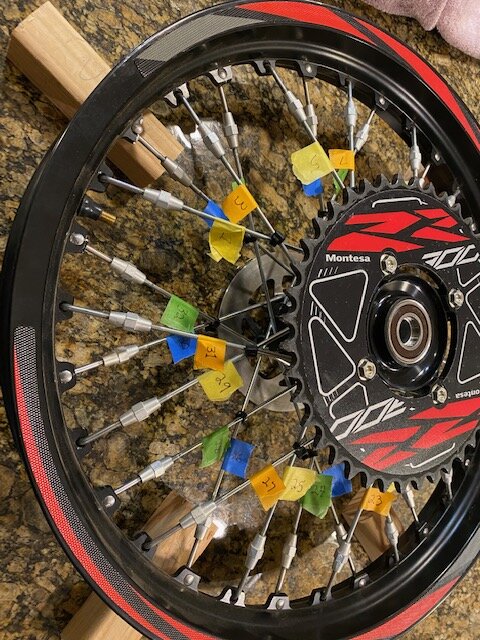
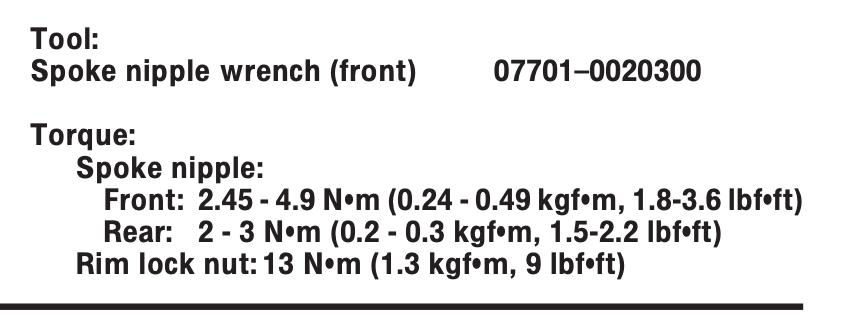
I was finally able to replace the modern tubeless rim on the rear wheel of my Montesa 300RR. As the bike was brand new, but had a damaged rear rim (a few cracked spoke tabs on the original rim), I was able to reuse all of the spokes and turnbuckles. I thought I would share what I learned, as I have found nothing on the interwebs or Youtube on how to do this. First, let me give out a huge THANK YOU to a wheel builder in the UK, Roy Thersby! Roy recently built some modern style tubeless rear/tubed front wheels using our vintage bike drummed brake hubs for my son’s TY175 build and my Fantic 240 build, so I knew he was an expert in putting these two-pieced spoke with turnbuckle style wheels together. I had spoken to around a half dozen wheel builders here in the US, but none had actually built one of these style wheels. I’m sure there are some around, including some of those here who offered help. Anyway, thanks again to Roy for taking the time to share his expertise. Also thanks to those on these forums that offered help. In my case, the first thing I did was throw out the part of the wheel building process where you either cut, or entirely remove all of the spokes, because 1. I needed to reuse the spokes. 2. As all of the spokes collide with each other on the hub end, I would have probably damaged the spokes or hub had I tried to remove them. I numbered all of the spokes 1-32 starting at the valve stem, on four colors of tape to also identify the four unique spoke orientations. I also loosely zip-tied each spoke pair, just to keep them from losing their orientation. Zip-tying is not necessary - the spokes are not going anywhere as they are literally locked into place on the hub. Note that on the Montesa 300RR rear wheel (which looks just like most other tubeless style modern trials wheels), there are only two unique longer spoke part numbers. Both roughly measured the same length (~175mm), but since I didn’t pull them out I didn’t actually measure them accurately. I’m sure the sprocket side spoke must be a tad longer than the disk rotor side as there is more of an offset on the sprocket side. The noticeable difference in the spokes was the amount of bend it had on the last 1/4” or so toward the hub end to get it point toward the center ring on the rim. The short spoke ends that go into the tabs on the rim are identical, the only difference being which side of the rim tab you poke them through first, depending on if it is a sprocket side or a disk rotor side spoke. All the turnbuckles are identical, with one side being a normal thread, and the other side being a reverse thread. The short spokes are the reverse thread portion on my wheel. On each side of the hub (sprocket side, and disk rotor side), there are two holes drilled into each of the tabs - an inner hole, and an outer hole. So you will have 8 inner spokes on each of the sprocket side and disk rotor sides (16 total), and 8 outer spokes on each of the sprocket and disk rotor sides. Two very important pieces of information to get - the rim offset, and the spoke torque value. You can measure the rim offset from your old wheel if still intact and identical width to your new rim. My offset was found in my owners manual, and is 30mm +/- 0.5mm from the outside of the disk rotor to the edge of the rim. I just used 1-3/16”. This is also what I measured after removing the rotor and laying the wheel rotor side down flat on a table. My manual calls for 3NM torque on the spokes (27 inch pounds). Unlike a traditional wheel, the largest issue with these style wheels is that the spoke nipples don’t simply slide through holes on the inside of the rim and attach to the spokes by just spinning them on. You also can’t simply remove them by spinning them off. Rather than nipples, these wheels have turnbuckles. When you want to take the spokes out - ALL of them grow in length as you loosen them. When you want to install them, ALL of them start at their maximum length when you are putting them together. So, you have to make enough room by moving the rim relative to the hub. Otherwise you’ll bend or break something. I learned two ways to create this room. I used one to remove the old rim, and I used the other to put the new rim on the wheel. So here’s what I did. Removed the wheel from the bike. Removed the tire from the wheel. Removed the disk rotor and the sprocket. I measured the offset, by laying the wheel flat on the table. Since my manual actually gave me the offset on the disk rotor side, that’s the side I measured. You can use the spoke side, just remember which side you measured when you put it back together. Using four colors of tape, I numbered each of the long spokes 1-32, corresponding to the tab hole on the rim that they will attach to, with number 1 being the hole next to the valve stem. All spokes that were in the same configuration received the same color of tape. I loosely zip-tied each spoke pair, thinking they would become loose and end up pointing all over the place. This turned out to be a non-issue as the spokes are locked into place in the hub. I laid my new rim next to the old wheel in exactly the same orientation as the old one. Right or wrong, the process I used to create space (length) to take the spokes apart was “radially”. If you look down on the wheel, you’ll see half of the spokes -16 total or 8 each on both the sprocket and rotor sides - fanning one direction (say clockwise) and the remaining half fanning the opposite direction. If you start loosening all the spokes that were fanning one direction, while tightening all the spokes fanning the opposite direction, then the rim will start to rotate relative to the hub. I started with 1 turn on each spoke - loosening the ones fanning one direction, while tightening those fanning the opposite direction. After things started moving, then I increased to 2 turns. At a certain point, each spoke that is being loosened will make a slight pop. This is when the spoke head (with that slight angle to it) starts to pop through the hub slightly. You can the see you have a little play and are able to push that spoke slightly further through the hub, giving you a little space (length) that you need to eventually free the turnbuckle altogether. It only has a little room to move before it hits the next spoke of the same orientation. I kept doing this until I was able to get all the turnbuckles off of the spokes spanning in that one direction. You will have to apply a little help to get those turnbuckles off. There is never excess space where they simply just pull off. As I removed each turnbuckle, I immediately put the short spoke into the corresponding hole and direction into the new rim. I applied a tiny bit of anti-seize on both spoke threads, and put the turnbuckle on the short spoke ONE turn (remember these are reverse threaded). Once you have all of the spokes off that were fanning that one direction, now go around the wheel loosening each of the spokes that were fanning the opposite direction that you had been tightening before. Eventually you’ll have all of the spokes apart and the rim is now separated from the hub. You should also now have all of the short spokes correctly transferred to the new rim, with the turnbuckles installed with ONE turn on the short spokes. NOTE: I simply figured out what I will call this “Radial Method”, and it is probably the wrong way to do this - but it worked. I hadn’t spoken to Roy at this point. The other method would be what I will call the “Lateral Offset Method”, which is how I put the new rim back on the wheel. I’m sure the lateral offset method could have been used to take the wheel apart as well. Just do the opposite of what I describe to build the wheel below (ie., start with the outside spokes, etc) After exchanging messages with Roy, he explained to me wheel building 101, but suggested I take all the spokes out and start with a bare hub and a bare rim. I explained I was re-using the spokes and planned on leaving all the spokes in the hub. The assembly process is the same, you just have a lot of spokes sitting there while you’re working on one if you leave them in. The key while assembling, on each side (sprocket and rotor), to always start with the inside spokes - those that will pass underneath, or inside of their crossing pair. I started with the rim laying flat on a table, and placed the hub disk rotor side down, sprocket side up in the middle of the rim. Starting with the sprocket-side inside spoke that would be closest to the valve stem, install the long spoke to its corresponding short spoke (that already has the turnbuckle on with one turn), turning the turnbuckle one to two turns - just enough to make sure the turnbuckle is fully engaged to the two spoke portions. Move to the next sprocket-side inside spoke and do the same. Repeat until you have all 8 sprocket-side inside spokes made up. Now repeat the process with the sprocket-side outside spokes. You will have to apply a little force on the last 2-3 spokes as things start to get into a bind. Be very careful as the turnbuckles are aluminum, and cross threading is easy to do. Make sure the spokes are directly in line with one another to prevent cross threading. Why this worked is that the rim is laying flat on the table, with ZERO offset on the rotor side, but huge offset on the sprocket side. This gives the extra length needed to make up the spokes on the sprocket side. Now, we need to create space for the spokes on the disk rotor side to be made up. The way to do this is to start going around the wheel, and tightening all the spokes that you have already made up. Do this in order, and give each spoke the same number of turns. Always start at the spoke that was closest to the valve stem and end with the one that ended just before the valve stem. I started with one turn on each spoke, then increased to 2 turns to speed things up. What you will notice is that as you are tightening the spokes, the rim is lifting up off of the table, and rising to the sprocket side. That’s the idea. And do it until the rim is well raised up toward the sprocket side, almost flush with the sprocket side of the hub. I never had to over tighten any spokes to do this, and I stopped before I ran out of threads on the turnbuckles. Flip the wheel over so that the sprocket side is down, and the disk rotor side is up (the rim will now be pretty close to the table). Now, again starting with the disk-side inside spoke closest to the valve stem, connect that inside spoke to its corresponding short spoke on the rim, giving it one to two turns until you’re sure the turnbuckle is fully engaged to both portions of the spoke. Go around the wheel installing each disk-side inside spoke until all 8 are installed. Now repeat with the disk-side outside spokes. You will probably struggle with the last 2-3 spokes as things are really in a bind at this point. What I did was to take a 1/2” wooden dowel and lay it across the adjacent spokes, with the spoke I was working on laying over the top of the dowel. The idea was to bow the spoke a little in order to have enough room to make it up. Worked great, just remember to make sure that the two portions of the spoke are in line with one another while you start the turnbuckle to prevent cross threading. It would have been nice to have a second pair of hands to make up those last few spokes. Now the wheel is assembled. And if everything was done using the same amount of turns, it will be pretty close to true, both laterally and radially. BUT, the offset will be way off. The rim will have virtually no offset relative to the sprocket side, and way too much offset relative to the disk rotor side. So the next step is to pull the rim back toward the disk rotor side. I installed the wheel into my truing stand. I measured from the flat portion of the hub that was laying on the table the offset that I was needing, and made a small mark with a gold colored sharpie (black hub) on the hub just to get an eyeball idea of where the rim should end up as I move it away from the sprocket side and toward the disk rotor side. You can look from the rim to the hub to see the movement of the rim toward the needed offset. Next, always using the same number of turns on each spoke, and starting at the spoke closest to the valve stem (#1), rotate the wheel one revolution and loosen all 16 spokes on the sprocket side by the same amount. Then rotate the wheel one revolution and tighten the 16 spokes on the disk rotor side by the same amount. I used 2 turns each time. Remember that to loosen spokes, turn the turnbuckles one way and to tighten spokes, turn them the other. Easy to get confused until you get your process rolling. Repeat. Each time you make one revolution of loosening the sprocket side spokes, and tightening the disk rotor side spokes, the rim starts to move toward the disk rotor side. You can eyeball from the rim to the mark you made on your hub as you go. Keep repeating this process until you see that you’ve achieved your offset. It probably won’t be exact, but it will be close enough to move on to truing. Now it’s time to start the truing process. I see no spec from truing, but from watching a few Youtube vids, about 2mm is sufficient for both lateral and radial runout for dirtbikes. You'd want to get closer for street bikes. If identical/symmetrical turnbuckle turns were always made through the building process and while shifting the offset, the wheel will be in the vicinity of being true. The first part of truing is “lateral” (side to side) truing. Put your truing indicator close to the side of the rim, and start spinning it slowly, making note of where it is either closer, or further away from the indicator. Tip - I actually put a piece of lined notebook paper on the table with the lines parallel to the rim. Was easy to see the side to side movement. Since you have the numbered pieces of tape on each spoke, it’s easy to see exactly where adjustments are needed. I look at where the wheel is starting to deviate in one direction, then again, where it stops that deviation. Loosen the spokes on one side in that area, and tighten the spokes on the opposite side to reduce that deviation. The rim moves toward the side you are tightening. I was using about 1/4 turn each time. Rotate the wheel and see if more is needed. When that area is running true, repeat for any other areas on the rim that are not running true. Next, the “radial” (up and down) truing. Set the pointer under the rim to where you can see the radial runout as you turn the wheel. This is the bobbing up and down of the wheel. Again, find the area where the wheel is not true, or comes closest to the pointer (this means the area of the rim that is further away from the hub than other ports). I take 6-8 spokes on the opposite half of the wheel (halfway around) and loosen them 1/4 turn. Then I tighten 6-8 spokes in the area that I saw closer to the pointer 1/4 turn. The key is to always adjust an equal number of spokes on each side (sprocket vs disk rotor) of the wheel to keep the the wheel laterally trued, while also adjusting the same number of spokes on each half of the wheel (top vs bottom) to shift the wheel until it is radially trued. Once I had the wheel trued both laterally and radially, I took the wheel off the truing stand and laid it flat on the table, disk side down) to measure the actual offset. In my case, it was on the money. If it is not, put in back on the truing stand, and repeat step 14 above. Use a smaller number of turns. You should be able to move the rim one way or the other without significantly un-truing it. Once you have the offset correct, and the wheel trued, then you can move on to torquing the spokes. Torquing - first, know that apparently no such spoke torque wrench exists for these spokes. The ones by Tusk and Pit Posse come with a variety of sizes of wrench ends, but all are way too small. These spoke turnbuckles are 10mm. So I took one of the unpopular sized wrench ends, and used a side grinder to open it up to 10mm. I looked at using a crowfoot adapter on a traditional inch-pound click style torque wrench, but decided to just make an adapter for my spoke torque wrench. The idea is to go around the wheel and tighten spokes until they reach the torque spec, without un-truing the wheel in the process. To do this, start at the valve stem (spoke #1) and tighten that spoke 1/4 turn (unless the torque wrench clicks - then don’t tighten that spoke any further). . . skip 2 spokes and tighten the next spoke (spoke #4) 1/4 turn (or until it clicks) . . . skip 2 spokes (spoke #9) and repeat. Keep going - when you get back to the valve stem, move to the second spoke away from the valve stem (spoke #2), tighten it 1/4 turn (or until it clicks). . . skip 2 spokes, tighten the next spoke (spoke #5) and repeat until you get back to the valve stem. Then go to the third spoke from the valve stem (spoke #3), tighten . . .skip 2 - tighten, until back to the valve stem. Then move to the fourth spoke from the valve stem (spoke #4) and repeat. Repeat this process until all the spokes are properly torqued. Do not continue to tighten any spoke after the torque wrench clicks. This process is intended to keep the rim trued while torquing. Once torqued, check the truing again and make any final adjustments. Install a new valve stem Install the tire, using tire lube as the tubeless tire could likely otherwise take a lot of pressure to seat. Install the wheel back into the bike and properly adjust the chain tension. After a ride or two, lift the wheel off the ground and eyeball whether it is still true. You can also hold a wood dowel or other type indicator across the swing arm, extending to the rim to check lateral and radial runout. If it is still true, re-torque the spokes as they will have bedded in and likely loosened. If the wheel needs to be re-trued, you now know how to do it. I hope this is helpful. Happy to address any questions. Any wheel experts out there, please feel free to correct anything I’ve gotten wrong, or add your tips and experience to this process. I probably went about this whole thing the wrong way, but it worked and I was able to learn how to do this myself. If I had had a local option to let a wheel builder do this, I would have jumped on it, but that wasn’t the case. Hope I never have to do another one! I’ll ad a few pics below that will hopefully illustrate some of the process.Thanks. That ship has already sailed as the old hoop has already been removed and I have the new hoop on hand. Will remember that if there's ever a next time. The good news is that I've found a wheel builder in the UK that's doing some vintage tubeless wheel builds for me and my son that has extensive knowledge of these type wheels. Have messaged him and have an initial response with his willingness to virtually help me get it back together.Thanks. Been out cutting dead limbs all day on my property out of my manlift, so have no patience or energy to try to tackle it tonight. At best, I might put some antisieze on all the threads.I was able to get it apart. I could not loosen all of the spokes at once. It puts the whole system in a huge bind. Think about all the spokes growing in length with both ends fixed. Not like a regular wheel where you're putting the nipple through the rim. There was not enough room on the hub side for the long spoke to slide through the hub hole enough to break the turnbuckle free from the spokes. That spoke end is kind of a tight fit where it pulls into the hole in the hub. With a little persuasion, it finally pushes through the hole in the hub, but you have to help it push through. But then, it hits up against a nearby spoke. So it doesn't slide through enough to break the spoke apart at the turnbuckle. So, I cut each ziptie and replaced it with a loose one to keep the pair together, while not restricting the spoke from moving. I loosened all of the spokes with the same fan direction, both sides of the hub, while tightening the spokes that fanned the opposite direction on both sides of the hub. This allowed the rim to twist enough relative to the hub to get the turnbuckles off. They didn't come off freely, they still required some persuasion, bowing the spokes slightly, or pushing down (or up) on the rim in the area where I was trying to remove a spoke. Tomorrow evening, I'll make an attempt at putting it back together. I don't know of another approach than try to connect all the spokes that fan one direction, once all are attached, tighten them beyond where they ultimately will end up, and then try to force the spokes that fan the opposite direction together. Sure seems like there must be a way to do this without forcing anything. I've spoken to several wheel builders, but none have put one of these type wheels together. I guess the good news is these wheels hold up well. Any expert advice is appreciated as to the process and tricks to put this type of wheel together.
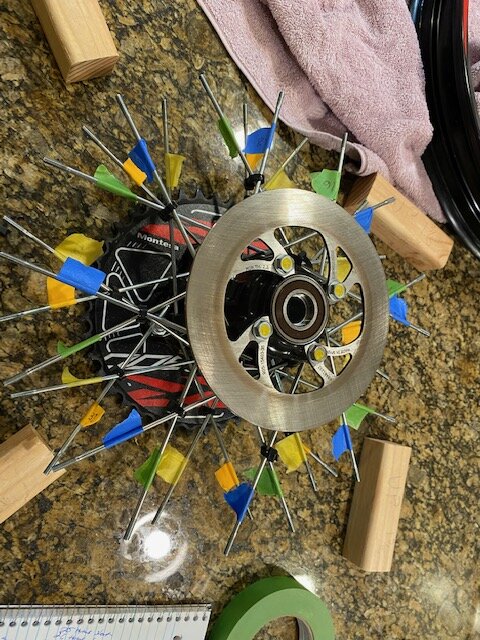
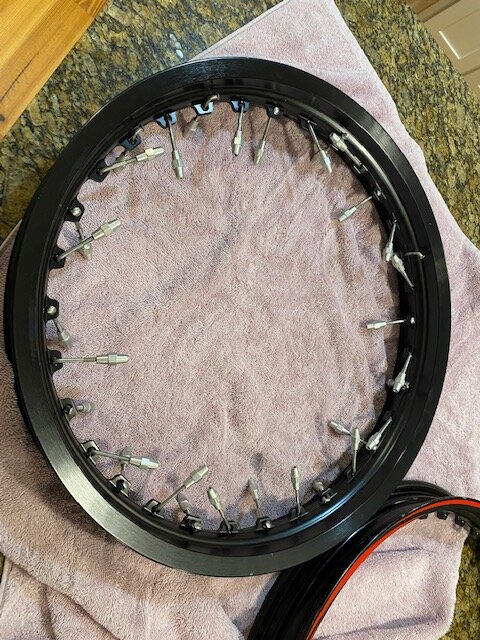 I found a great deal on a new 2017 Montesa 300RR (already have the identical bike, so just swapping to a new one). The great deal came with one flaw. The tubeless rim hoop on the rear had a couple of spoke tabs that were broken, where it appears the wheel must have been struck. Spokes were all good, hub was good, so just needed a new rim hoop. I tried to buy an entire wheel assembly, but US Honda, Partzilla and others all show the replacement wheel is one backorder, with no estimated date of availability. I was able to find an OEM rim hoop, so ordered and received it. Also bought a truing stand. So tonight, I removed the wheel off the bike, removed the tire. I took measurements and also got the factory specs for offset, spoke torque, etc. I zip-tied spoke pairs together, then used 4 colors of tape, numbering from 1 to 32 starting at the valve stem. Planning to reuse existing spokes as the bike is brand new. As I started loosening spokes, it became obvious that I cannot simply loosen all the turn buckles until they come off, as all of the spokes grow and there is not enough room on the straight (hub) side for the spokes to simply slide through as they lengthen, because they hit adjoining spokes. What is the trick with this style spoke? Only way I can think to do this is to loosen only the spokes that fan in one direction, while either leaving alone (or even tightening) the spokes fanning the other direction, until half the turnbuckles can be removed, then loosen the opposite half of the spokes. Before I continue further, thought I'd check to see if someone here has actually done one of these wheels and knows the trick. Many thanks for any help.
 While doing a search on truing up a new rear rim, I came across this post. Thought I would add what my 2017 Montesa manual says regarding front and rear spoke torque in case someone in the future searches and finds this thread.
 Maybe I'll see you over there for an event one weekend. May hit the Herritige Hills event on the 24th. http://swvta.com