| |
-
Thank you Stuart. I thought it was an earlier model tank, but what you said makes sense. Thanks.
-
I'm trying to identify / gather information on this early model Bultaco aluminum slimline tank/seat. This tank is aluminum with an aluminum cap that hinges on one side. The tank has been repainted.
Who made this tank? What would be the approximate year these were made and for what model Bultaco bikes (M10, M27, M49 ?) and approximate value.
Thanks
-
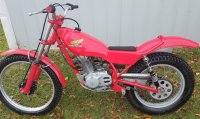
Very good eyes! I put the alloy side panel over the inlet tube thinking it looked better, but have since change it and routed it through. Its not a show bike, but I'm proud of the restore I did. since I have the attention a couple that know the M27, I have a few extra parts that I'd like your help on putting a value to for when I decide to sell. see picture and if you would, tell me what the parts are worth...at a fair price. I also have a second petro tank that was restored along with the one on the bike...same condition. The cylinder is in excellent shape, but I haven't measure it yet to see if it has been rebored. Thanks.
-
Thanks for the information. I believe my question on the rear brake pivot location has been answered. I do have the flat plate footrests, IRZ carb & manifold and some other OEM parts that I've kept off. so it makes sense that someone did a modification. Thanks for confirming.
-
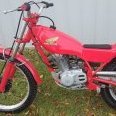
May be a silly question, but from all the pictures I've seen of a Model 27, the rear brake arm pivot point is fastened behind the foot rest. On my M27, the rear brake pivot point is fastened on the inside of the frame, opposite side of the footrest. My frame does not have, nor ever looks like it had the small frame arm where the brake arm pivot should attach. Perhaps over the years, someone made this modification, but has anyone ever seen or heard of this type of rear brake pivot point on a M27? I'm wondering if there were a small batch made like this? My description may not be understood, so I have attached a picture. My frame and engine numbers match, but the frame number has a "J" stamped into it that I don't know what that designates; if anyone knows. Thanks.
-
Thanks feetupfun....also very good to know to align it so the rim is centerline on the frame...and of course the sprockets align. With the tips I've received, I should be able to get it laced and aligned all back up correctly.
-
Thanks cuzzy! This will help a bunch! Very good to know that the rim is not centered between the swingarm. If you (could) look down over the rear tire/rim does it look like the rim is centered over the hub? Or, does the rim sit off to the right from the center-line of the hub. I'm going to guess the rim also is off-set to the right side of the hub (speedo side). Putting this back together has stalled me well over two months and I appreciate your help. Thanks.
-
I am replacing the spokes on my Bultaco M27. Unfortunately, I went about it wrong and separated the hub (for powdercoating), spokes & rim well over a year ago and I can't remember if the rim is centered over the conical hub or if it has an off-set to one side. For reference, I believe the M27 shares the same hub, spokes, and rim as the M10 and M49. My owners manual does not specify much about the hub or spokes. Currently, I do have it laced up, with loose spokes and the rim is naturally sitting about 1" (2.54 cm) off-set over the hub to the right. I need to know if I am to center the rim over the hub when tightening up the spokes. I do believe it needs to be centered, but I would like confirmation before I pull the hub over. Thanks.
-
It has been amazing how much support the trials community has supported this effort...what a great bunch of friends!
Michael_t exactly right...the buyer (John) of my bike didn't know it was stolen and through a stoke of luck, a good friend of mine recognized it as my stolen bike. There wasn't a bit of hesitation from John to return the bike to me. Zero help from the police over the last 3 months. Also, your right, bike is worth a fair amount more than the 1,500...I just set a realistic amount to try to collect for John for his loss.
-
I'd like to share what I've done to six of my older bike when there is too much piston to barrel clearance and there is "slop". As long as the piston and barrel are not over @20 thousandths (diameter or total) out of specification, I have my pistons coated with an abradable power coating (APC), hone the cylinder, and put new rings in it; for a couple, I had to get a 1 over sized rings and file down ends to get a perfect fit/end gap. I cannot say how good this stuff works, it's quite amazing and very cost effective; usually under $50 (USD) plus cost of rings. In fears of having this post deleted, I won't get into all the technical information about this product, so please don't think this is an advertisement for this product, as I have only been a customer of the company who does this. The company that does this is called Line2line Coatings and located in the USA. They have a great deal of technical information available on their website and on Youtube. I cannot stress how great this product works. I had a (nearly impossible to find) VERY scuffed BetaTR34 piston (had to beat it out) that most would NEVER consider putting back in the bike coated with APC. I also had a ring made for it and honestly, the bike now sounds better than new and outstanding compression. I've coated original Yamaha TY's, Bultacos, Tiger Cub, Suzuki TM, and the BetaTR34 pistons, with outstanding results in all of them. Regards.
-
Hello all fellow trials community. I had a 1985 Honda TLR250 stolen on 8/13/17 in the Columbus, Ohio area. The bike was restored with many upgrades and it looked "show-room" new. I cannot express how distraught I am. There are very, very few of these bikes and my hopes are it will eventually "show" up for sale and/or be seen...even if it is years down the road. So, please tell your friends and plant a seed in your memory and if you ever see a TLR250 (not a Reflex), PLEASE take the time to take down information that may assist me in recovering it. gawnej@att.net
-
Great information jc2. No thesis...My need to identify design changes from the 115/116 Alpina and later models are because I'm going to race an Alpina big bore in vintage harescrambles. The rules to qualify as a vintage bike is the bike need to be a 1974 or older bike. But, "Like Design" bikes are allowed into the vintage class if one can provide evidence that a post 1974 manufactured bike is "Like Designed" as related to that specific bike model. A Like Design bike is a bike where the suspension travel, suspension mounting points, engine mounting points, frame material, and frame and swing arm are of "Like Design" and there is no performance advantage. "Problem" with Bultaco, and I assume other bike manufacturers of this era, is the bikes model number may extend through several years and may also have design changes within the same model number. So, why don't I just get an Alpina that is 1974 or older?....well....They are hard to find here in the States and I'm trying to open up my options of available bikes. So, lets say I find a model 188, good shape, good price, etc., I would need to provide "evidence" that the model 188 is a "Like Design" bike to a model 138 (which according to several sources, the model 137/138 was an available bike in 1974 (September). From all the great reply's on this topic, is looking like any model after the 137/138 would not qualify :-(
-
Thanks again for all the bits of information. Seems that I'd need to line the different models up next to each other to determine frame differences, shock mount position, fork yokes, etc. But, I'm leading to a conclusion that from a model 137/138 to the 212/213 models, there was little structural/geometry design change. Perhaps, I should chase down frame changes that the Sherpa went through during this period would provide better results.
-
Thanks to all for your reply's. I've made good progress at finding what I need thanks to your help, except I can't find any specifications (like listed on the motoguapa website) for the Alpina models 165/166. Again, I'm looking for information regarding any design changes from the previous Alpina model 137/138. Items like frame and swingarm changes, suspension mounting point changes, engine mounting point changes, over length, wheelbase length, footpeg height, etc. Unfortunately, I need to find the "original" specifications on this bike, such as a sales brochure or specification sheet on the bike. Any copy of such document or source on the internet would greatly be appreciated.
-
Good point... So, I'm looking for any design changes for the Alpina as they went through their model number changes (assuming some sort of design changes occurred for each new model number) for the following:
Model 116 to model 138 (~1974)
Model 138 to model 166 (1974 - 1976)
Model 166 to model 188 (1976 - 1977)
As you mentioned, parts book would be better, but even harder to find.
-
I need to know any (if any) basic design changes of the Bultaco 350 Alpina years 1974 to 1975, 1975 to 1976 and 1976 to 1977. I do know in 1975, the brake and shifter was moved to the right and left, respectively. Primarily, I need to know design changes regarding these items: Suspension (travel length) on front and rear, rear suspension mounting points, frame changes (including any engine mounting point changes) and swingarm changes.
I may need to buy Haynes manuals for each year to get detailed specifics (part numbers), but any help from you will greatly be appreciated. Thanks.
-
The restore of my Seeley is dragging, but I'm making progress. The information provided in this post has really help. 4Stroke...I have also fitted a TLR200/250 carburetor (Keihin PW22) on my Seeley and it is running good, except the bike back-fires when letting of from mid to high revs. I believe this is due to unburned gas, so I will try to use smaller jets and see if that helps. Currently, I have a 38 pilot and 98 main. Do you recall the jet sizes your running?
Seeley owners...I need an exhaust! The picture is of the exhaust that came with the bike. There is no mid-muffler and the "silencer" is a nicely hand-made piece, but the bike is much too loud. I don't believe it's getting much, if any, back-pressure. I have the resources to fabricate and fit different sized exhaust pieces together, but I would really appreciate any help from Seeley owners who have place an aftermarket exhaust on their bike. The handful of aftermarket exhausts that were similar to OEM and available 10 years ago are not available anymore (to my findings). I have read that someone fitted a WES silencer to a Seeley, but I need more information and details before I make any investments. Any help would be much appreciated and picture are always good. Thank you.
-
Similar to trialswarrior advise...peel back the lifted decal a little further, wipe underside of decal and fender clean with alcohol, heat decal with hair dryer enough to make existing adhesive tacky, spray some 3M spray adhesive to your fingertip (wear latex or nitrile gloves), dab a thin layer of adhesive to both decal and fender, wait 10 seconds or so, press down and hold 10 more seconds. After heating the decal, don't wait to apply the adhesive....you want the decal to be pretty warm, but not hot or it wont adhere. If it's cold outside, apply warm heat to fender as well. Clean any excess adhesive off with goof-off. May take a few tries to perfect it, but ends up holding better than factory application.
-
jeniejlg...thank you for posting the pictures. I really do appreciate all the replies. I have looked for the manifold insulator on the web, but haven't found any. Would you happen to know where I could purchase one of these manifolds? I have found and purchased the appropriate CR125 front backing plate and a carb to airbox boot on ebay. I have yet to identify a carburetor...but I'm narrowing down my selection.
-
Thank you for the information and picture! This Helps! Yes, it would be interesting to know how many of these Seeley's are still out and about. The previous owner of my Seeley imported it to the USA about 15 years ago and had been sitting in his garage ever since. The bike is actually in good shape, it just needs some TLC and a few parts. My front fender/mudguard looks original and it's a white colored Preston Petty mudguard. It will likely take me a few months to complete, as my time is limited and I'm slow and don't like to rush.
I do have another question...is there to be a heat block/spacer where the carb fastens to the head? The long bolts indicate to me there should be a heat block. I have looked on-line at pictures of Seeleys, but it's difficult to clearly see that part of the bike.
-
I have an early production Seeley 200 (frame # 1011) and the previous owner has misplaced a couple parts that I don't foresee him finding, so I need to find replacements. I have exhausted my search efforts on the web, so I hope I find better luck with this post. I need a front backing plate and front axle. I was told a MT125 Elsinore backing plate (1973-1976) would fit, but it does not. I assume I could fit an entirely different ft. rim with larger brakes, but I would like to keep as original as possible. Also, no carburetor and air boot on the bike...my only option may be to fit a similar carburetor, which may be of best option or interest anyway.
I assume the front tire assembly/backing plate were common on other bikes of this era, but I rather not keep guessing and making incorrect and costly ebay purchases. For the carburetor, I know there are several options, but any insight as to which carb (make and model/part number) anyone has had success with (along with jet sizes) would be greatly appreciated.
-
Nice event summary Biff...still a lot of riding remaining for the year if your willing to do a little traveling. Also, I'm expecting the Gate Trials at Keith's to soon be posted on the MOTA site. Perhaps your fully aware, but the TI vintage cup finals in KY (Oct. 31/Nov.1) requires the riders to have two "qualifier events" ridden to participate in this event. I have spoke with members of the TI organization and they have agreed to count the Metamora (Great Lakes) Vintage Cup as a qualifier. There's still a qualifier event available Oct. 18th... Anyway, enjoy your stay in Europe!
-
Not good news...don't want to see the bike become a parts bike as the rest of it is in good condition. Can anybody else offer some leads where a piston & ring can be found? Thanks.
-
I am looking for a piston and ring for a 1988 TR34 (260cc). The previous owner seized it or "locked it up" and I had a very difficult time removing the piston. I have exhausted my internet search efforts and have no leads or resources. If anyone knows where these parts can be found, please reply. Thank you.
-
The 1977 world round at Port Huron, MI...wow...I remember it...I still have the event T-shirt. It is good to remind ourselves of the rich history our club (MOTA) has played in promoting trials by also having the first two North American Nationals in 1972 and 1973. Anyway, this weekend (July 18/19th) is our vintage cup in lovely Metamora, MI. I believe we have sparked a lot of interest from riders in our area and gives us a reason to pull that twinshock out from under the covers. Our club has been working hard at making this a quality event and we have 16 sections marked for the two day event. We are anticipating between 30 and 40 riders. Camping is available and we will have a simple potluck dinner Saturday evening. Also, we have very nice top finisher awards for each day and even nicer awards for the 2-day overall top three finishers. Our club is definitely looking forward to hosting the event for all to enjoy.
|
|