| |
-
If it's any consolation, we did some heat dissipation testing years ago (before liquid cooling was the norm) on raw aluminum MX engine parts vs. flat black and found that the flat black finish on aluminum parts reduced temperatures by up to 15%. A satin black finish (which would look better) would probably yield a little less effeciency but still was better than the natural finish. A rough, as-cast surface was better at heat reduction, rather than a smooth, polished surface, probably due to the greater surface area.
Jon
-
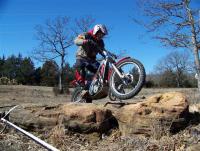
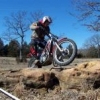
A few more photos from the event.
Jon
-
Poor Shan, he doesn't get much time to play on the bikes as he's running all over the country doing those great articles for Cycle News and Trials Competition Newspaper. I sent him a CD of all the photos (as I usually do) as he's trying to get something together for a Cycle News twinshock article.
We have the vintage/TS event every 3rd Sunday so the series will be part of the ongoing calendar and we haven't set the exact number of events yet (this was our first event). NEOTT also has their event on the 3rd Sunday (except for the 4th this month) so it will probably change to the Sunday before. The nice thing here in NorthEastern Oklahoma is that Texas, Arkansas and Kansas events are an easy drive so there's an event of some sort every weekend to ride.
The TS/vintage event is open to any rider and the modern/new bikes are usually restricted to using the #1 "Expert" line, which would be like a moderate Novice section in our club event. A top level rider on a 70's 250 Montesa Cota TS took 17 points to win the "Expert" class (#1 line) so I figured the difficulty of the sections was just about right. The #3 line (easiest) was generally single digit final scores and the trial was a test of basic skills rather than trick techniques. Club Trials are generally a low-key, fun activity and a TS/Vintage event seems to be even more of that with a higher level of fun.
Jon
ps. I still got my eye on that Bul in my buddies garage as my TY350 is not eligible for the TS class without modifications..........
-
We had a great time. Good venue and easy to build challenging sections that were safe. I took over 150 photos and downloaded all of them to CDs so every rider got a copy. Some Grandads, Sons and Grandkids rode together so lots of happy memories for them. It was good to see how well the old bikes performed in the hands of the Experts. Hmmmmm, I wonder if I can talk my buddy into selling me that nice Sherpa-T he has in the back of his garage........
Jon
-
Well,
After beating my gums about it for several years, we were able to start a twinshock/vintage series here in Oklahoma and our first meet was last Sunday. Tommy Moore (Shan's Dad) and I set up the sections which turned out to be just right. We had a big BBQ after, prepared by Gary Simmons of JVR vintage restorations (the meet was held on Gary's property) and everybody had a great time. I've been wanting all those neat old bikes dragged out of the garages and put to work doing what they do best. The Tulsa TV station covered it and had a great segment on it that night. One of the nice things about being a Trials rider here is that there's a Trial just about every weekend somewhere close, that takes no more than a couple of hours to drive to.
Jon
-
I agree! Based on my background and experience, I would have made different design decisions, but that background also makes me really, really appreciate how much effort he has put into his creation. Good for him!
Jon
-
Chubs,
You will probably get several opinions and there are slight differences between engine materials that may dictate minor changes in proceedures, but generally just take it easy for a few hours and riding easy sections seems to work well as it has the on/off throttle applications that help burnish off the very small, microscopic mountains left by the machining operations (the "valleys" are what holds the oil) and the appropriate heat/cool cycles that avoid local hot spots on the cylinder/piston that can create partial seizures.
Avoid heavy loads/high RPMs on the engine and make sure the coolant is topped off. I like to run a little more oil in the fuel, maybe 60:1 for the first tankfull but that's not absolutely necessary if your jetting is correct.
Breaking in a top-end (especially with a plated cylinder lining) is a lot less stressful on materials than a complete new engine.
Jon
-
I forgot that adjustment technique was on the web. Jim (along with Dale Malasek) has been involved in making all the GasGas video owner's service manuals through the years and saved riders probably hundreds of thousands of dollars. I'm constantly using that website as a tech resource to answer riders questions.
Jon
-
I looked back through some archived answers off our website and this should help:
"My first guess is that the shift centering spring needs to be adjusted. The
centering mechanism is located underneath the clutch, so you'll need to take
off the clutch sidecover to get at it. You'll see a coiled spring with two spring
tangs that go on each side of a special bolt/bushing that has a 4mm Allen
capscrew and a 10mm hexhead eccentric bushing.
The process of centering it is a little tricky at first, so expect to make
several attempts to get it right. If someone who knows how to do it shows
you, it's a lot easier than describing it. Lay the bike on it's side to take
the sidecover off and you won't have to change the oil and the rear wheel
will be free. Loosen the 4mm capscrew up a little but not loose. Put the
shift lever down into first but do not release it (you may have to rotate
the rear wheel a little to get it to go into gear). SLOWLY allow the shift
lever to come back to center and just before it hits center you should hear
a light "click" (which you probably not hear, which is probably you have
shifting probelms). If you don't, adjust the eccentric bushing (10mm open-end wrench) a
very small amount either way and try it again (it only takes a very small
amount of turning). Repeat this if necessary till you get the click. Then
try the same process with shifting up into second gear, slowly allowing the
lever to return to center to make sure you get the click. If you hear the
click in first (downshift) and second (upshift) the shift shaft mechanism is
centered, tighten the capscrew down and your problem should disappear,
hopefully.
It will take a few attempts to get it right, like adjusting four-stroke
valves, but once you get the hang of it, it should be a lot easier. "
Jon
-
Welcome, Will!
A new Sidecars section was just added and your input would be appreciated. I for one would like to see photos of your outfit's progress.
Cheers.
Jon
-
I run mine at the top of the sightglass. The main thing is to change it often as the Pro has a fairly small volume case and the trans fluid has to do a lot of extra stuff, compared to a "normal" two-stroke, such as the crank mains and the split trans shaft roller bearings.
Cheers.
Jon
-
Steve,
Try about 400cc's and check the sightglass with the bike upright and level. My 02' Pro with the magnesium engine takes 350cc's and the sidecover was changed in 03' and about 400cc's seems to be correct.
Jon
-
Welcome aboard.
Some riders have sent me photos of their riding areas down there and it sure does look like a Trials paradise!
Jon
-
Thanks, Andy!
That will get my buddy going in the right direction.
Cheers.
Jon
-
You can take the pipe off and spray the inside with oven cleaner and let it sit overnight. That will loosen the carbon and make it easier to scrape off. Careful though, it's nasty stuff and you'll want to carefully rinse the pipe before scraping and don't get any in your eyes.
Jon
-
O.k., now, Copey. You're starting to worry me again.............
Jon
-
Another way to tell is that the 86' has a smaller rear sprocket than the 85' due to different internal engine gearing. I've had good luck finding some TY Mono restoration parts for my 85' at B&J Racing: http://www.bjracing.com/ty350.html and I don't think they are too far from you.
Jon
-
A friend of mine bought a nice, Sachs engined Saracen and I'm going to help him to restore it for use in a Vintage series we are trying to start here in the Midwest. It is in need of an ignition system as the MotoPlat system it has is munched (as is the points system in the box). Do any of you in Trials Central Land have a good resource here in the U.S. or the U.K. for the Sachs ignition systems I can point him to?
Thanks in advance.
Jon
-
I used to have an MAR but can't remember if they had an offset. Could you possibly mount the complete hub assembly on the swingarm and measure if it is centered in the arms?
Jon
-
Dean,
I'm not quite sure if the TLR has a Keihin carb, but take a look at this early Keihin pilot to see if that's the type you need. If so, PM me with your address and I'll send you a big bunch of #38's free so you can drill them and experiment without worrying about making a mistake. I have a lot of them for some unknown reason in my jet boxes and never use them.
Jon
-
I would think that those numbers are what you may need but have the dealer check them out just to be sure.
I would probably use the wedge spacer, it will kick the manifold angle up 3 degrees. You don't want the bowl to rest on the engine case as it will often cause frothing of the fuel in the bowl and that will affect the air/fuel mixture ratio and performance. It's true that sometimes you can get away with not using it but that's because the clearances are so tight and I would just as soon have a little more clearance than "just enough" to get by.
I like the aluminum manifold and hose connector (I think it's used on the Raga) as it seals better. The one-piece rubber manifolds (JTR370 type) will often bow between the bolt holes when overtightened (which is a little easier to do with several spacers stacked) and cause an air leak. If you use the JTR manifold and the spacers, you will probably need slightly longer capscrews to attach it.
You'll also need the #E16003 throttle cable that has the 16.6cm free length (the Dellorto cable has a shorter "free length", which is the length of exposed wire cable when it's pulled at one end of the uninstalled cable, due to the reduced travel the slide takes).
Jon
-
I had a 1996 JTR370 (one of only about 5 in the U.S.) stolen from my enclosed trailer in front of the shop. It had lots of trick bits so would be easy to identify but I'm guessing it's under a creek somewhere. My one big consolation was that the perp may have been adversly affected by Big Blue and I told the Sheriff to look for a suspect with a broken right kneecap (got a blank stare until I explained) as the 338cc, high-compression, short kickstart lever'ed beast did not take to "uncommitted" kickstarting with a favorable response........
Jon
-
Interesting you should mention this, Mark.
This stat sheet was also attached to the roster list:
Jon
(black text scanning didn't look too good, I edit to a greyscale scan)
-
The larger outside diameter spigot of the Keihin may put a little too much stress on the smaller inside diameter PHBL type manifold and it may possibly develop cracks, so you'll really want to keep an eye on it.
You can also use the manifold off the 96' JTR370 which was for the larger spigot PHBH Dellorto (#M01615006) or the aluminum manifold and 34mm rubber boot (manifold-#MT300616131, boot-#MT300616133) designed for the Keihin.
The spacers are #MT280216221 for the wedge spacer to tilt the carb up a little to clear the top of the case and the standard spacer block is #M01614005.
The carb should fit fine as the airbox boot is designed, from what I can guess, for the Keihin/Dellorto flatslide, which is why the standard Dellorto needs the rubber donut adapter. This may also be why the length of the airbox boot seems a little short for the Dellorto PHBL but the PWK Keihin, with the slightly longer body, fits right up with no problem.
My 2002 280 Pro has the stock airbox boot designed to fit only the PHBL (the only carb available that year) so I don't have the donut adapter and the airbox boot fits completely over the carb bell with no short-length problem. The boot was re-designed for 2003 for the Dellorto VHST26BS flatslide and Keihin larger diameter bell/longer body carbs.
Jon
-
A large, ethical part of my brain would think a small wire connector under the tank that could be pulled apart slightly to disable the CDI would work. A small, revengeful part of my brain suggests a hand grenade under the tank with the throttle cable connected to the pin......
Jon
|
|