| |
-
I dunno. I just drove 2300 miles round trip from the Alabama gulf coast to ride a 10 section x 4 loop event in Michigan. Up on Saturday, event Sunday, back on Monday. Did get to ride it and visit with my son and daughter-in-law who live up there and visit with some friends, so I thought it was worth the drive.
-
I've only had 4T's (Beta EVO 300 4T, Montesa 4RT260 and Montesa 300RR). As others have said, heavier than the 2T's, but very smooth and controllable on power delivery. If I were good enough to launch up 6' rocks, I'd be on a 2-stroke. But for the 3' obstacles I can handle, the 4T's have been awesome.
-
Biggest differences between my trials bike and road bike are:
1. My road bike holds a gallon of oil and my trials bike holds half of a quart
2. My road bike has an oil filter nearly the size of a car oil filter and my trials bike has one the size of large thimble.
My diesel 3/4 ton pickup has two behemoth oil filters and holds 3 gallons of oil, but I go 10,000 miles between changes.
-
I also installed hour meters on every bike, lawnmower, tractor, generator, etc that I own. I like to know where I'm at on all of this.
Regarding the filters,
New 2017 4RT 260 purchased in January - 3.7 hours:
When I drained the engine oil from the 260, it was pretty clear amber. I let it run over my fingers and noticed very little dark streaks but some fine metal flecks. When I pulled the oil filter, I also noticed metal flecks and noticed darker coloration. The bottom screen also had some metal flecks. When I drained the tranny oil, it was also mostly a clear amber color, but I noticed some black streaking (very fine particles).
New 2017 300RR purchased in May - 1.22 hours:
Surprisingly, the engine oil was much darker than I found on the 260. I think the dealer ran the bike more than he claimed. It wasn't black, but definitely dirtier than the 260. About the same amount of metal flecks as the 260 when I let it run over my fingers. I wasn't able to pull the oil filter or screen due to stripping the head on one of the rear slid plate bolts, and my not wanting to try to get the side cover off with the skid plate in tact. The tranny oil looked about the same as the 260 - clear amber with some black streaking. I will definitely be changing the oil and filter again when I get back from Michigan and my replacement skid plate bolts arrive, as I want to get a baseline on that filter.
My plan going forward, now after initial break-in:
Change the engine oil every 15 hours
Change the oil filters every 30 hours (but still will do the 300RR in the next couple of weeks)
Change the tranny oil every 30 hours
Clean the air filters as needed, probably every couple of trials, depending on dust.
To me, oil changes, air filter cleaning and valve adjustments are the most critical maintenance things to get long life out of these motors. While I don't send samples off for analysis as some do, my taking the time to look at them periodically gives me a good indication of whether I should expect any looming problems.
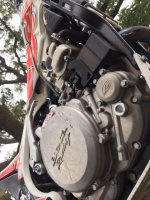
Here's a pic of the 260 oil filter that was pulled at 3.6 hours:
-
Just did my new 17 4RT260 and new 17 300RR (well, sort of).
The 260 went like clockwork, case came off easily with gasket intact, after tapping around the edges with a small dead blow hammer. While the filter was a little bit of a pain, I just kind of flattened about 1/2" of the edge of the hat with my needle nose pliers, lined it up with where it needs to rub the outside edge of the case, and it came right out. Grease was the trick on the spring for reinstall. Going in, I found if I spun the flywheel slightly to where the filter lined up with one of the longer slots on the side/round edge of the flywheel, I could press the filter down under the lip on the case, then it popped right in.
On the 300RR, I managed to strip the allen head on one of the rear skidplate bolts, so that took me out of the game as far as replacing the filter. So I just changed the engine and transmission oils. Have ordered 10 of those skid plate bolts, and will drill/easy-out the stripped one at the next oil change.
Used the HTX740 for the transmission and Honda Pro HP4 10W40 for the engine.
Cleaned and oiled the air filters as well.
Thanks for all the help on this forum. Took a little time, but was pretty straightforward.
-
Picked up a new 300RR to go with my 4RT260 and XTrainer. Fun times up in Michigan over the past two weeks with my son and daughter-in-law.
-
Mine's mounted on the steering head tube portion of the frame. On my EVO 4T, it's just to the right side of center. On my Cota 4RT, just to the left. Out of the way and easily seen.
-
After a similar experience. I had the rubber boot between the carb and intake come loose (look closely, it can look like it's still connected, but it's not). It will become super lean, as I had a huge air leak. I could get it started with the choke on, but it would not stay running once the choke was off.
-
Just received a box of parts while at TTD this weekend. Haven't swapped anything yet, but I'm pretty confident that it's the radiator cap. The coolant is definitely coming from the overflow. I double checked the coolant level at TTD, and still burped quite a bit of coolant over the 3 days, all from the vent line on the cap. I'll be riding Tuesday, is will have a chance to put he new cap on, fill the radiator again and confirm.
-
If still a handful after regearing, a heavier flywheel like the SuperSmooth is another possible option.
-
I cleaned up the bike today, and
1. checked the level since the last ride - it is just below the top of the fins in the radiator,
2. ran it long enough to confirm the fan kicked on, and confirmed that it is spinning the correct direction, pulling air from front to rear,
3. checked hose connections, cap, etc for any sign of leakage, and didn't observe everything.
Before cleaning, it's pretty apparent that the coolant stain originates from the cap vent drain hose which is short and ends right over the top of the fan housing.
It was getting dark so I haven't had a chance to ride for a period to take a better look. I have a group of riders coming by tomorrow so will have a chance to look at it further.
Stu, I looked all over the pump housing and surrounding areas and couldn't see a weep hole. Where should I be looking?
Also, looking at the pump housing, to appears the gasket that was sent doesn't cover the entire 4T pump outline, so I'm going to have to see if I can find the correct gasket before tearing into it.
I'll follow up if I find anything further of concern.
Thanks for all of your help!
-
In addition, you could put a Super Smoot flywheel in to smooth out the snap.
-
That's a good idea on the fan. I haven't ever the fan checked direction.
I'd also be interested in more info on the impeller upgrade. Only one Ive seen was the Jitsie for the 2Ts. Looks like the only issue is the spacer casting not having the extra rectangular port on the 4T.
I may also be overfilling as suggested by feetupfun and 2T4T above. I usually raise the bike on a stand with the rear tire on the ground and the front in the air, and then fill it until it overflows. But . . . when I've checked it after a ride, I can't see any at all, and I'm having to add more than just what the filler neck will hold.
Thanks!
-
Thanks, I did a search, and it looks like I would have to order from the UK. I think I'll either go with the Motorex M3.0, which appears to be very similar to the LiquidMoly, or the Evans waterless. Would like to see if I can find one common coolant to use in all my water-cooled bikes that I can get locally.
-
1. I've noticed that my 2016 EVO 300 4T burps coolant, to the point I'm having to add coolant almost every ride. I'll go through the circuit closely to make sure it's coming out of the cap overflow line, but a quick look seems to indicate that's where it's coming from. I rejetted the bike for my altitude, and it seems to run very well. The cooling fan seems to operate normally (comes on frequently, but doesn't run all of the time).
Do any others of you experience anything similar?
2. I've read where some Betas seem to have eaten the water pump impellers. So I ordered a new impeller, gasket, water seal and circle in order to take it apart and make sure my pump is intact. While ordering parts, I went looking for the coolant specified in the manual (Liquid Moly RAF12 Plus), which I've been unable to locate in the US. It seems the key elements of the coolant are that it's pre-mixed, ethylene glycol based, free from amines, nitrites, phosphates and silicate for aluminum engines.
The nearest coolant I can find that seems to fit the bill is Motorex M3.0. Many others (MOTUL M5.0 that I used in my Husky, and Motul Motocool Expert that my Beta XTrainer calls for) don't say that they are free of silicates.
Anyone have any recommendations for the proper coolant for this bike that can be somewhat relatively easy to locate in the US?
Many thanks for any help.
-
Thanks! Will check him out.
-
What are you all paying for the Elf tranny oil? Here in the US, takes a couple of weeks to get it through our Honda dealers, and $50 USD per quart/liter. Literally black gold!
-
I couldn't find an obvious single thread to your problem looking at the wiring schematic. But given it seemed to happen immediately upon washing it, I'd simply pull apart connectors and spray some contact cleaner in them to dry them out, and also check your grounds. Also, there are a number of places where several wires are twisted together. One could have come loose from the bundle. Look anywhere for a loose wire. Has to be something fairly straightforward, but it may be a bear to find.
-
-
You can see in this pic the two overflows tying together into a white plastic tee. I think as Thall1 indicated, it may be the final hose coming off the bottom of the tee.
-
Or pull the air filter cover, cut a piece of plastic from a ziplock bag a little larger than the opening, lay it over the filter opening, then put the cover back on. Remove once you're done.
-
Had an awesome time tonight on the stock springs. A lot less washing out of the front end on tight turns in the sand and stops on obstacles. Also, was able to bunny hop much higher and further than with the heavier springs. Haven't come off any high obstacles to know whether or not bottoming is going to be a problem, so not making any final verdict at this point.
-
Stock Rear should be 7.0KG for a 155-174lbs rider+gear. I had gone to 8.0KG, Im around 220-225lbs dressed.
Stock front should be 0.80kg for a 155-174lbs rider + gear. I had gone to 0.92 front.
That all being said, I noticed with the larger springs I'm not able to stick my front tire or make tight turns without pushing/sliding, and I'm not easily able to launch (for say a double blip or bunny hop), so I'm trying the OEM springs again. I may end up somewhere in-between. The coaches I've used (a couple of them very near my weight) have all said that they typically stay on the stock springs in order to get the most action out of their suspension.
Here's a Beta table I found online:
Beta USA Evo Spring Chart
Evo 2 and 4 stroke
Front:
.80 kg (Stock)
155-174 lbs (STOCK)
.84 AB-80127-84
175-200 lbs
.88 AB-80127-88
201-219 lbs
.92 AB-80127-92
220-260 lbs
.94 AB-80127-94
261-295 lbs
Rear:
7.0 kg (Stock)
155-174 lbs (STOCK)
7.4 kg AB-81027-74
175-190 lbs
7.6 kg AB-81027-76
191-205 lbs
7.8 kg AB-81027-78
206-220 lbs
8.0 kg AB-81027-80
221-235 lbs
8.2 kg AB-81027-82
236-250 lbs
8.4 kg AB-81027-84
251-265 lbs
8.6 kg AB-81027-86
266-290 lbs
-
Just to update this topic, I swapped back to my stock front and rear springs today. Took right at 1 hour to do both.
Front spring is super simple as outlined above.
The rear spring can also be done without touching any of the linkages below (can entirely be done from the top). You can also leave the airbox in place:
1. Put the bike on a stand.
2. Support the back wheel (I used two 2x4's) as it's gonna fall otherwise when you take the top shock bolt off.
3. Remove the rear fender (1 bolt + 5 screws).
4. Remove the muffler (1 bolt + 1 screw).
5. Remove both rear sub-frames (I tried to pull the spring with these on, no can do. It's just 4 more bolts)
6. Measure the spring length (will be a good starting point for setting pre-load). Mine was 5-1/2" exactly. This is about 1/4" of spring pre-load from the unsprung spring.
7. Back off both locking ring nuts. You need to back off at least a half inch or so to be able to get the top C-collar to slide down enough to slide off. I used a long punch and a hammer). Slide the big rubber bushing (mine is yellow) down the shock piston rod, then push the C-collar down then out to get it off.
8. Remove the top shock bolt. (Make sure the rear wheel is supported)
9. You can work the spring off by lifting up and pulling through the opening at the left rear of the shock to the left of the airbag.
10. When putting the new spring on, note that the top of the spring is a smaller diameter than the bottom, so be sure to orient it this way.
11. Put everything back in the reverse order, being sure to
- get the top C-collar and rubber bushing on the shock piston rod back into place
- (with the back wheel supported) lift on the front end to help align the top shock bolt. It can be done by yourself, bit if someone is nearby, it'll go a lot easier with a little help.
- put pre-load back on the spring,
- lock the second locking ring at the bottom
- check the airbox to confirm it hasn't become disconnected from the carb.
- properly torque all the fasteners
Again, took right at an hour to do both the front and rear springs.
-
Mine used to pop. Found a major and a minor problem:
Minor problem - bought from a gent in Colorado Springs, I'm at sea level. So was way too lean. Jetting and needle clip change resolved all the decel pop.
Major problem - the boot between the carb and intake had come off. Talk about decel pop!
Mine starts on the first kick every time, purrs like a singer sewing machine, and virtually no pop at all.
|
|