| |
-
Possibles:
piston in backwards
blocked exhaust
worn rings
pilot jet and starting circuit jet in each other's locations (they are the same type of jet but have different size holes)
-
The sale price sounds pretty normal to me
-
The other thing that would make it look a lot better would be to fit a replica of the original rear mudguard. You can get them in red or white and it would make the rear end look much better
-
They are rare indeed, mainly because the 349 sold alongside the 248 was seen to be a better bike (they were not desirable when new which is why they are rare now)
However nowadays some oldies like me who still love riding twinshocks see things differently than we did when we were kids, and nowadays I would prefer to ride a 248 than a 349 of the same year
As far as making it look nice, I've recently seen Montesas of that era that have modern build, shapely aluminium fuel tanks, and I prefer that look to the original Montesa seat/tank design. The TY tank doesn't look quite right in a single colour, but with some clever design input, it could be re-painted to make the bike look very attractive
-
Kickstart - yes
Engine number - yes
-
People call lots of things Sammy Miller Replicas. You could buy lots of aftermarket parts for Sherpa Ts from Sammy Miller products that were developed by Sammy Miller and used on the bikes he rode, including distinctive-looking frames
I've even seen a standard Honda TL125 advertised as a Sammy Miller replica
-
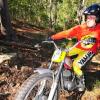
Looks like a Cota 248 with a Yamaha fuel tank
-
A change in the front sprocket of one tooth makes a noticeable difference. Two teeth on the front makes a large difference
-
Guy, Mikuni agents normally also have the pilot jets that fit TY yamahas. This is the web page for the Aussie Mikuni importer to show you the range they sell
http://www.mikunioz.com/product-category/jets/pilot-jets/
-
Number 1 not certain but probably where the fuel goes in (looks too small but that might be from taking the photo so close)
Number 2 is where the engine oil is injected
Number 3 is the float bowl overflow
Number 4 not certain but looks like float bowl vent
-
another thought for your weak spark is to check the strength of the flywheel magnets
-
not sure of this applies to your source coil, but I have fixed a couple of TY175 source coils by unwinding the last few turns, to remove a corroded section of the winding. There are other ways for the coil to fail though apart from corrosion at the outer end. The winding might have a break/crack or have corrosion that can't be seen.
As for the electronic option, I have had a good run with ignitions from John Cane with TY175 and TY250 motors. Both ignitions are many years old now and had no issues. I do live in a dry climate though which might make a difference to reliability
-
Last one I had done was about $AU100 (by a local auto electrician)
-
for weak spark after changing the stator coil and points, check that:
The coil laminations are not touching the magnets
The coil laminations are well earthed
The wire up to the HT coil has no broken or hard sections
The HT coil has a good earth
-
while you are trying different points settings, set the clamping screw just tight enough to hold it in place. This makes it easier to make changes through the slot in the flywheel. When it is set right, you can then tighten the clamp screw fully
-
They are a quirky bike all right. If I had known you only had a ride with no trials usage involved I would have said the same as bisby
In case you are doing it some other way, I recommend you drain the gearbox with the bike vertical
-
it either leaked out while you were riding or you processed it through the motor (as lineaway said)
-
Some of them are stamped with model number of the first model that used that design of barrel. An example of that are my M49 barrels that are stamped 27. M27 is the first model 5 speed Sherpa T and M49 is the second model
-
partially or fully blocked pilot jet or pilot mixture passage
-
Cutting the axle avoids the risk of bending the frame by using force
If your only problem is the axle being frozen in the inner bush, it is relatively easy to release the axle from the inner bush once it is out of the swingarm
If the inner bush and outer bushes can be reused, all you need to buy is a new axle. If the inner and outer bushes need replacing, you needed a kit anyway
There are two kits and one is much more expensive than the other
-
http://www.motoguapa.com/BULTACO/BULTACO%20ARCHIVOS/Alpina/Bultaco%20Alpina%20Mod%2085%20-%2099%20r.jpg
This shows what the original tyres on an M85 look like
-
clutch drag
possible causes:
incorrect adjustment (too much freeplay)
insufficient travel (wrong handlebar lever ratio or lengthened arm on camshaft)
plates not flat
spring pressure not set evenly
sticky surfaces on plates
grooves worn into basket fingers
It is fairly normal to have more clutch drag when the motor is stopped due to the difference between static friction and dynamic friction between the plates
-
Check for a sheared flywheel key. With this you will get spark but it won't run because the spark is not at the right time
-
It was fashionable at the time. There is no downside for unpainted cases if you clean the mud off after riding.
-
I wondered that too after looking at the photo again so I had to go up to the shed and look at it properly. I've been using that screwdriver for about 10 years and had not noticed that ball on the end. It is pretty weird
|
|