All Activity
- Today
-
So the decal sets are made of film that you use soapy water when applying it on the bike. This film is so thin. I thought it was kin of "thick" stickers with glue on the backside. I once had a company close to where i live making a proper decals set for an old TXT 321 for me and i do not think i paid more for that job than what the decal set cost on ebay. Perhaps if i buy a decal set and have this compane just use them as templates and have the company make a proper set of decals with glue on the backside is the way to go?
-
I think the new EM has a Tech rear shock. It is an Italian company and has a range of products but their website is not that great and what the products might fit is not listed. Mostly the front forks in trials but some of the other stuff looks pretty good: https://www.rideformula.com/cat/motorcycle/
-
 Ddani joined the community
 -
I'm installing custom Ohlins tonight
- Yesterday
-
Yes you're right, about 1ml of soap in 1ltr of water.
-
When we had a leak, the black plastic appeard to have been the cause. Time well spent!
- 1 reply
-
- 1
-

-
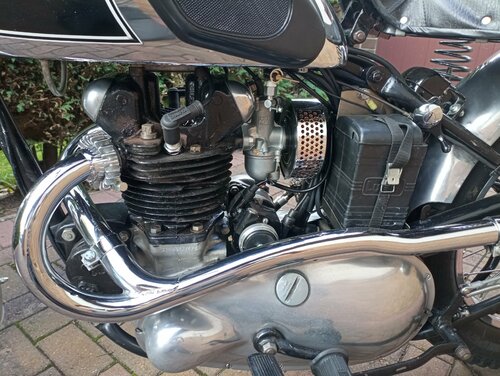
Today, Piston, rings, cylinder, clutch, selector, clutch arm, carburetor gaskets, spark plug, intake pipe, valve box, cylinder head, air box rubber, rear frame: new original! Used air box in good condition. I ordered clutch and throttle cables. It feels good to be moving forward, but I still have work to do. It took me quite a while to gather the parts for this machine. When I compare it to the TYZ, there is a world between the two. The Yamaha was much more modern in design and manufacturing. This 311 was really the “before” Honda engine.
-
Absolutely time to revisit the carburetor and if this is a carburetor where you can put the slide in rotated 180 degrees from where it should be, that is very likely the problem. Should take all of 5 minutes to check that.
-
Bike is fresh out of storage, just been out and it did actually start. Started with the choke but was absolutely screaming. Tried to adjust the idle whilst pulling the kill switch off and quickly putting it back on, so the bike wasn’t left screaming. Bike then died without the choke and wouldn’t start again. Something to have a play with again… run out of time tonight.
-
Get compression test done? 🤔 It's a 2-stroke, pull the spark plug, remove the kill switch magnet so you don't get a shock, plug the spark plug hole with your finger or thumb and turn the engine over slowly. Spark is useless if it happens at the wrong time, once you know it has compression check your ignition timing or you can't rule out ignition as being the issue. What is the recent history of the bike, is it fresh out of storage or was it running and then failed?
-
 Something tells me when the carburetor acts up you will know why the spring is in there.
 -
Haven’t done, but will get one done asap 👍🏻
-
Trouble-shooting section of the service manual will give you all the same questions we could possibly ask.
-
Are you sure the engine has fuel?
-
 tomodanotri joined the community
 -
Have you checked the compression?
-
I’ve got a 2011 Beta Evo 200 that won’t start. The bike has got fuel, air and a spark. Carb has just been taken off and cleaned, jets are good. Any suggestions? Cheers!
-
.thumb.jpg.959a058f27f115810079be4fec95cb91.jpg) Jus back home from the post office after getting the new float valve/needle in the mail for my TXT Pro. When looking at the picture of the spring loaded needle i still think that if you take out/off the spring for the needle will not make any diffence at all since the needle will go up and shut off the fuel when the float chamber is full just as easy (if not more easy) without the spring. The spring loaded needle sit on the carburetor just like it is shown on the picture so what the spring does is to push the needle down towards floats You can see where i have tried to draw a yellow spring
Jus back home from the post office after getting the new float valve/needle in the mail for my TXT Pro. When looking at the picture of the spring loaded needle i still think that if you take out/off the spring for the needle will not make any diffence at all since the needle will go up and shut off the fuel when the float chamber is full just as easy (if not more easy) without the spring. The spring loaded needle sit on the carburetor just like it is shown on the picture so what the spring does is to push the needle down towards floats You can see where i have tried to draw a yellow spring -
It is this combo posted by agiow: 9 / 48 is the way to go on a 125 GasGas you are agree on right? I have 9 / 46 on the bike right now so i do not think i woulld notice any difference going up to 49 or 50 rear sprocket
-
I'm having to replace the RH Crank main seal (bike was consuming gearbox oil) so while I'm in there I thought about replacing the water pump seals as preventative maintenance. In the end I decided 'if it's not broken, don't fix it'. I'll probably regret that, the bike's got 280 hours without any pump problems but I'm probably pushing a friendship at this stage. I did take the impeller off to take a look and found that it has been rubbing on the housing. It's caused a small amount of galling on the back of the impeller, some flakes of plastic in under there and obvious rubbing wear on the housing. My solution was to put the impeller in the lathe and take about 0.5mm out of the back recess. I checked periodically with bearing blue until I just had full clearance. There was slight rubbing at the perimeter flange too but I solved that by rubbing the impeller on some wet & dry on a flat surface. Previously I could hear the rubbing when I turned the impeller up to my ear. Now that's all gone. Pic after machining. Hopefully this will avoid debris in the coolant, possible damage to the outside seal and potential failure of the impeller. As an aside, just in case anyone comes looking: The Primary Gear Bolt is RH thread with Loctite 243 on it. It took a really solid go at it with heat and a pneumatic impact wrench to get it off. I snapped one hex driver (not a top quality driver). The seal, bush and O Ring all need replacing at the same time. Pretty easy to remove the seal - pull the bush out with a couple of magnets then lever out the seal.
-
Follow up on this. New CDI, no more trouble. I've stripped the potting out of the old one with the intention of trying to find the failed component. I suspect it could be something cheap and easy to fix like a capacitor. But of course once the bike is running nicely the motivation to spend time locating a solved problem is very low!
-
Just a follow up. I put a 1.5mm rubber washer cut from insertion rubber sheet between the top triple clamp and the nut. My thinking was the rubber would stop the nut from rotating. It seems to have worked extremely well. I've not had any more trouble at all. Haven't had to touch it in the past 80 hours of riding. A cheap easy fix. I suspect slipping an O Ring in there would do the job too.
-
Tip, small amont of soap to water. It hardly takes any moisture to work. Wipe excess right away. Just did stickers Sunday.
- Last week
-
 Flapper joined the community
 -
https://blog.splatshop.co.uk/sherco-trials-fork-oil-levels-2006-to-2011-paioli-ceriani/ And a useful YouTube video. Also a blog list for carb floats adjustment etc https://blog.splatshop.co.uk/category/docs/sherco/ Been searching days for this info and the site has been so helpful thought I might update some links
-
I've fitted a couple of non genuine sets. The piece that goes on top of the airbox can be the trickiest part of the job and you need some masking tape to hold it in place until the soapy water has dispersed and properly dry (24 hours).
-
I return! The Gaerne Balance Classic latches closed around my 20" calves with ease, but the velcro just baaarely closes. I wear a size 45 work boot from a Finnish manufacturer (we have wide feet) and this size 45 is quite narrow, though accurately sized lengthwise. I'm going to try to muscle through it and see if they'll break in, as I want to finally go on my first non-parking lot ride. Alpinestars and Sidi boots didn't come *close* to closing, so I'll take it. Future buyers beware, my intel says only the Classic has the adjustable latches necessary for big fits, the Oiled and Pro-Tech variants don't.
-
 My 2 penny opinion on that combo: try to use an uneven/even combo of gear numbers like uneven (like 11 teeth at the front sprocket) and even (like 48 to 50 teeth at the rear sprocket) or put a half link inbetween if gears. The reason why is if you have on both gears with even or uneven numbers the chain links will not rotate on the gears and will produce more wear to the gears and the chain itself.


-
Recent Topics
-
-
Classifieds
-

50.00 GBP
-

55.00 GBP
-
2,250.00 GBP
-
-
-
TC News Feed
